Monday, December 14, 2020

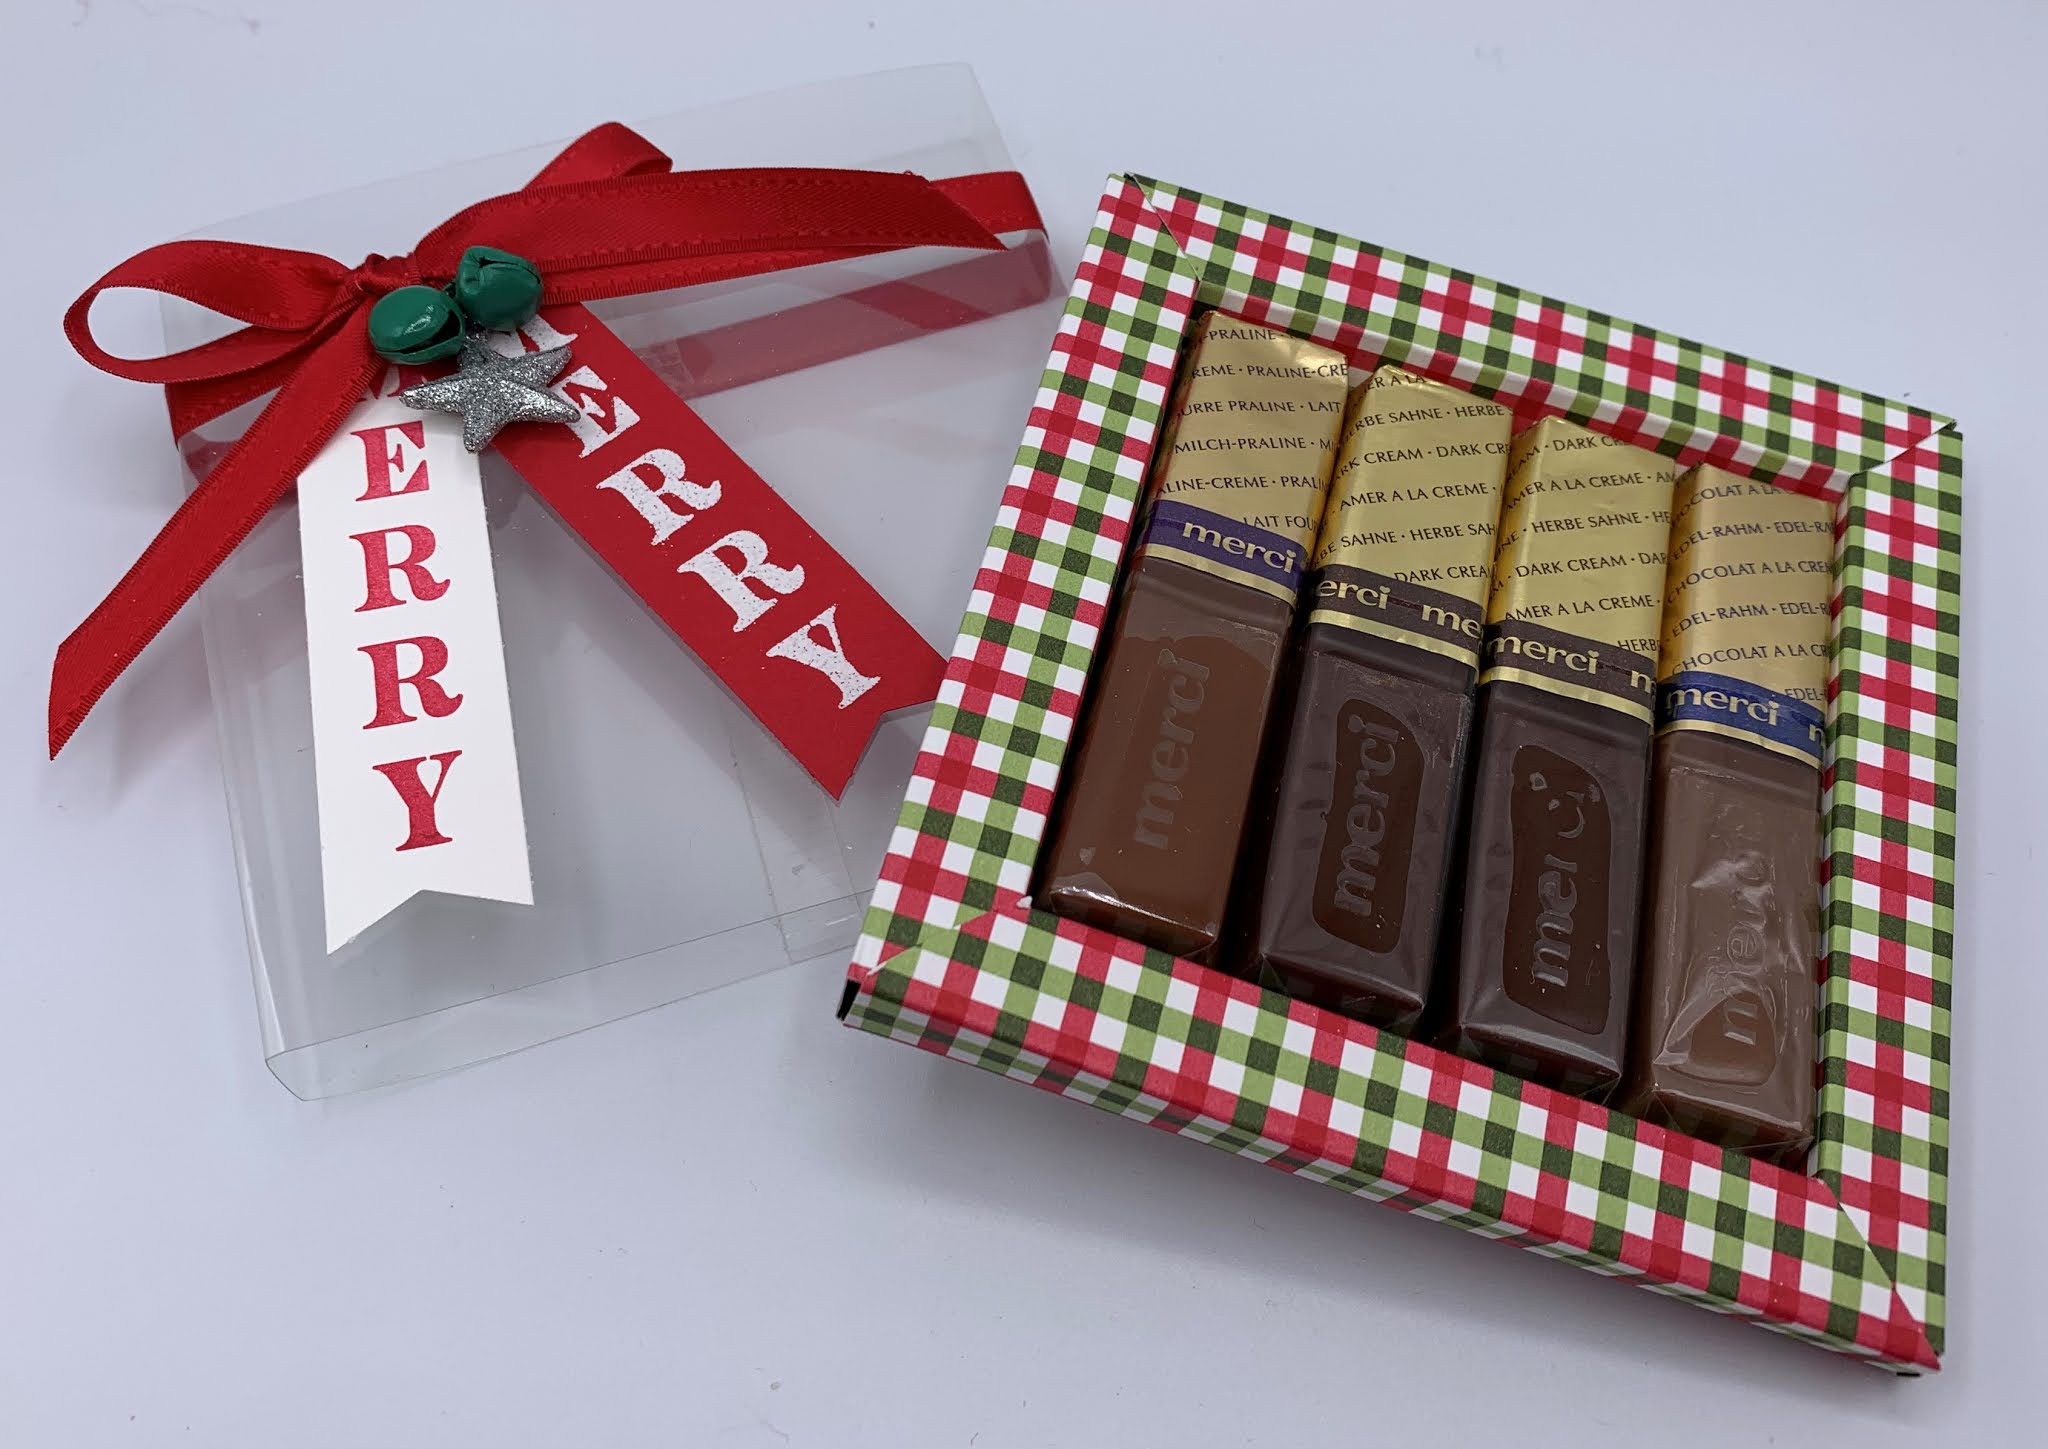
Merry Merci Chocolate Box

Happy Monday My Blogger Friends! 
To continue KICKING OFF the upcoming Christmas Holiday Season...... Today, I'm sharing a FUN Holiday Gift giving idea. I use product from both the 2020-2021 Stampin' UP! Annual Catalog ...... as well as the 2020 Stampin' UP! Mini Holiday Catalog. So...... let's jump right in with my fun little Holiday gift giving project
I have to admit.......there are papercraft projects that come along and just STEAL my heart ...... And this little project that Julie DiMatteo created back in 2018 is one of them.  You can watch Julie's video on how to create this project here:  Merci Chocolates Shadow Box with Video Tutorial - The Paper Pixie
I am IN LOVE with everything about this gift box.  To begin with ...... It holds 4-Merci Chocolates - HOW FABULOUS is that!!!!  It's also a packaging that SERIOUSLY looks like you went out and spent BIG BUCK on it.  And the BEST PART ..... It's SUPER EASY to create.
All the measurements and cutting/scoring directions are on Julie's blog post (above).  The box is created as a shadow style box that is 4" x 4".
It also has a clear 'Window Sheet' slider cover that makes it a SHOW-STOPPER gift.
Here's what the box looks like when all the sides are scored and constructed.  The attention to detail that Julie created on this gift box is AMAZING!
And here's how the Merci Chocolates fit inside the 4" x 4" box ...... And the depth of this box is about 1/2" making everything line up PERFECTLY.
I used the 'Real Red 3/8" Double-Stitched Satin Ribbon' to wrap around my Window Sheet belly band .... And my banner flag sentiment pieces were created using the 'Festive Corners' set.
I also added a couple 'Jingle Bells' and a 'Glitter Star Ornament' to the my ribbon piece.
Don't you just LOVE IT!!!
MANY THANKS to Julie DiMatteo for 
sharing this FABULOUS project.

Thanks for joining me today!  I'll be back tomorrow to share more Holiday projects with you ........ Hope you can make plans to stop back and join me for that share.  Keep Living Your Dream!

Sunday, December 13, 2020

Via COFFEE POUCH

Happy Sunday My Blogger Friends
To continue KICKING OFF the upcoming Christmas Holiday Season...... Today, I'm sharing a FUN Holiday Gift giving idea. I use product from both the 2020-2021 Stampin' UP! Annual Catalog ...... as well as the 2020 Stampin' UP! Mini Holiday Catalog. So...... let's jump right in with my fun little Holiday gift giving project.
Check out this SUPER FUN holiday gift giving idea.  It's PERFECT for all your coffee drinking friends.
And the best part of this project.......It isn't held together with any adhesive.  It's secured with 18" of 'Real Red 3/8" Double-Stitched Satin Ribbon'.
I started out by scoring my 6-3/4" x 3" piece of Mossy Meadow card stock at 2-1/4".  From there ...... I adhered two panels of 'Heartwarming Hugs Designer Series Paper' to the top and bottom panels.  Those pieces of DSP measured 2" x 2-3/4" and 2-3/4" x 2-3/4".
My sentiment was stamped from the 'Press On Set' ........ And all I did was create a banner flag to that piece with my Paper Snips.
And check out how PERFECTLY that ribbon ties up into a pretty bow.
Just thrilled with the way this project turned out.  And I have several of these tucked in my purse to hand out to all my coffee drinking friends this holiday season.

Thanks for joining me today!  I'll be back tomorrow to share more Holiday projects with you ........ Hope you can make plans to stop back and join me for that share.  Keep Living Your Dream!

Saturday, December 12, 2020

2020 Christmas Countdown Project

Happy Saturday My Blogger Friends!
Today.......I have a fun alternate project I made with the November 'Jolly Gingerbread' kit.  I made this project as a way to journal my countdown to Christmas 2020.  Typically......I am back in Madison, Wisconsin in December.......And I create a Christmas countdown journaling project to capture all the fun things I did each day during my visit.  But this year.......things are a tad bit different.  I'm pretty much housebound and needing to find ways to keep myself ENTERTAINED and AMUSED.  So my little Jolly Gingerbread Christmas 2020 Countdown project was created.  Check out what I created.  
This Christmas 2020 Countdown project is going to be a fun way for me to capture all the special (and not so special) things I did each day prior to Christmas Day.  It's CUTE and ADORABLE and will make a great keepsake for me to look back on in years to come.
I used two of the gingerbread gift card holders that were included in the 'Jolly Gingerbread Kit' and adhered them together to create a fun little gingerbread house.  Now......there is nothing spectacular about creating these houses with this kit......they are ALL OVER the internet right now and it seems like everyone is creating mini gingerbread houses with this kit.  I did however create a bottom to my box and by adding this piece to my house......I was able to keep my countdown tags tucked nicely inside my house.  (The bottom is created with a 2-1/2"x2-1/2" piece of Cinnamon Cider cardstock and scoring it so it fit perfectly to the inside of my house.)
My house was created using pieces within the 'Holly Jolly' kit......
And I decorated all four sides of my house with those supplies.
For the inside of my house......I created 25 tags.
I created a scallop number marker for each tag.  The numbers are from the 'Wonder of the Season Memories & More Pack' ...... And I added some '2020 Subtles & In Color Designer Series Paper' to the bottom of each tag for a little added FUN!!! 
And each tag is topped off with either 'Cinnamon Cider 1/4" Ribbon' or 'Petal Pink Metallic Edge Ribbon' (now retired ..... But you could use the 'Whisper White 3/8" Metallic-Edge Ribbon' along with your Petal Pink Stampin' Blends and create the same ribbon).
To finish off each tag ....... I used either my White Gel Pen or Cinnamon Cider Marker and added stitching lines around the outer edges of each tag.  This gave me the extra WOW FACTOR I was looking for.
Just couldn't be happier with the way this project turned out.  Now that my project is finished ...... I look forward to entering something to each day ...... And hope to add a photo to the back side of each tag for some added FUN!!!

Thanks for joining me today!  I'll be back tomorrow to share more holiday projects that I have created ..... Hope you can make plans to stop back and join me for that share.  Keep Living Your Dream!

Friday, December 11, 2020

Post-It-Note Holder

Happy Friday My Blogger Friends!
To continue KICKING OFF the upcoming Christmas Holiday Season...... Today, I'm sharing a FUN Holiday Gift giving idea. I use product from both the 2020-2021 Stampin' UP! Annual Catalog ...... as well as the 2020 Stampin' UP! Mini Holiday Catalog. So...... let's jump right in with my fun little Holiday gift giving project.
Looking for a fun little gift to give out this holiday season?  How about making up some 4"x4" Post-It-Note Holders.  They just couldn't be easier to make.
I started out with a 4"x4" coaster and covered the front with a panel of 'Heartwarming Hugs Designer Series Paper'.  Right through the center......I added a small panel of Real Red card stock that measures 1-1/4" x 4".
To create the stand.....I used a piece of Thick Whisper White card stock that measured 7" x 1-1/2".  I scored that piece at 1-1/4", 2-1/2" and 4-3/4".
Here is how the glue was added to adhere it to the back of my coaster.
All that was left to do was add a pad of 3"x3" post-it-notes and secure that to the front with a large binder clip. 

Thanks for joining me today!  I'll be back tomorrow to share more Holiday projects with you ........ Hope you can make plans to stop back and join me for that share.  Keep Living Your Dream!

Thursday, December 10, 2020

Snowman Tag

Happy Thursday My Blogger Friends!
Today, I have a PRETTY holiday tag I created and want to show you how easy it is to use minimal supplies to create this SUPER PRETTY TAG. . Now that you have the details for my tag creation ...... Let's jump right in with my tag share for today........ 
This tag just screams.......Happy Christmas!!!
I started out by creating some snow layers ........ And used the 'Snow Wonder' set to stamp my sentiment onto the bottom layer.
My base tag is a Balmy Blue tag and I ran that through the 'Winter Snow Embossing Folder' and inked up the edges for some soft highlights.
My snowman is from the 'Snow Wonder' set and I used my Real Red Stampin' Blends to color his hat and scarf.
My tag was topped off with some 'Real Red Double-Stitched Satin Ribbon' and tied up with some Gold 'Forever Greenery Trim'.
My finishing touch was adding a few 'Iridescent Pearls' around the front of my tag.....And this tag was called DONE in no time flat.
Just couldn't be happier with the way this tag turned out......What do you think my dear friends?

Thanks for joining me today!  I'll be back tomorrow to share more Holiday projects with you ........ Hope you can make plans to stop back and join me for that share.  Keep Living Your Dream!

Wednesday, December 09, 2020

Sweetest Season Card

Happy Wednesday My Blogger Friends!
To continue KICKING OFF the upcoming Christmas Holiday Season...... Today, I'm sharing a FUN Holiday Season card idea. I use product from both the 2020-2021 Stampin' UP! Annual Catalog ...... as well as the 2020 Stampin' UP! Mini Holiday Catalog. So...... let's jump right in with my fun little Holiday card project.
This holiday card just makes me HAPPY.
I started out with an Old Olive base card......And added a center panel of Whisper White with a panel of 'Heartwarming Hugs Designer Series Paper' added to the top.
My sentiment panel is a frame that was die-cut from the 'Tasteful Touches Dies'.......And I stamped my sentiment from the 'Sweetest Time' set using Old Olive Ink.  
And a decorative touch of two candy canes was added (using the 'Sweetest Borders Dies').
So do you agree with me my friends......
Doesn't it just make you HAPPY!!!

Thanks for joining me today!  I'll be back tomorrow to share more Holiday projects with you ........ Hope you can make plans to stop back and join me for that share.  Keep Living Your Dream!

Tuesday, December 08, 2020

Merry & Bright Card

Happy Tuesday My Blogger Friends!
Today, I have a card that is filled with all the bright and happy that goes along with the holiday season......And comes together in a SUPER JIFFY.  Best part........Change up with any color combination you might have on hand and you be able to create endless cards this holiday season.  Let's jump in with my card share for today.
For this card I started out with a Whisper White base card and added a Mossy Meadow panel to the top of my card.  Then I added a panel of the 'Heartwarming Hugs Designer Series Paper' to the top of that panel.
My sentiment panel had three layers built onto it.  To the top Whisper White panel......I used the 'Winter Snow Embossing Folder' and that created a pretty texture to that layer.
I used the 'Joy Dies' to crop out the "Bright" sentiment and the 'Peace & Joy' set was used to add the rest of my sentiment message.
Just couldn't be happier with the way this card turned out....
What do you think my friends???

Thanks for joining me today!  I'll be back tomorrow to share more Holiday projects with you ........ Hope you can make plans to stop back and join me for that share.  Keep Living Your Dream!