 I received this Flower Pin for Christmas last year from Sue (a fellow SW Stamper Friend) and I had never posted it. She made it using the SU Bigz Flower Die.......She used the Big Shot machine and die cut the flowers from fabric - and then layed the flowers and hot glued the pieces together. She added a pin to the back and created this amazing flower pin for me.
I enjoy looking at it so much.....that I pinned it to the handle of one of the cabinets in my studio - this way I can look at it every day and feel blessed that I received this from her.
We are getting ready to leave on vacation - going to spend a month driving back to Wisconsin and visiting family and friends along the way. We are leaving tomorrow and heading to Greeley Colorado. My BFF has a second home there and we are planning to stay with her for a couple days before we head off to Wisconsin. Will report in along the way - Hope you keep Living Your Dream.
I received this Flower Pin for Christmas last year from Sue (a fellow SW Stamper Friend) and I had never posted it. She made it using the SU Bigz Flower Die.......She used the Big Shot machine and die cut the flowers from fabric - and then layed the flowers and hot glued the pieces together. She added a pin to the back and created this amazing flower pin for me.
I enjoy looking at it so much.....that I pinned it to the handle of one of the cabinets in my studio - this way I can look at it every day and feel blessed that I received this from her.
We are getting ready to leave on vacation - going to spend a month driving back to Wisconsin and visiting family and friends along the way. We are leaving tomorrow and heading to Greeley Colorado. My BFF has a second home there and we are planning to stay with her for a couple days before we head off to Wisconsin. Will report in along the way - Hope you keep Living Your Dream.
Tuesday, August 24, 2010
SU Flower Pin
Check out what one of my fellow SouthWest Stamper members made for me.........
 I received this Flower Pin for Christmas last year from Sue (a fellow SW Stamper Friend) and I had never posted it. She made it using the SU Bigz Flower Die.......She used the Big Shot machine and die cut the flowers from fabric - and then layed the flowers and hot glued the pieces together. She added a pin to the back and created this amazing flower pin for me.
I enjoy looking at it so much.....that I pinned it to the handle of one of the cabinets in my studio - this way I can look at it every day and feel blessed that I received this from her.
We are getting ready to leave on vacation - going to spend a month driving back to Wisconsin and visiting family and friends along the way. We are leaving tomorrow and heading to Greeley Colorado. My BFF has a second home there and we are planning to stay with her for a couple days before we head off to Wisconsin. Will report in along the way - Hope you keep Living Your Dream.
I received this Flower Pin for Christmas last year from Sue (a fellow SW Stamper Friend) and I had never posted it. She made it using the SU Bigz Flower Die.......She used the Big Shot machine and die cut the flowers from fabric - and then layed the flowers and hot glued the pieces together. She added a pin to the back and created this amazing flower pin for me.
I enjoy looking at it so much.....that I pinned it to the handle of one of the cabinets in my studio - this way I can look at it every day and feel blessed that I received this from her.
We are getting ready to leave on vacation - going to spend a month driving back to Wisconsin and visiting family and friends along the way. We are leaving tomorrow and heading to Greeley Colorado. My BFF has a second home there and we are planning to stay with her for a couple days before we head off to Wisconsin. Will report in along the way - Hope you keep Living Your Dream.
Sunday, August 22, 2010
CraftNooners Card May
Today I have a post that I totally forgot to post (at the end of May)......Here's a sneak peak at one of the cards my CraftNooner (and BFF) Buddy Jan made for our last gathering in May.....
 Jan designed this really BRIGHT and FUN card using this amazing Chicky-La-La as our focal point. (I know Jan, I can hear you saying right now "Who" makes this stamp set - AND - the actually "Name" of this stamp set is.....YOU ROCK GIRLFRIEND!) Jan also brought over her Copic Markers and allowed us the opportunity to try our hand at Copic Coloring (I think I failed at this part of the challenge).
 Jan also let me stamp an additional Chicky La-La Lady (I kind of like that name for this stamp set..........) so I could color her later and make another card using her cute cute image.
 Next my buddy Opal had us try our hand at water coloring.......Using Gelly Roll Pens. WOW, the colors just slide on the paper and blended so nicely. THANKS Opal for turning me on to this amazing method of water coloring.
 And last (but certainly not least) my CraftNooner Friend Berta had us make this very LOVELY card with an unexpected edge to the card. The DSP she had us use all coordinated and matched so nicely........and the REAL FUN was layering the flowers (using the same DSP) to create a great layered look to our finished card. This was a card I was for sure going to C.A.S.E. again soon.
My CraftNooner Stamping Buddies went on hold from June 1st till the end of the year. Two of the members were returning to their second homes and we decided to do card challenges from a distance. We each picked two month and each of those months we selected not only a color theme but also a design challenge. We are to make three cards and mail those cards to each of the CraftNooner members (Jan, Opal, Berta and Kadie). The challenge would be to use the colors for that month and incorporate the technique for that month into the design of our cards. I will be sharing those cards with you very soon. I will tell you - Not only have I been having a BLAST meeting the challenges BUT......I am also OVERWHELMED with the envelopes I've been receiving in my mailbox from the ladies. MISS YOU LADIES and can't wait till we are back together and resuming our every other Friday CraftNooners gatherings.
Hope you had a great weekend and you can swing back tomorrow - I'll be sharing lots of new posts next week of cards I've been working on in August. Thanks for stopping by and Keep Living Your Dream!
Saturday, August 21, 2010
Christmas in July
Today I would like to share five amazing cards that I made during a SaddleBrooke Saturday Fun Shop. This Fun Shop was a Card in a Box event that my good buddy Kris Holmes put together. There were six of us that attended this Fun Shop - and not only did we have a fabulous time.......We also walked away with five Christmas Card ideas. Here are those cards:
This first card was designed by my friend Kris......I FELL IN LOVE with this Snowman - and have already placed it on my "Have To Have Stamp List".
 This next card was designed by my Stampin Buddy Liz - It's an easel card, which I actually squealed when I saw we were making an easel card.......I had never made an easel card and with the help of Liz, it turned out beautiful.
 Next is a card designed by my SaddleBrooke Stamper friend Patty - she designed a very elegant card that pulled together some traditional Christmas colors along with a layout that I knew would be a winner to duplicate for my Christmas cards for this year.
 This next card was designed by my SaddleBrooke Stampin Buddy June. LOVE LOVE LOVE how June had everything diecut and the card front run through the CuddleBug to help us put her card together quickly. Can image how this card could be duplicated with other Holiday diecut designs for all different Holiday cards with this layout.
 And last (but certainly not least), my SaddleBrooke Stamper Buddy Opal designed this card
that displayed a fabulous scallop circle focal point on the center of her card. WOW............How lovely is this! I immediately knew that this was going to be another card I would be able to make LOTS of for my Christmas cards this year.
And last (but certainly not least), my SaddleBrooke Stamper Buddy Opal designed this card
that displayed a fabulous scallop circle focal point on the center of her card. WOW............How lovely is this! I immediately knew that this was going to be another card I would be able to make LOTS of for my Christmas cards this year.
 ALL and ALL......this was a great KICK-OFF to some wonderful Christmas card that I WILL be duplicating this year for my 2010 Christmas Cards.
Thanks for stopping by today - and please stop back tomorrow and I'll share more Kards by Kadie designs with you. Keep Living Your Dream!
Friday, August 20, 2010
Thursday, August 19, 2010
Scrapbooking Sketch Book
I want to share with you today a sketch book I created to help me with my scrapbooking. Here is the journal book I created to hold my scrapbooking sketches in.......
 I took a blank hardbound book and created this "Kadie's Scarpbooking Sketch Book" for me to keep samples of layouts for me to use for scrapbooking. Here is what the tabbed sections look like.
 I divided my book out into single and double page sketch layouts along with combination sketches.
 I went on line and goggled Scrapbooking Sketches and there were thousands of sketches to pick from.....I printed off from several sites and was able to created MANY MANY pages for my sketch book.
 Here's just a few more samples of what the inside of my sketch book looks like.
Have to tell you that this has really helped take the guess work out of creating scrapbook pages -which in turns allows me to create more pages and get more fun books completed for my grandkids.....It was totally worth the work it took me one afternoon to get this sketch book completed.
Hope you can stop back tomorrow to see the great card making sketch book I created in July. Keep Living Your Dream!
Wednesday, August 18, 2010
SU Color Collection Sampler
I created this SU Color Collection Sampler to help me keep track of the new SU colors.....check it out:
 I created the cover to model both the Inventory book and punch template ring that I created.
 I printed out a page for each collection and I then punched a square of each color out and glued it to each section.
 Here is what all four collections look like.....
 And a tight and close-up look of what the punched out cardstock looks like.
 I have made two of these sampler rings to keep in my travel bag and one is sitting on my studio desk to help me quickly know which color and collection my card stock is located.
I love creating new projects and the more organized I am the faster I can get the projects out of my head.......off the ground.....and finished. All these samplers help me do just that.
Thanks for stopping by today - hope you can stop back tomorrow for two other creations I came up with and completed in July. Keep Living Your Dream!
Tuesday, August 17, 2010
Punch Template Ring
Today I want to share with you a fabulous tool I made to help me determining what punch I want to use for my projects. Here is what the end results of my hard work looks like.
 I took every single punch I owned and spent time punching out that punch on to a black piece of card stock and then labeling each of the pieces of card stock with the punch and SU name of each of those punches.
 I also divided my punches up into sections - which makes it easier for me when I'm working on a project to go directly to that type of punch.
 Here's a sample of what the pages look like when I open the booklet up.
 I can then lay the template over the stamped out image I want to use and this will help me determine if the punch is appropriate or not for my project.
 And here is yet another punch laying over one of the images in our SU catalog........What a fabulous idea this was. Only wish it was my idea...but....NOT. It's one of those ideas that someone - somewhere came up with it - and we are all greatful for that persons brilliant idea.
Stop back tomorrow and I have one last sampler I made.....and that is a new SU Color Collection Sampler.......It will surely be worth your stopping back. Keep Living Your Dream!
Monday, August 16, 2010
My Product and Supply Inventory Book
Today I want to share with you a little booklet that I made for when I go to trade shows and conventions. It seems like the older I get.......the harder it is for me to remember some of the product that I have - so my BFF Jan had one of these booklets that she took to the convention in November and I thought.......I have to make one of those....so....here goes:
 I took an $1.99 photo booklet that I found at Michael's and turned it into a great booklet that fits into my purse or backpack for when I travel to conventions. I used an exacto knife to remove the front and back cover and added some FUN pink cardstock to the book.
 I then used my SU tab punch to divide my book up into SEVERAL sections and added the names for each of those sections to the tab.
 Seems like I have more trouble remembering the Cricut Cartridges I have (and yes.....I have bought at least THREE cartridges that I already had-and couldn't return them because I had opened them up before I realized that I already had them........).......So this booklet is helping to keep my Cricut cartridges posted and my punches (which I also have been know to re-buy punches that I already have......PLEASE TELL ME - SOME OF YOU DO THAT TOO!
 One of the other areas that I seem to be out of control with.....are......paper stacks - until I started using this inventory booklet I was forever buying (or should I say...RE-BUYING) those paper packs that I already had in my DSP cabinet. Now I can grab my inventory booklet and see those paper packs that I already have.....and those that I just need to buy.
 So here are all the Cricut cartridges that I own......It's nice to know that I am able to mail off the cartridges that I buy and my daughter can load them on to her Gypsy and then mail them back to me.......That way.....I we both are able to enjoy my purchase and helps me to justify all the cartridges that "I just had to have!".
Hope I was able to share with you some tips on using an Inventory helper - and to say that it has totally worked for me and I haven't had to return product to the store because I bought a repeat of something I already have......LIFE IS GOOD!
Hope you can stop back tomorrow when I'll share with you a Punch Template Ring that I created for all my punches. Keep Living Your Dream!
Sunday, August 15, 2010
Convention Dry Erase Booklet
It's Sunday and the end of the weekend........But don't be sad.......I will bring a SMILE to your face with sharing this fabulous gift I gave to my conference friends.....Here we go.....
 I made this note holder that has a sheet of "Clear Craft Plastic" on the inside that erase pen and take notes on the clear plastic to take notes when shopping or you can play hangman with your grandkids...
 Here's a close-up picture of one of the 3-embellishment I put on the front of each notebook.
 Here's what the inside of notebook looks like.......The top portion has a compartment that you tuck a kleenex in so you can erase the scribble you make on the lower portion. And as you can see - the lower portion has a white sheet of paper and laying over the top is a piece of clear craft plastic that will act as your dry erase board.
 And a close-up of the pen holder. What a fabulous gift......I've made these for my grandkids to use in the car when they want to play hangman or tic-tac-toe......and it's a big hit for both old and young.
Hope you had a fabulous weekend.....It's back to work tomorrow - hope you are ready. Stop back tomorrow and I'll share some more creations by Kadie....Until Monday - Keep Living Your Dream!
Saturday, August 14, 2010
Convention Gifts Part One
Happy Saturday to you - Hope you are enjoying your weekend - and you have scheduled LOTS of time to do some serious scrappin........I know I'm going to be trying to fit some time in my studio today. Today I'm going to be sharing three of the four gifts I gave to the gals who went with me to the convention.........So let's get started......
 This is a close up of the scallop piece I put on the front of the water bottle flaps......
 And here is what the water bottle flap ended up looking like.
 I made each of the gals a bag of chocolate treats....and here is the embellishment I added to the bag topper....
 I tucked just the right amount of chocolate for each of us to keep our strength up - while we traveled around the convention center and checked out all the latest and greatest things we just had to have........
 And the last share today is the post-it-note purse ring that I made for each of the ladies. It is designed to clip into the side of your purse - so you always have a piece of paper to take a quick note.
The convention was FUN......The ideas were just pouring out from the booths....and the Company I kept that day was FABULOUS. So lucky to be part of these three ladies world. Thanks for letting me join you.
Stop back tomorrow and I'll share the final gift that I made my convention goers.......Until then....Keep Living Your Dream!
Friday, August 13, 2010
Tucson Convention Gifts
The beginning of the year, three of my SaddleBrooke Stamper Friends and I went to the Tucson convention........And here are the gifts that I made for each of them........
 This is a group shot of all thre gifts - all packaged up and ready to hand out.........
 Here is Opal's gifts......
 This one is for Jan....
 And Berta received this gift package........
 This is a group shot of all thre gifts - all packaged up and ready to hand out.........
 Here is Opal's gifts......
 This one is for Jan....
 And Berta received this gift package........
Stop back the rest of this weekend and I'll share with you the break-down of each of these gifts. Needless to say - the ladies really enjoyed the surprise and the candy came in handy for our long day of convention shopping. Until tomorrow.....Keep Living Your Dream!
Thursday, August 12, 2010
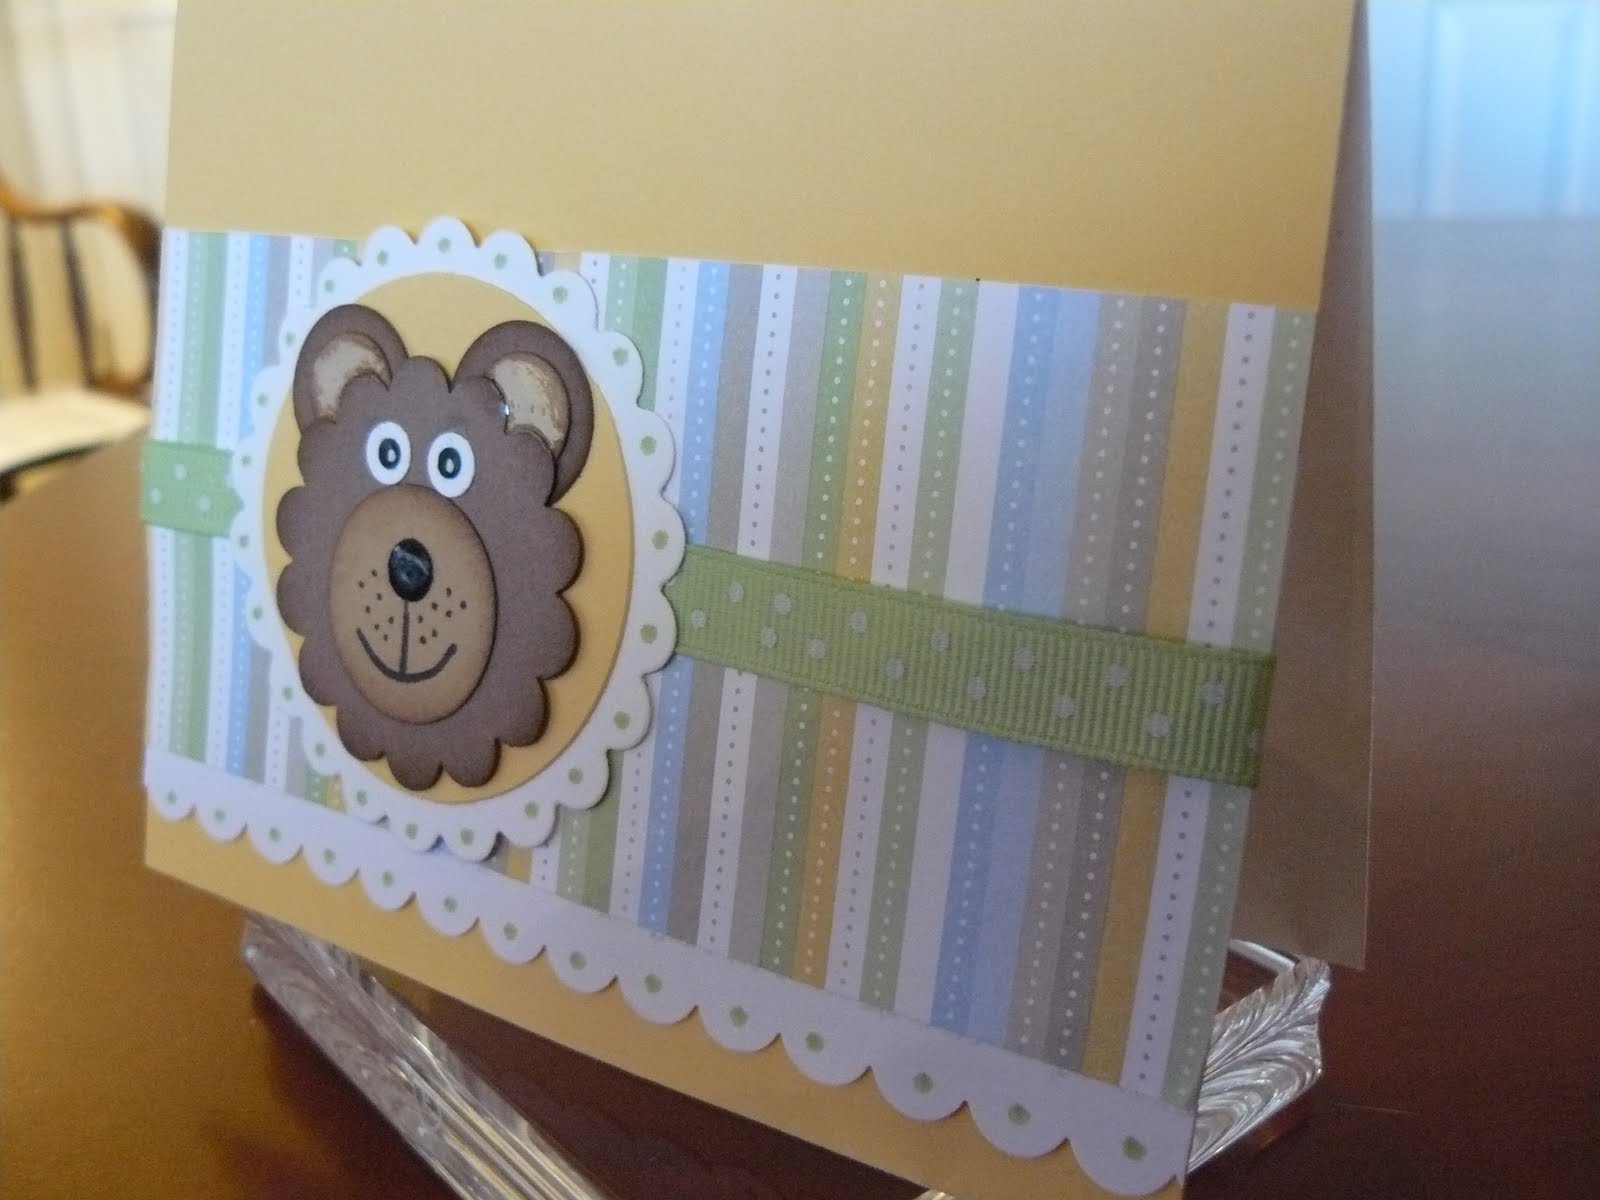
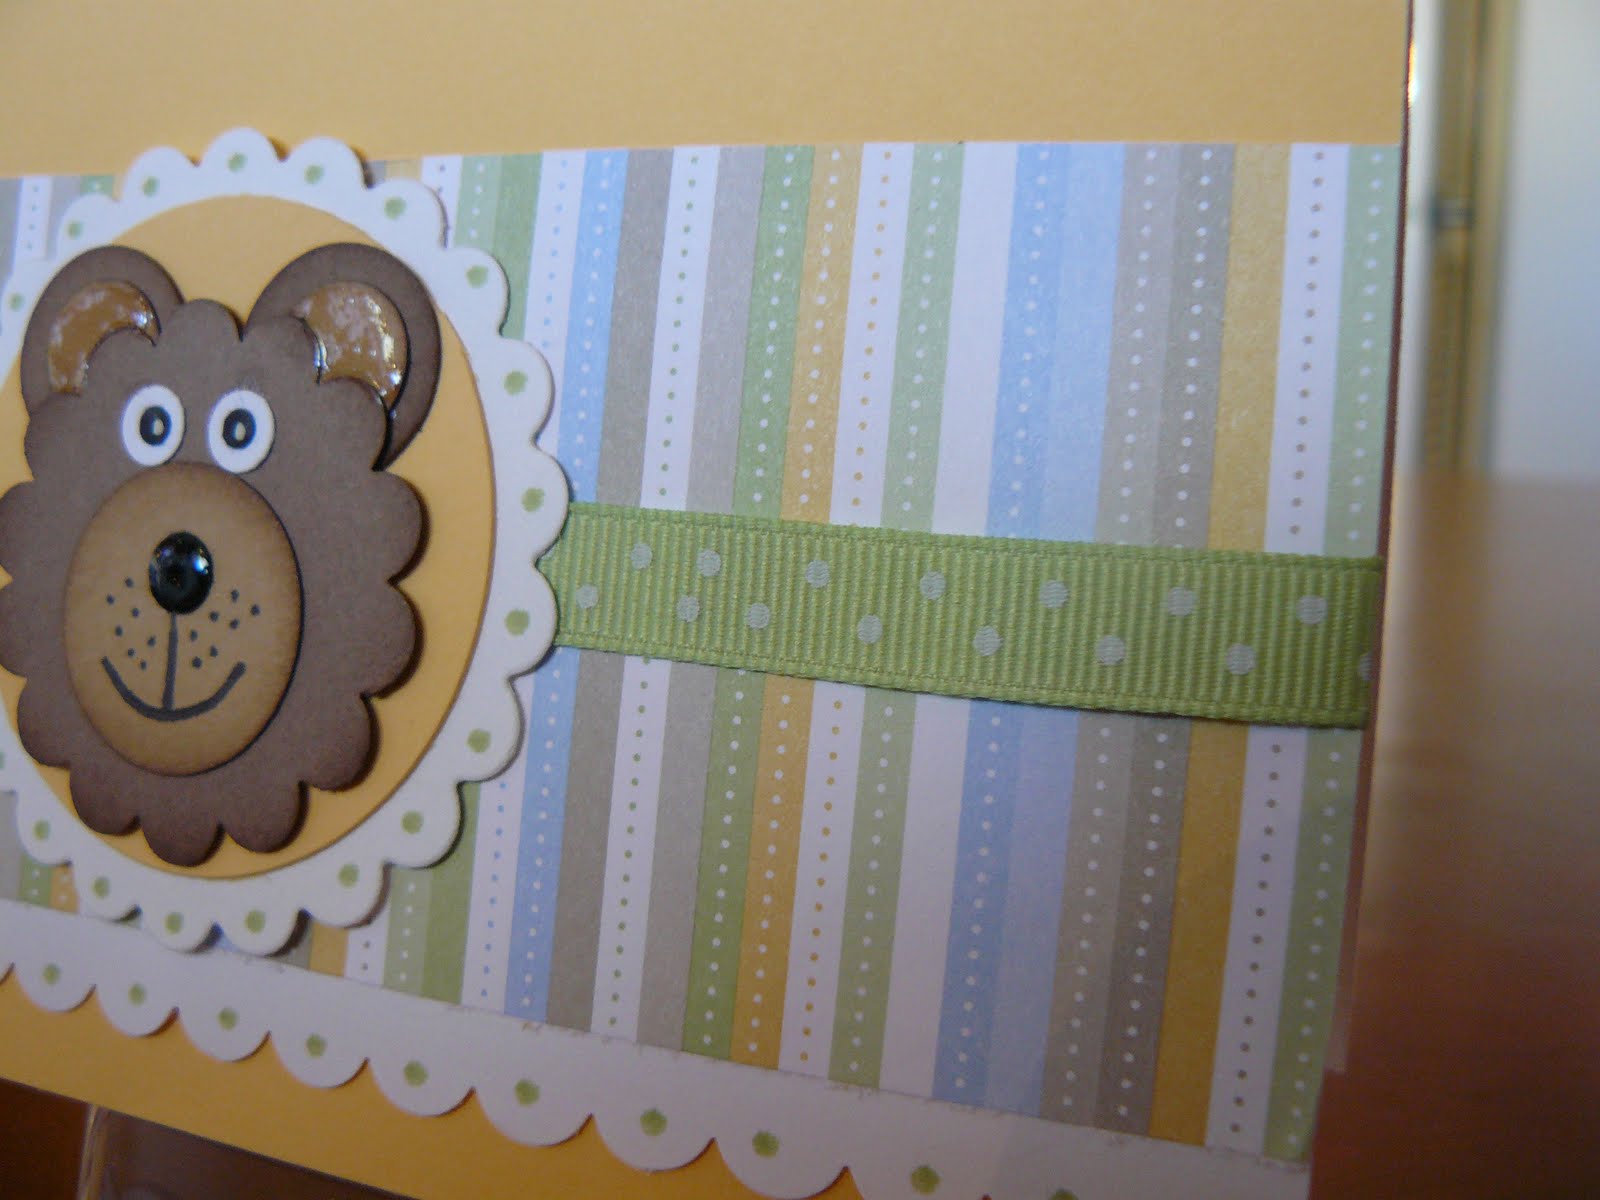
Teddy Bear Card
Today I will be sharing a card that I made some time ago - and actually designed it to be a card to give to my grandkids, but realized that the teddy bear makes a great baby card.
 As you can see - the bear is made from several SU punches and it's mounted on a 1-1/2" circle and SU Scallop Circle. I added a piece of DSP and some ribbon........punched a scallop edge border and called it a day.
 Here's a close up of the bear - think it turned out so stinkin cute. I also added some crystal effects to the ears and nose and that gave the bear just the right amount of WOW.
Hope you can visit over the weekend......I will be sharing the Tucson convention gifts that I made for my three convention traveling friends - when we went to the Tucson convention at the beginning of the year.
See you tomorrow and Keep Living Your Dream!
Wednesday, August 11, 2010
Small Stationary Holder
Today I will share with you some really fabulous Stationary holders that I've made for my friends.
 These great stationary holders keep 6-note cards inside and the closure is a flip down clip that secures the stationary holder closed.
 Here I've taken the note cards out of the stationary box to show you how much fun is wrapped up inside these stationary boxes.
 And here I'm spotlighting just the Pumpkin Pie Stationary Holders and showing all six note cards.
 Hope you enjoyed this fun Stationary Holder that I made - I've shared this project with several of my SaddleBrooke stamping ladies for their birthday.
Stop back tomorrow and I'll share more Kards by Kadie creations........Keep Living Your Dream!
Tuesday, August 10, 2010
Celebrate with a Happy Happy Birthday
I made this Happy and Bright Birthday card for those times when Happy and FUN are what a Birthday is all about.
 The band across the center of this card helps to give a ceiling to the floating balloons and then right above that is the BEST part of this birthday card.
  I added a small green pocket above the Happy Birthday band and added four colorful ribbons to that green pocket. It totally give this card that WOW factor that was needed.
 I plan to use this card for many upcoming birthdays and know that the intent in making this card was to bring a SMILE to the face that receives it.
Thanks for joining me today and for allowing me to share yet another card created especially for my Kards by Kadie blog. Hope you can return tomorrow for more fabulous Kards by Kadie creations. Keep Living Your Dream!
Subscribe to:
Posts (Atom)