Wednesday, December 31, 2014

Santa Treat Bag

Happy Wednesday My Blogger Friends!
Today's post is a left over project that I just had to share with you before I pack away my holiday supplies.  It's a project that the very talented Patty Bennett created and shared on her blog PattyStampingSpot.  Let me jump right in and share this project with you.......
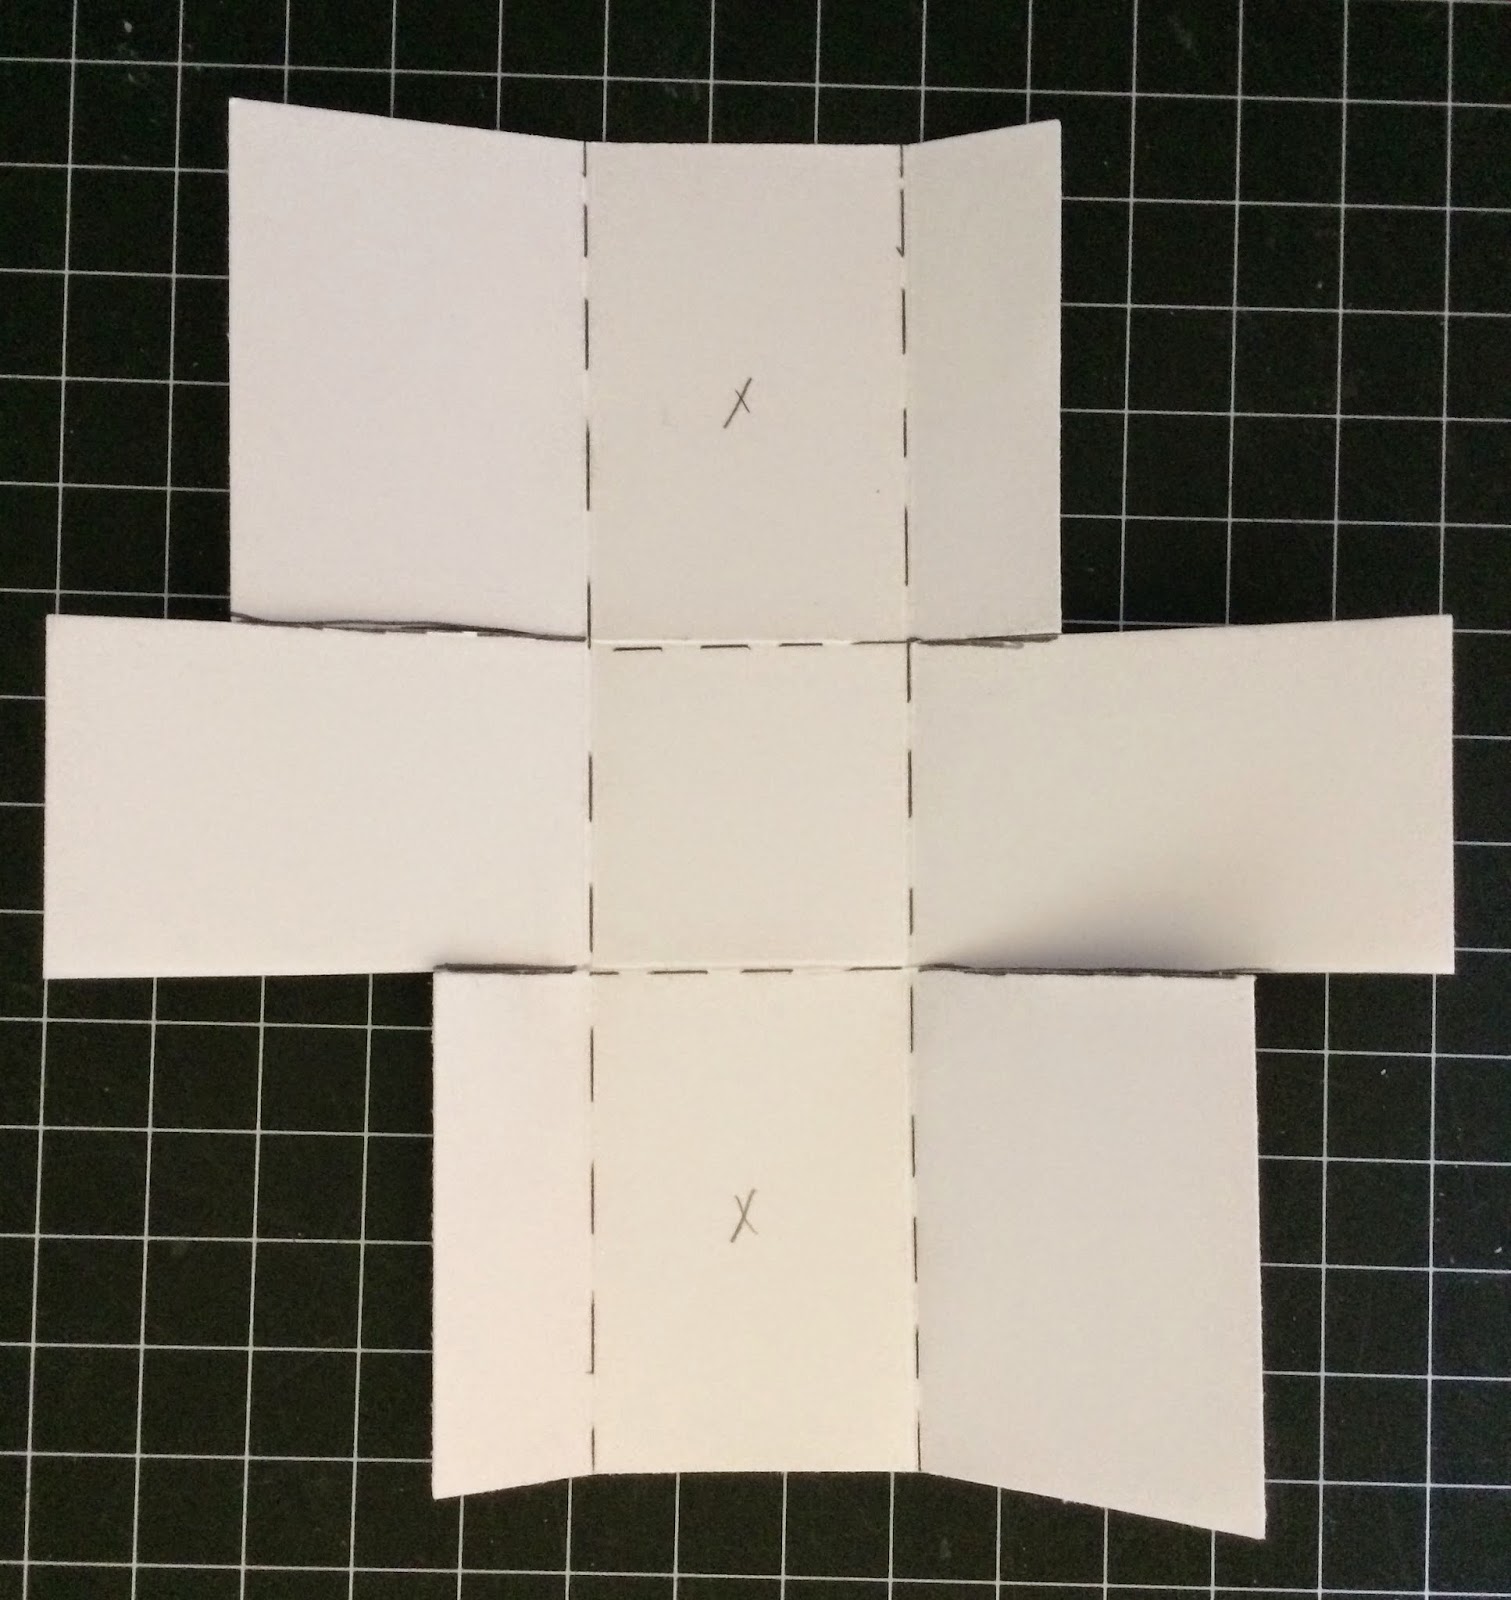
These little treat bags are so extra special that with the help of some Stampin' UP! punches.....You can create these darling bags in NO TIME FLAT!
The packaging uses the 'Petite Cafe Gift Bags' as the base for your Santa Treat Bag.
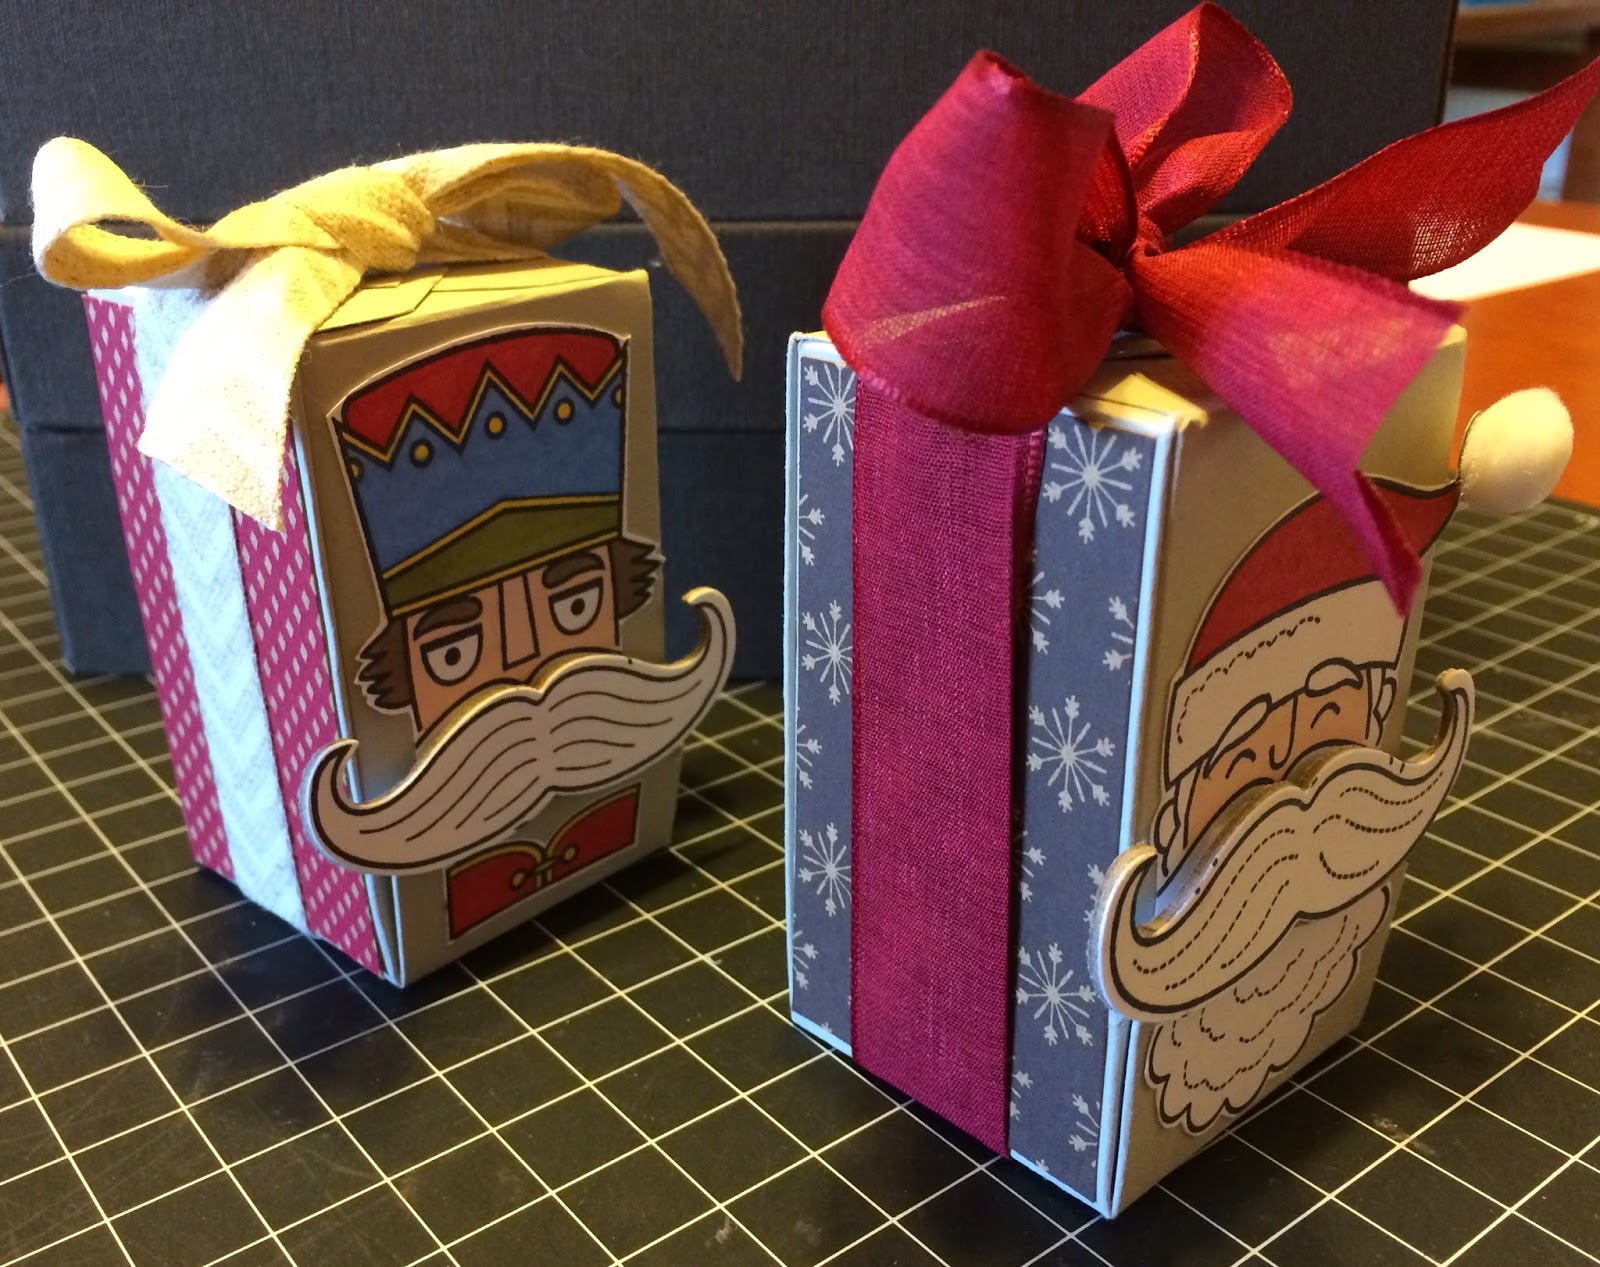
The bricks are made from the Ticket Duo Builder punch......
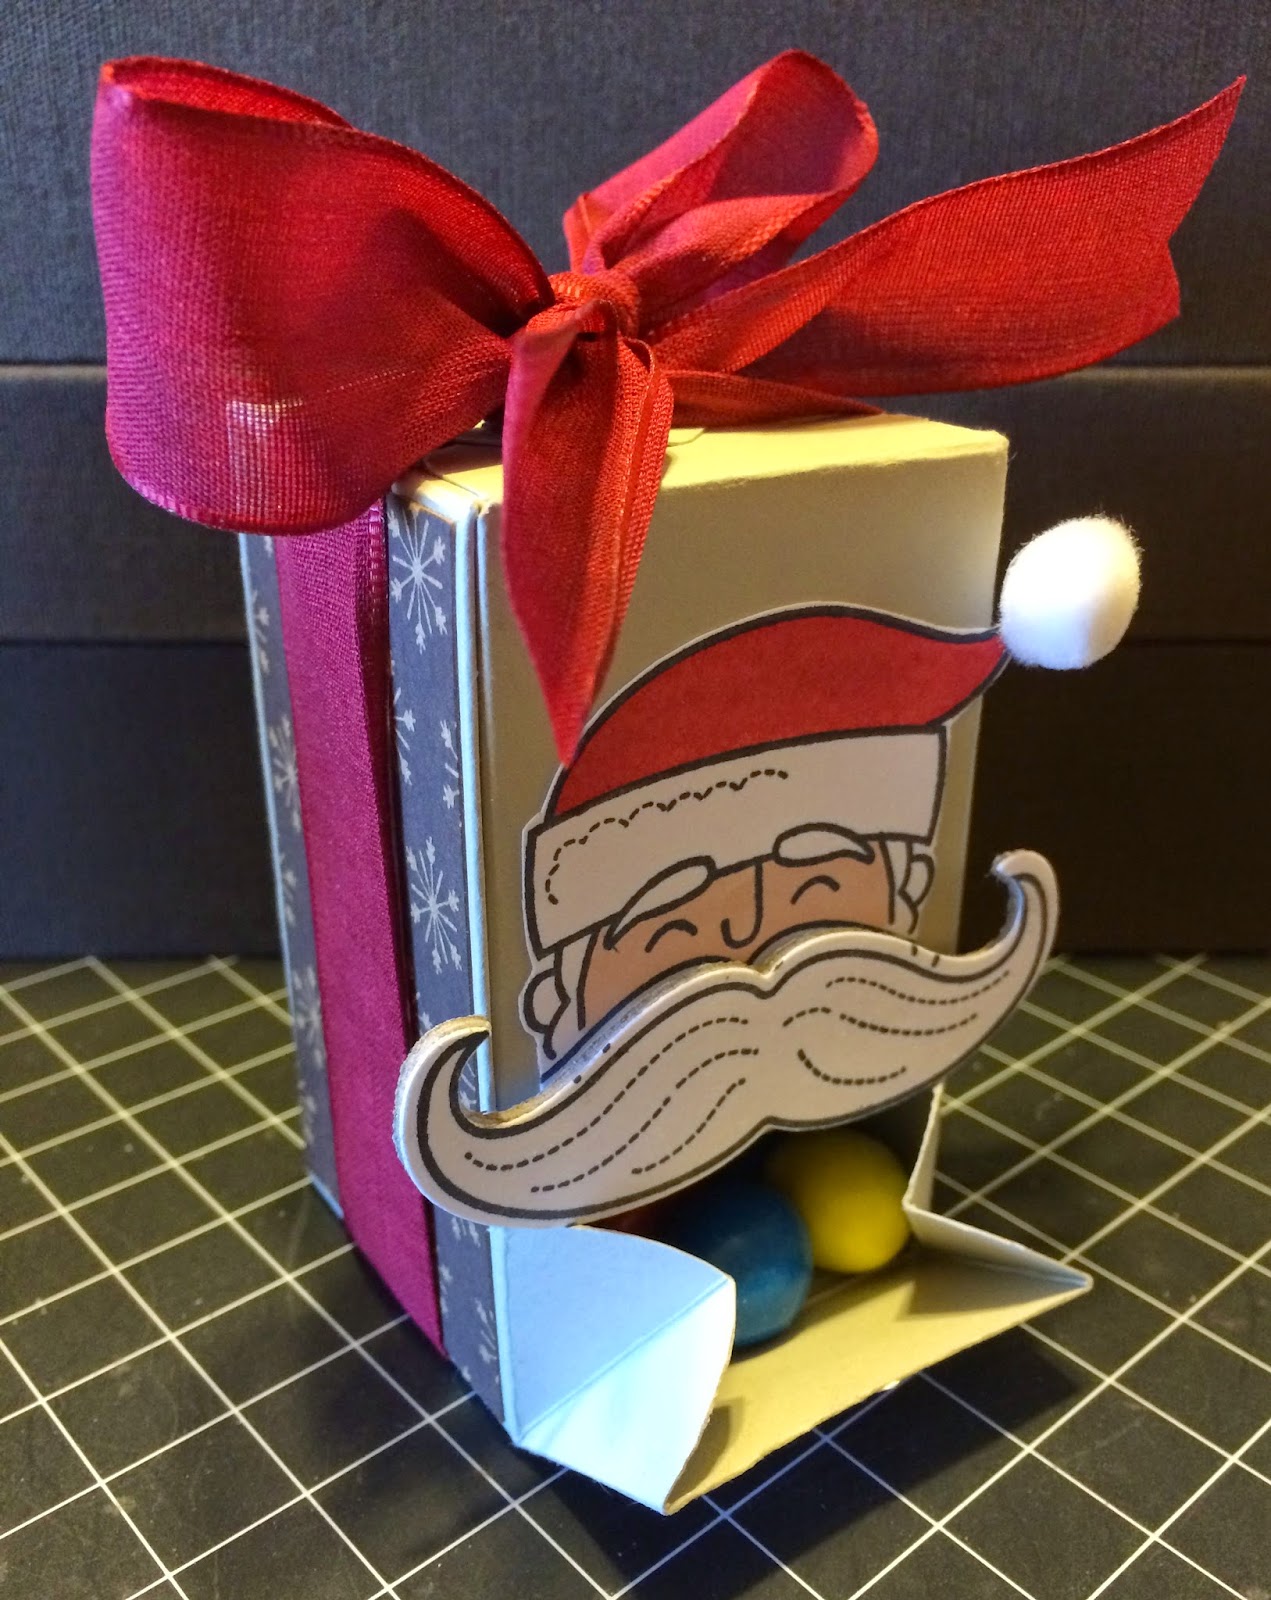
Santa's bag is from the Owl Builder punch.....
And the Santa legs are from the Ticket Duo Builder Punch, the Santa boots are from the Heart Punch and the white fur fluff is from a retired bitty flower punch (but you could use the Boho Blossom Punch too).  All the pieces just get glued together and you end up creating the most adorable treat bag.  I promise you........you will want to make a couple of these.....because they are just too cute to not keep one for yourself.

Thanks for joining me today!  I'll be back tomorrow to share with you a sweet card I made for my good friend Mary Fish .......... Hope you can make plans to stop back and join me for that share.  Keep Living Your Dream!


Tuesday, December 30, 2014

SU Holiday DSP Trees

Happy Tuesday My Blogger Friends!
Before I share my fun Holiday Trees with you.......I have a darling little picture of my Twoie to share with you......
Here's my little Dude'r eating what I think are some chocolate chip cookies.  Could this face be any more adorable!

For my share today........I have a project that was featured in our Stampin' Success (exclusive Stampin' UP! demonstrator magazine) in December.  Let's jump right in with my share for today.
This trio of holiday days was a 'do it yourself' project that from the moment I saw it.......I knew I would be making it for my home decor this holiday season.
The trio of trees has three different sizes of Terra Cotta pots.  This is the largest.......
And here are the two smaller pots.
The magic of this project is the sizing of the Typeset Specialty Designer Series Paper that is used to make up the trees.
And of course the painting of each of the Terra Cotta pots to black with a gold trim at the bottom.
The smallest tree uses 3/4" to 2-1/4" DSP; The medium tree uses 3/4" to 2-3/4" DSP and the largest tree uses 3/4" to 3-3/4" DSP.  You just cut out your square of DSP and size them in 1/4" increments and make 12 of each size. 
 I added a piece of foam to the inside of each pot and then glued a dowel inside and began stacking my DSP squares onto the dowel.  All that was left to do was add some moss to the bottom of each pot......spritz the DSP with some Vanilla Shimmer Smooch Spritz and add a Gold Glimmer Star to the top of my tree.    


Thanks for joining me today!  I'll be back tomorrow to share with you a darling Santa Gift Bag that I made .......... Hope you can make plans to stop back and join me for that share.  Keep Living Your Dream!

Monday, December 29, 2014

Lantern Fun

Happy Monday My Blogger Friends!
Today I have a special little share for you ........ It's one that my amazing internet friend Lynn gave me for Christmas........And I share with my friend Mary Fish and some of the Stampin' PALS.  It's a fun little lantern that looks "OH SO AMAZING" with little tea lights (from the Dollar Store) tucked inside the center.  Let me jump right in with this share.........
These fun little lanterns are made with a 6-1/4" x 6-1/4" piece of cardstock (I used Coastal Cabana for this one) and two die-cut Curvy Keepsake pieces for the front and back of your lantern.
And here's the Whisper White one I created.
They looked  SUPER AMAZING all lined up in my kitchen window........
And on Christmas Eve night ........... I turned on the tea-light inside each of them ........ And it created a pretty festive look in my kitchen!
Here's what the pattern looks like once you get your 6-1/4" x 6-1/4" piece of cardstock cut and scored and the Curvy Keepsake die-cut piece attached to the center front panel.
Take your 6-1/4" x 6-1/4" piece of cardstock and score it on all four sides at 2-3/8".  (I have drawn dash lines on your scored line to make the rest of these direction easier to follow.)  You will put your cardstock into your trimmer and line up the right scored line at the 3/4" line and cut your top panel at that 3/4" line ..... But just down to the center flap.  YOU DON'T WANT TO TRIM THE CENTER FLAP on either side of your cardstock AT ALL!   Now you are going to want to trim the lower flap of your lantern.  Slide your cardstock over to the OUTER 3/4" marking and line up the edge of your cardstock to the outer 3/4" marking line.  You will then cut your bottom flap at this outer 3/4" marking line but only up to the center flap.   YOU WILL DO THE EXACT SAME PROCESS TO THE OTHER SIDE OF YOUR 6-1/4" X 6-1/4" PIECE OF CARDSTOCK.
Once you get both your side pieces cut down.......This is what your flaps should look like.  Next I attached my Curvy Keepsake die-cut pieces to the center flap......and then used my large oval punch to go in on the shorter flap side and punch out my oval piece.  I then added a panel of vellum to the center panel and this is where the tea-light will shine through.  All that is left to do is assemble your lantern.  Fold up the side flaps and adhered both sides.  
I added a small snowflake from the 'Snowflake Card Thinlits Dies" and also used that same die to create a fun little banner for my lantern.
All that was left to do was add some Rhinestones and drop a Dollar Store tea-light into the center of my lantern.  This project just couldn't be any easier.

Thanks for joining me today!  I'll be back tomorrow to share the darling little trio of holiday trees I made to decorate my hallway for Christmas .......... Hope you can make plans to stop back and join me for that share.  Keep Living Your Dream!

Sunday, December 28, 2014

Candy Dispensers

Happy Sunday My Blogger Friends!
Today I have a SERIOUSLY FUN treat to share with you.  It's one that I CASE'd from Brenda Quintana at Qbeesquest.blogspot.com.  She posted this tutorial on her blog (Oct 31st) and I knew the minute I saw it......I was going to be making some of these for the holidays.  
Brenda created this darling little candy dispenser with the Stampin' UP! Gift Box Punch Board.
And the bonus.....she has a video on how to create these:
I'm just crazy for the way she created the opening for this candy dispenser.
Of course I made the Santa dispenser.....
And filled it full of Peanut M and M's.
And the darling Nutcracker......
That also was packed full of candy.


Thanks for joining me today!  I'll be back tomorrow to share with you a darling little Santa Treat Bag .......... Hope you can make plans to stop back and join me for that share.  Keep Living Your Dream!

Saturday, December 27, 2014

Teacher Gifts

Happy Saturday My Blogger Friends!
Today's post is a fun little gift that I made for my Wisconsin grandkids to give to their teachers for Christmas.  Check out this FUN and QUICK set of notecards I made.......
I wanted to create something extra special for my three grandschool age grandkids to give each of their teachers for Christmas and I thought what would say 'thank you' to a teacher like a set of darling little notecards.
I created four 'wise owls' in yellow, red, blue and green and added a giant black-board with the word "thank you" stamped on it.  I think my favorite touch on these cards are the giant glasses that the owl is wearing along with the 'pointer' that I attached to his wings.
I packaged each set of notecards in a gorgeous clear plastic box and added a pretty grosgrain ribbon bow (which I didn't take a picture of).......and finished the packaging off with a fun little holiday tag.  The kids loved their teachers gift and can only image how thrilled their teachers were to receive this gift.

Thanks for joining me today!  I'll be back tomorrow to share with you a couple treat dispensers that I made .......... Hope you can make plans to stop back and join me for that share.  Keep Living Your Dream!

Friday, December 26, 2014

Christmas Place Setting

Happy Friday My Blogger Friends!
Check out this cute table setting I made for our dinner table for Christmas evening.....

Our place settings included a Red Charger along with a whimsy Christmas Tree plate.  I also had a set of crystal tea lights and a beautiful wine goblet with matching red cloth napkin at each place setting.  The real fun was how I arranged our silverware at each place setting........ 

I used a retired pillow box die and diecut out some red cardstock and added a fancy buckle and two black buttons.  The pillow box die created the PERFECT holder for me to tuck all our silverware ...... and each holder was placed on top of our Christmas Tree plates.
So here are the two silverware holders I created.  I made a Red Santa one for me........And a Green Elf one for Jack.
This was the perfect touch for our Christmas dinner table for the two of us.


Thanks for joining me today!  I'll be back tomorrow to share with you a Teachers Appreciate Gift that I made .......... Hope you can make plans to stop back and join me for that share.  Keep Living Your Dream!

Thursday, December 25, 2014

12-Tags of Christmas - FINAL DAY

MERRY CHRISTMAS
 My Blogger Friends!
Merry Christmas my blogger friends,  Hope your day is filled with lots of holiday tradition and festive times.........Jack and I will be spending the day together in our Arizona home.

Today I have the last two tags for my 12-Tags of Christmas to share with you.  Let's jump right in with my final two tags...........
This first tag is a special Pacific Point/Snowfall tag.
I used the Festival of Trees punch to create my Basic Gray tree.  And used Daffodil Delight circles for my festive ornaments and tree topper star.
And this little beauty just happens to be one of my favorite 12-Tags of Christmas tag.
The star was stamped on Whisper White cardstock and heat embossed with Silver embossing powder.  LOVE LOVE LOVE how this tag turned out.


Thanks for joining me today!  I'll be back tomorrow to share with you my Christmas dinner place setting .......... Hope you can make plans to stop back and join me for that share.  Keep Living Your Dream!

Wednesday, December 24, 2014

12-Tags of Christmas DAY FIVE

Happy Wednesday My Blogger Friends!
Today I have two more Christmas tags to share with you......And these two tags will come together in no time flat for you.
First up is a trio of Festival of Trees tags.
I used Pacific Point cardstock for my base tag.  Three little layers of Whisper White cardstock were added to create my snow.....and then three little Festival of Trees were stamped onto Whisper White cardstock using Pear Pizzazz ink.
This "Merry Little Wish" tag was made with Whisper White cardstock an the 'Trim the Tree Designer Series Paper Stack'.
I stamped my sentiment onto Whisper White - Punched it out with the Word Window Punch ..... Matted it with a Cherry Cobbler Modern Label Punch and then added a 1-1/4" square of Whisper White behind it.  Two Cherry Cobbler Candy Dots were added to the Whisper White Square piece.


Thanks for joining me today!  I'll be back tomorrow to share my final two Christmas tags with you ........ Hope you can make plans to stop back and join me for that share.  Keep Living Your Dream!

Tuesday, December 23, 2014

12-Tags of Christmas DAY FOUR

Happy Tuesday My Blogger Friends!
Today I have tags seven and eight in my 12-Tags of Christmas series.  These two tags will come together in a super snap.......Let's jump right in with my share for today.
First up is a Night of Navy tag that uses the 'All Is Calm' Specialty DSP for the giant snowball at the bottom of my tag.
I stamped my "JOY" across the top of my tag with VersaMark and used Silver Embossing Powder for a WOW FACTOR.  And then I used my 'Essentials' paper piercing template to trace around my DSP snowball and used my Signo White Gel Pen to connect in the holes.
This tag uses a Soft Sky tag base and some Cherry Cobbler 1-1/4" Striped Grosgrain Ribbon to top off my tag.
I ran my base tag through my Big Shot with the Perfect Polka Dot embossing folder.  I used the "Four Frames" stamp set for my polka dot label.......and create a poinsettia flower with the help of the Petite Petals punch. 

Thanks for joining me today!  I'll be back tomorrow to share Day FIVE of my 12-Tags of Christmas share ........ Hope you can make plans to stop back and join me for that share.  Keep Living Your Dream!

Monday, December 22, 2014

12-Tags of Christmas DAY THREE

Happy Monday My Blogger Friends!
Today's tags are SUPER FESTIVE and add all that special WOW FACTOR you might be looking for to add to your holiday packages.  Let me jump right in with my tag share for today......
This first tag is a Whisper White base tag......and uses the 'All Is Calm' DSP along with Lost Lagoon for the layered mat pieces.
I punched out an ornament with some Silver Glimmer paper and added a pretty 1/8" Silver Taffeta Ribbon for the topper.  My sentiment is stamped onto Lost Lagoon cardstock and punched out with the Modern Label punch.
And this little tag is made from the SU Scallop Circle punch.
I simply punched out two scallop circles and trim off 5-scallops/4-scallops and 3-scallops to create a darling little Christmas tree.


Thanks for joining me today!  I'll be back tomorrow to share Day Four of my 12-Tags of Christmas share ........ Hope you can make plans to stop back and join me for that share.  Keep Living Your Dream!