Tuesday, May 31, 2022

Post It Note Box

Happy Tuesday My Blogger Friends!
My blog post for today is '3D TUESDAY'.  That means today I have a fun little 3-D project that I created and want to share that with you here today.  This project was SUPER FUN to create, and I want to jump right in and share that project with you now.
First of all ...... I must tell you that I rarely share a project that doesn't use current product ...... But this project was created to coordinate with all the other PINK accessories that I have in my studio.  So......Don't go lookin' for this Designer Series Paper because it's not out there (I have to admit that I did purchase a boat-load of this paper when it was available......LONG AGO).
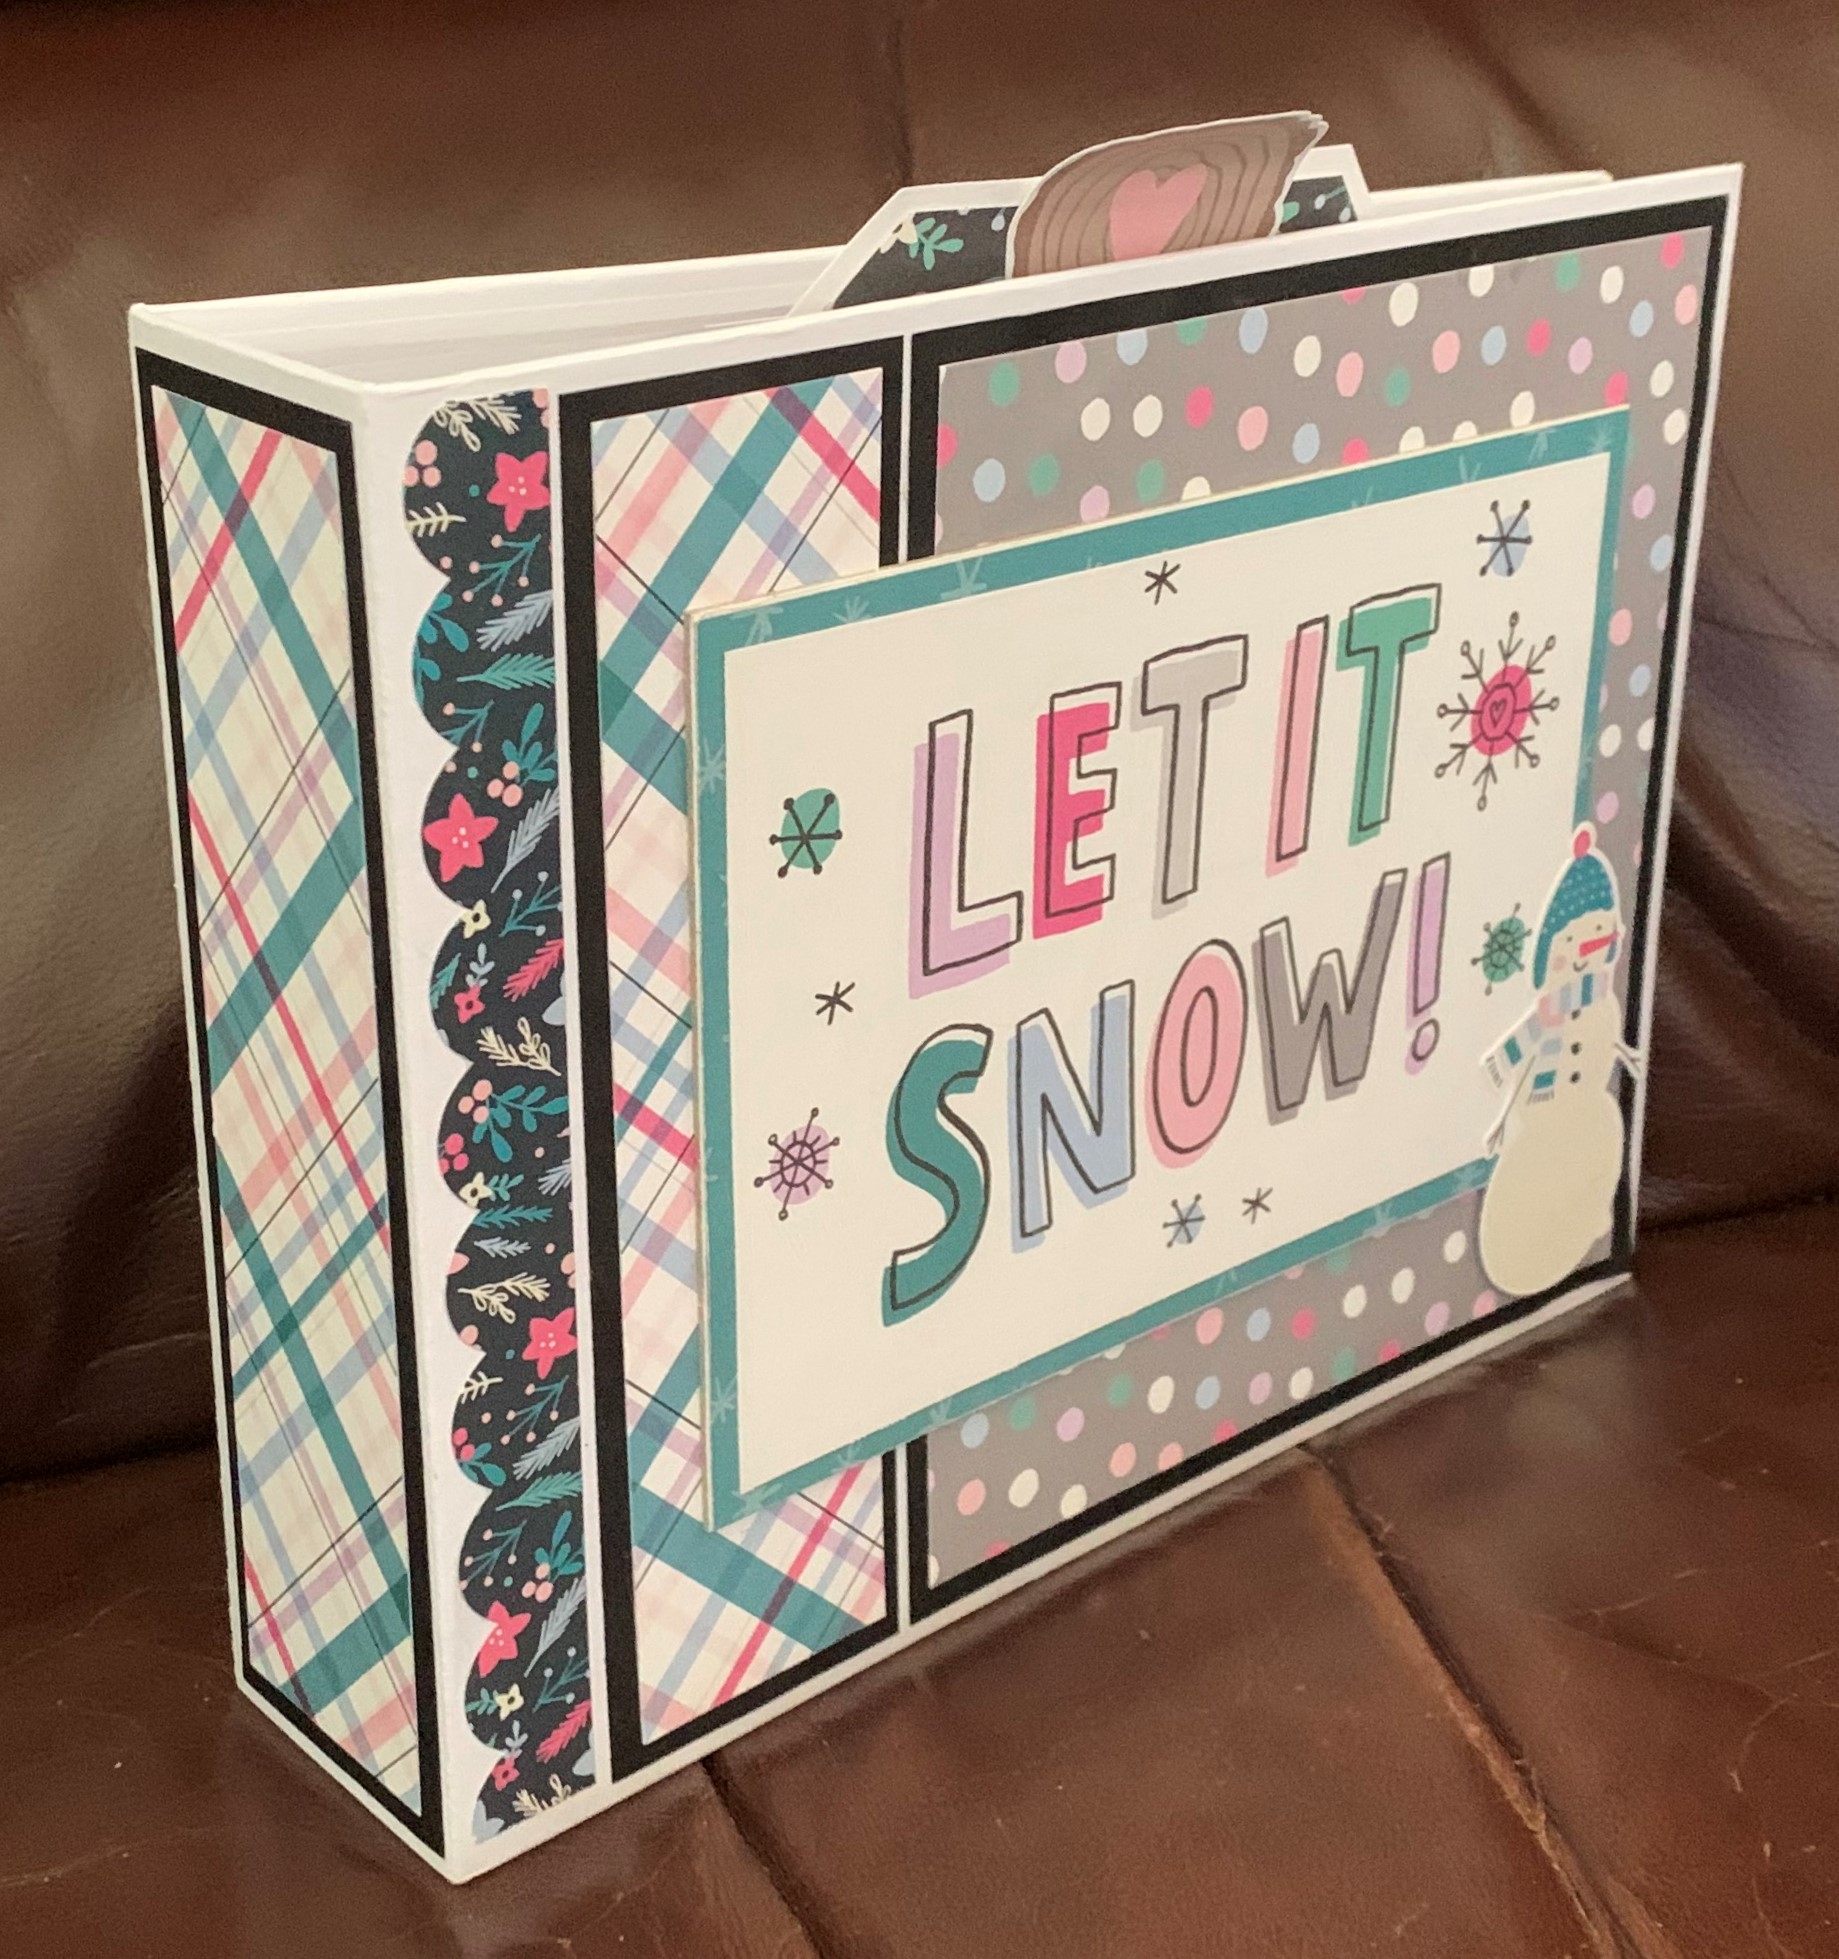
Seems like I am ALWAYS grabbing for post-it-notes when I'm in my studio ...... And it seems like I didn't have a spot for my larger post-it-notes to be housed in.  So.....I grabbed some White cardstock and got busy creating a post-it-note holder that will house my 5" x 3" post-it-notes.
I started with a 9-1/2" x 6-5/8" piece of Thick White cardstock.  I scored that with the shorter side at the top of my Scoring Board at 1-3/4" on both sides.  Then I turned my cardstock so the longer side was at the top of my Scoring Board and scored that at 2-1/2" and 4-1/4".  Above is a template of how I snipped my piece out to create my sides and tabs.
My Designer Series Paper panels are 1-piece for the front that is 2-1/4" x 2-1/8" and then 2-pieces for the sides that are 5-1/8" x 1-1/2".
I used the 'Days To Remember' set to stamp my "Don't Forget" and that was stamped onto a tag from the 'Pretty Pillow Box Dies'.
And here is how the back of my holder looks.
So, there you have it my friends.....
Couldn't be HAPPIER with the way this turned out.
And it looks GREAT in my pink studio.
What do you think????

Thanks for joining me today!  I'll be back tomorrow to share a Wine Down Wednesday card with you ........ Hope you can make plans to stop back and join me for that share.  Keep Living Your Dream!

Monday, May 30, 2022

Extraordinary Upgrade

Happy Monday My Blogger Friends! 
Today is Mix-It-UP! Monday, and I have an upgraded version of the card I shared with you yesterday.  I used the exact same product that was used to create yesterday's card ..... But I added a couple additional products found in the 2022-2023 Stampin' UP! Annual Catalog to bring this card up to the next stamping level.
Here's my Spotlight Sunday card from yesterday on the TOP.
And my Mix-It-UP! Monday upgraded card on the BOTTOM.
The first upgrade I made to my card today was creating a fun flip-open gate-fold card.
The left-side flap opens and swings back......
As well as the right-side flap opens and swings back.
    
My base card is a 5-1/2" x 8-1/2" Cajun Craze cardstock.  That is scored at 2-1/8" on both sides and this creates the gate fold portion of this card.   I covered both sides of the front of my card with White cardstock panels and 'He's The Man Designer Series Paper'.
My sentiment and images are from the 'Simply Succulents' set ...... and I used my Stampin' Blends to color in both of my succulents.
The finishing touch was adding a few 'Rustic Metallic Dots' around the front of my card and highlighting both the succulents and pots with my White Gel Pen.
So, what do you think my friends.....
Do you have a favorite????

Thanks for joining me today!  I'll be back tomorrow to share a 3-D Tuesday creation with you ...... Hope you can make plans to stop back and join me for that share.  Keep Living Your Dream!

Sunday, May 29, 2022

Extraordinary

Happy Sunday My Blogger Friends
Today is Spotlight Sunday ....... And I have a card I created using product from the 2022-2023 Stampin' UP! Annual Catalog.  This card uses several products from that new catalog ........ And I'm thrilled with the way it turned out.  Let's jump right in with my card share for today..........
I started my card off today with a White base card.
To the top of that ..... I added a panel of 'He's the Man Designer Series Paper'.  I then added a White panel right down the center and used my Cajun Craze Stampin' Write Marker to add some stitching lines around the outer-edge of that White panel.
My image is from the 'Simply Succulents' set and that was layered onto the front of my card.
I used my Stampin' Blends to color that pot of succulents in.
And the finishing touch was adding three little 'Rustic Metallic Dots' to the front panel.
And that's all it took my friends.
Quick and Easy.....
But a WOW kind of card.

Thanks for joining me today!  I'll be back tomorrow to share an upgraded version of this very card with you ...... Hope you can make plans to stop back and join me for that share.  Keep Living Your Dream!

Saturday, May 28, 2022

Scrapbook Saturday

Happy Saturday My Blogger Friends!
My Scrapbook share for this week is a DARLING little album I got from 'ArtsyAlbums.shop' called "Let It Snow".  It is designed to help you document a full year of what's happening in the snow.  Here is what I created.
This ADORABLE 8-1/2" x 6-1/2" album is OH SO SWEET.  It has a total of 7-pages and Tracy has designed some pretty special things within this album.
When you open this album up it is filled with LOTS of real estate for PLENTY of winter snow pictures.
This first page has a SUPER FUN flip-out feature.  There is also a pocket inside and another smaller flip-out feature on the inside.
Pages 2 and 3 are LOADED with spots to tuck pictures.......
And the inside of Page 3 has another flip-out feature.
I think Pages 4 and 5 are some of my FAVORITES.  Page 4 has a CUTE pocket to tuck journaling cards.....
And Page 5 has yet another flip-out feature.
Here's Pages 6 and 7.
And HANDS-DOWN ....... Page 7 is my ALL TIME FAVORITE.  Tracy designed a waterfall feature that when you open it up......It is LOADED with 10-waterfall flaps that are PERFECT for plenty of pictures and journaling.
Just couldn't be HAPPIER with the way this album turned out.
What do you think my friends???

Thanks for joining me today!  I'll be back tomorrow to share a Spotlight Sunday creation with you ........ Hope you can make plans to stop back and join me for that share.  Keep Living Your Dream!

Friday, May 27, 2022

Friends Friday Pics

Happy Friday My Blogger Friends!
My blog post for today is Friends Friday.  On Friday's, I have the honor of spotlighting some of the fabulous cards and projects that I received from Friends ....... Fellow Demonstrators ........ and Family.  Each of these creations are works of art........and it is with great pleasure that I share with you today some AMAZING projects that two very special friends made for me.
First up for today is this OH SO PRETTY card that my sweet Stampin' UP! friend Doreen Buckmore made for me.  What a LOVELY card.
Next up ....... Is this FUN card from my OH SO TALENTED InkBig friend Peri Beal.
Check out the inside of her card ...... HOW FUN!!!!!
And speaking of the talented Peri Beal ........ Look at this BEAUTIFUL card folio she created for me.
To say I was BLOWN AWAY when I opened this little gift is an understatement.  It has four GORGEOUS cards and coordinating envelopes.

Thanks for joining me today!  I'll be back tomorrow to share a special Scrapbook Saturday creation with you ........ Hope you can make plans to stop back and join me for that share.  Keep Living Your Dream!

Thursday, May 26, 2022

Thinking of You

Happy Thursday My Blogger Friends!
My blog post for today is Tag Thursday.  Today, I will feature a tag I created and show you how easy it is to use minimal supplies to create a SUPER PRETTY TAG.  Now that you have the details for my Tag Thursday creation for this week ........ Let's jump right in with my tag share for today........
Here's another tag I created that spotlights
the five new Stampin' UP! 2022-2024 In-Colors.
I started off with a White base tag and used a small piece of the 'Perfectly Penciled Designer Series Paper' and colored every other section with one of the five new In-Color Stampin' Blends.
After that Designer Series Paper was adhered down onto my base tag ...... I used the 'Art Gallery' stamp set to create my sentiment.
I cropped out three stitched square frames from the 'Stylish Shapes Dies' and adhered one each to a small square.  I positioned a butterfly that was cropped out from the 'Brilliant Wings Dies and added a touch of 'Wink of Stella' to the top of each butterfly.
My tag was topped off with some 'Tahitian Tide 1/8" Metallic Woven Ribbon' and tied up into a pretty bow.
So, there you have it friends.......
Don't you just LOVE IT!!!

Thanks for joining me today!  I'll be back tomorrow to share some Friends Friday creations with you ........ Hope you can make plans to stop back and join me for that share.  Keep Living Your Dream!

Wednesday, May 25, 2022

You Inspire Me

Happy Wednesday My Blogger Friends!
My blog post for today is Wine-Down Wednesday.  My middle of the week card feature for today will hopefully offer you some inspiration and provide you with some motivation to keep you moving through your busy week.  Let's jump right in with my card share for today........
I started off with a White base card.
I added some dimension to the front of my card ........ and to do that I began by adhering a panel of the 'Tea Boutique Designer Series Paper' right down to the center of my base card.
Next, I added two panel of White cardstock to both the left and right-hand side of my base card ...... And I used Stampin' Dimensionals to lift those pieces up and this helped create LOTS of dimensions to my card.
One additional piece that I added to both inside edges of those White cardstock pieces was a 1/4" piece of Crushed Curry cardstock.
My sentiment was created with LOTS of layers from 'Scallop Contour Dies' and 'Rectangle Stitched Dies'......
And I used the 'Beauty of Friendship' set and Crushed Curry ink to create my stamped sentiment.
So, there you have it friends......
Isn't it just PERFECT!!!

Thanks for joining me today!  I'll be back tomorrow with a Tag Thursday creation to share with you ........ Hope you can make plans to stop back and join me for that share.  Keep Living Your Dream! 

Tuesday, May 24, 2022

Double Hershey Bar

Happy Tuesday My Blogger Friends!
My blog post for today is 'CASE IT TUESDAY'.  That means today I have a fun little 3-D project that I found on the internet ....... And I created a CASE of that project to share with you today.  This project was SUPER FUN to create, and I want to jump right in and share that project with you now.
I am THRILLED that the very talented Lisa Ann Bernard at 'Lisa Queen B Creations' shared this DARLING little "Double Candy Bar Holder" on her Blog.  Here is a link to her blog post and video:   Double Candy Bar Holder - Queen B Creations 
Here are the measures that Lisa shared on her blog post:  
Cardstock - 7-1/8" x 8-1/4"  and (2) 2" x 5-1/2" Score on 7-1/8" side at 2-1/4", 2-5/8", 3", 5-1/4" & 6" Score on 8-1/4" side at 1", 1-3/8", 6-7/8" & 7-1/4" She also used two pieces of 2″ x 5-1/2″ for the inside pockets.
I created my candy bar holder with Crushed Curry cardstock ...... and I covered my holder with the 'Tea Boutique Designer Series Paper'.
I did cover my holder completely ..... but it's not necessary.
And here is how the back of my holder looks.
When you open this holder up ....... The MAGIC reveals two SUPER YUMMY Hershey Chocolate Bars.  
And those two chocolate bars fit PERFECTLY inside the two pockets that Lisa designed.
The holder is secured closed with the help of two magnets ...... And those are hidden under the Designer Series Paper.
I topped my holder off with some 'Evening Evergreen 3/8" Open Weave Ribbon' that was tied up into a pretty bow......
And my tag was created with the help of a tag from the 'Pretty Pillow Box Dies' and a stamped sentiment from the 'Peekaboo Farms' set.  So......What do you think my friends????  I am in LOVE!!!!

Thanks for joining me today!  I'll be back tomorrow to share a Wine Down Wednesday card with you ........ Hope you can make plans to stop back and join me for that share.  Keep Living Your Dream!