Friday, June 30, 2023

Happy Birthday

Happy Friday My Blogger Friends!
Today is Fun Fold Friday and that means I have a special little Fun Fold card to share with you. Let's kick off this Fun Fold Friday share right now.........
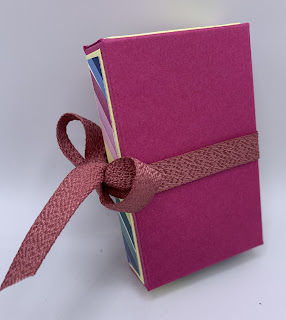
I spotted this fun fold card on Pinterest and knew I just had to make it.  It starts off with a 5-1/2" x 4-1/4" piece of Flirty Flamingo cardstock.  Next, I cut two squares of White cardstock that were 3-1/2" x 3-1/2".  I scored those on the diagonal and those will become the flip out sections.  Those flip out sections were then added to the back of a 4" x 10" piece of White cardstock (that piece was scored at 5-1/4").
My belly band was created with a 11" x 1-1/4" piece of Flirty Flamingo cardstock.  I decorated the front of that piece with die-cut pieces from both the 'Stylish Shapes' and 'Something Fancy' dies.
The White cardstock panel was covered with a panel of the Flirty Flamingo 'Brights Collection'.  I stamped two balloons from the 'Something Fancy' set on each of the White flip-out sections.
Here's how the sentiment piece on the Belly Band turned out.
Over-All.....This card comes together pretty FAST.....
And the best part......
It's a FUN card to give to someone special.
Hope you have fun making these!!!

Thanks for joining me today!  I'll be back tomorrow to begin sharing a special new Sweet Treat Saturday release with you ........Hope you can make plans to stop back and join me for that share.  Keep Living Your Dream!

Thursday, June 29, 2023

Hello Handsome

Happy Thursday My Blogger Friends!
My blog post for today is Tag Thursday.  Today, I will feature a tag I created and show you how easy it is to use minimal supplies to create a SUPER PRETTY TAG.  Now that you have the details for my Tag Thursday creation for this week ........ Let's jump right in with my tag share for today........
I saw a Herringbone card on Pinterest and thought I would give it a try on my tag share for today.  I started off with a 2-1/2" x 4-1/4" White base tag.
The first thing I did was stamp my sentiment into the bottom right corner.  I used the 'He's All That' stamp set and Copper Clay ink.
To create my Herringbone pattern ..... I started with a long 1/2" piece of Copper Clay cardstock and postitioned it down the front of my tag.  Next, I grabbed the same size piece of Pebbled Path cardstock and tucked that up to the left-hand edge of the Copper Clay piece.  I repeated this step with the Wild Wheat and Moody Mauve and Boho Blue cardstock pieces.  Making sure that each 1/2" piece I postioned down was tucked tightly to the previous edge.
I added five 'Rustic Metallic Dots' to my Herringbone pattern ..... And topped my tag off with some 'Copper Clay Ribbon'.
Doesn't get any EASIER my friends.
What do you think????

Thanks for joining me today!  I'll be back tomorrow to share a Fun Fold Friday creation with you ........ Hope you can make plans to stop back and join me for that share.  Keep Living Your Dream!

Wednesday, June 28, 2023

Thank You

Happy Wednesday My Blogger Friends!
My blog post for today is Wine-Down Wednesday.  My middle of the week card feature for today will hopefully offer you some inspiration and provide you with some motivation to keep you moving through your busy week.  Let's jump right in with my card share for today........
I started my card share with a 5-1/2" x 8-1/2" Crushed Curry base.  It was scored at 4-1/4".
Next, I added a 4" x 5-1/4" panel of White cardstock to the top.   I cropped out two patterns from the 'Delightfully Eclectic Designer Series Paper' that meausred 2-1/2" x 3-3/4".  I joined those two DSP pieces togher at the center and then adhered those down to the top of my White panel
My sentiment piece was stamped onto a panel of White cardstock.  I used the 'Irresistible Blooms' stamp set to create that sentiment.  I realized after I had completed my card that I had a matted White panel that was going to go behind the Crushed Curry panel.......But I forgot to add it.
My LOVELY flower was stamped from the 'Irresistible Blooms' set onto some Cajun Craze cardstock.  I used the coordinating 'Irresistible Blooms Dies' to crop out that flower.  
To finish off the front of my card ..... I added a few 'Adhesive Backed Solid Gems'.
And to complete my card (thank you Susan Wormley for inspiring me to do the inside) ..... I added another panel of the DSP and a flower to the inside.  PERFECT!!!!
And so I called this card DONE!!!!!
What do you think my friends.

Thanks for joining me today!  I'll be back tomorrow with a Tag Thursday creation to share with you ........ Hope you can make plans to stop back and join me for that share.  Keep Living Your Dream! 

Tuesday, June 27, 2023

4th of July Floating Shelves

Happy Tuesday My Blogger Friends!
My blog post for today is '3D TUESDAY'.  That means today I have a fun little 3-D project that I created and want to share with you.  This project was SO FUN to create .... and I want to jump right in and share that project with you now.
It's time to get my three floating shelves decorated ..... And I knew it was going to be a Red, White and Blue theme.
All three boxes were created with 8-1/4" x 7" pieces of Real Red, White and Night of Navy cardstock.  I scored on the 7" side at 1/2", 2-1/2", 4-1/2" and 6-1/2".  Then I scored on the 8-1/4" side at 2, 4, 6 and 8.  This is the Real Red box.....
Here's the White version.
And the Night of Navy box.
These boxes look GREAT on my floating shelves.....
What do you think my friends!!!!

Thanks for joining me today!  I'll be back tomorrow to share a Wine Down Wednesday card with you ........ Hope you can make plans to stop back and join me for that share.  Keep Living Your Dream!

Monday, June 26, 2023

You Are Amazing Upgrade

Happy Monday My Blogger Friends! 
Today is Mix-It-UP! Monday, and I have an upgraded version of the card I shared with you yesterday.  I used the exact same product that was used to create yesterday's card ..... But I changed things up to bring this card up to the next stamping level.
Here's my Spotlight Sunday card from yesterday on the top....
And my Mix-It-UP! Monday upgraded card for today on the bottom....
The first upgrade I made to my card for today was change the orientation from a lanscape style card to a portrait style card.
I started with a 4-1/4" x 11" White base card.  That piece was scored at 5-1/2".
I added a 4" x 5-1/4" panel of White cardstock to the top of my base card.  But before I adhered that piece down ..... I ran it through my embossing machine with the 'Country Side Blossom Embossing Folder'.
Next, I added a 2" x 4-1/2" banner flag to the front of my card.  That was created with the 'Bright and Beautiful Designer Series Paper'.
My three flowers were created using the 'Chic Dies'.....
And I created a smaller sentiment piece with the 'Season of Chic' set.
So, what do you think my friends....
Do you have a favorite???

Thanks for joining me today!  I'll be back tomorrow to share a Wine Down Wednesday card with you ........ Hope you can make plans to stop back and join me for that share.  Keep Living Your Dream!

Sunday, June 25, 2023

You Are Amzing

Happy Sunday My Blogger Friends
Today is Spotlight Sunday ....... And I have a card I created using product from the 2023-2024 Stampin' UP! Catalog.  This card uses several products from that new catalog ........ And I'm thrilled with the way it turned out.  Let's jump right in with my card share for today..........
I started my card off today with a 8-1/2" x 5-1/2" White base card.  That piece was scored at 4-1/4"
Next, I added a 2" x 5-1/2" panel of the 'Bright and Beautiful Designer Series Paper' to the top of my card.  And I added a 1/4" x 5-1/4" panel of Berry Burst cardstock to the top and bottom edge of that Designer Series Paper.
I cropped out three pretty flowers from the 'Chic Dies' and arranged them to the top of my card.
My sentment was stamped onto a banner flag that was cropped out from the 'Stylish Shapes Dies'.  The sentiment is from the 'Season of Chic' set.
So, there you have it friends.....
What do you think???

Thanks for joining me today!  I'll be back tomorrow to share an upgraded version of this very card with you ...... Hope you can make plans to stop back and join me for that share.  Keep Living Your Dream!

Saturday, June 24, 2023

Double Flip/Flop Box

Happy Saturday My Blogger Friends!
Today I have another Saturday Sweet Treat packaging idea to share with you.  This project is a SUPER YUMMY, sweet treat packaging.  Let me jump right in with my share.
I stopped DEAD-IN-MY-TRACKS when I spotted this DARLING little packaging idea.  It was shared by Cathryn at In The Pink Designs (LOVE THAT BLOG NAME).  Here is a link to her post: In the Pink, Designs by Cathryn: Gnome for the Holidays two flap box for Hershey Miniatures - Stampin' UP! (inthepinkcathryn.blogspot.com)
You start with a 7-1/2" x 5-1/2" piece of Berry Burst cardstock.  You score on the long side at 2, 2-3/4, 4-3/4" and 5-1/2".  Then you score on the short side at 3/8", 1-1/8", 4-3/8" and 5-1/8".  I covered my flip/flop box with the new 'Bright and Beautiful Designer Series Paper'.
The Moody Mauve Ribbon I used was wrapped around my flip/flop box to secure it closed.
Check out what happens when you untie the ribbon......
There are two sections that you flip/flop open......
To reveal some YUMMY treats inside.
I also added DSP to the inside compartment.
My sentiment piece was created with 'Hello Ladybug' set ..... And I used the 'Give It A Whirl' dies to crop out my scallop piece.
And there you have it friends.
Makes presenting some YUMMY treats SO MUCH FUN!!!

Thanks for joining me today!  I'll be back tomorrow to share a Spotlight Sunday creation with you ........ Hope you can make plans to stop back and join me for that share.  Keep Living Your Dream!

Friday, June 23, 2023

Diagonal Butterfly

Happy Friday My Blogger Friends!
Today is Fun Fold Friday and that means I have a special little Fun Fold card to share with you. Let's kick off this Fun Fold Friday share right now.........
My Fun Fold card share for today was shared by Lisa at Queen B Creations back in 2022.   Here's a link to her video:  (448) 👑 How to make a Diagonal Joy Fold Card Tutorial - YouTube.  The base for my card is a 8-1/2" x 5-1/2" piece of Black cardstock.  That piece is scored at 4".
You will cut off on a diagonal from the upper left corner of your Black base to the lower right corner.  This will create the diagonal fold for this card.  I used the 'Zoo Crew Designer Series Paper' to cover my Black base card.
The center section piece is a 3" x 8" piece of Black cardstock ...... That piece is scored at 4".  I used 'Season of Chic' stamp set for my inside stamping.....
And the front of this panel was stamped with the 'Hello LadyBug' set.  I also added a FUN little ladybug onto the front of this center panel.
Just doesn't get any EASIER.
Hope you have fun making these!!!

Thanks for joining me today!  I'll be back tomorrow to begin sharing a special new Sweet Treat Saturday release with you ........Hope you can make plans to stop back and join me for that share.  Keep Living Your Dream!

Thursday, June 22, 2023

Thinking of You

Happy Thursday My Blogger Friends!
My blog post for today is Tag Thursday.  Today, I will feature a tag I created and show you how easy it is to use minimal supplies to create a SUPER PRETTY TAG.  Now that you have the details for my Tag Thursday creation for this week ........ Let's jump right in with my tag share for today........
My tag share for today is featuring the 2022-2024 In-Color Collection.  I started off with a 2-1/2" x 4-1/4" White base tag.
The first thing I did to my tag was stamp my sentiment at the bottom.  I used the 'Ringed With Nature' set ..... And used Sweet Sorbert ink.
Next, I cropped out five 1/2" panels of each In-Color and created a banner flag end on each.  All I did was adhered each banner flag down onto my tag ..... And I positioned those in random lengths.  At the end of each banner flag ..... I added a single 'Glossy Dots Assortment' gem.
I topped my tag off with some '2022-2024 In-Color Baker's Twine'.....
And called this tag DONE.
What do you think my friends????

Thanks for joining me today!  I'll be back tomorrow to share a Fun Fold Friday creation with you ........ Hope you can make plans to stop back and join me for that share.  Keep Living Your Dream!