Friday, August 31, 2012

Fall Fest Craft Box of Cards

Happy Happy Happy Friday My Blogger Friends!
Last night I met my Doll Baby at CupCake-A-Go-Go for a yummy yummy cupcake.  Check out this loveable picture of the two of us.....
This was (OF COURSE).......after all the yummy frosting was cleaned off our faces!
 
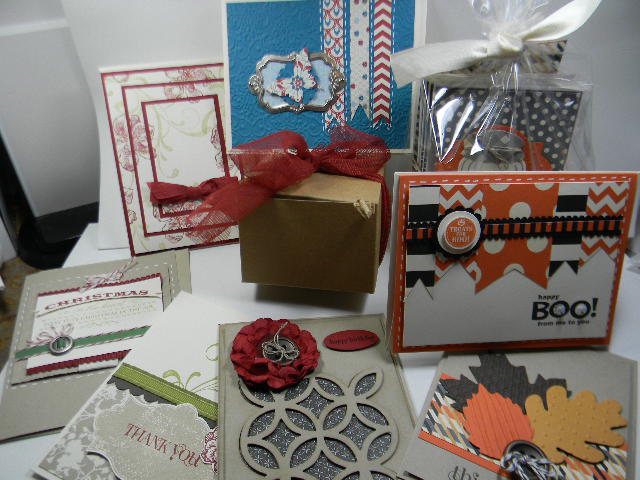
My post today is one of the Projects we made at last Saturday's Fall Fest.....Check out this ADORABLE Craft Box of Cards we made........
We wrapped up one of the Kraft Gift Boxes on Page 161 and filled it with four little 4x6 note cards.  To finish off our box of cards 3-D gift.....we wrapped it up in one of the new Gusseted Cellophane Bags on Page 34 of the Holiday Catalog.
To cover our Kraft Gift Box and 4x6 notecards......we used the Howlstooth and Scaringbone Designer Series Paper.
We didn't cover the inside of our box - but did give our DSP a fun picnic blanket triangle look when we adhered it to the sides of our Kraft Box.
We added one of ther Brushed Bronze Designer Button with Linen Thread to the front panel of our Kraft Box for that little SOMETHING SOMETHING our box was needing.
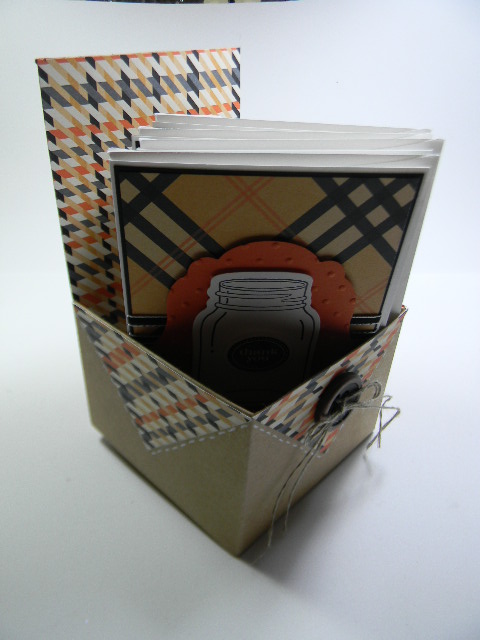
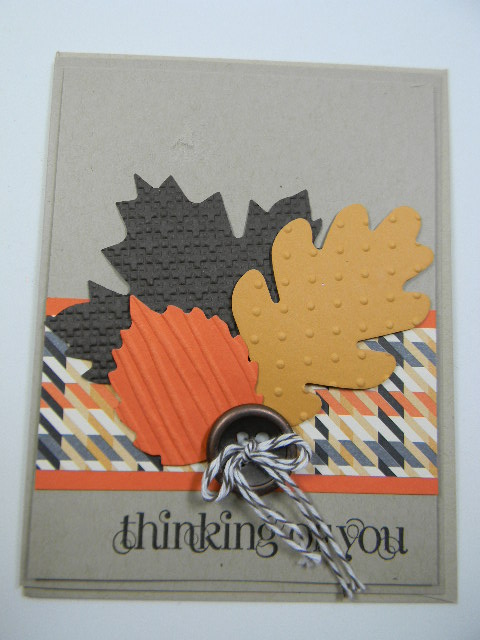
Here's one of the versions of cards we made for our box. 
We used the Howlstooth and Scaringbone DSP to create our background and added a fun little piece of frayed 7/8" Cotton Ribbon across the center of our card panel.  It actually did an amazing job of hiding the two DSP seams.
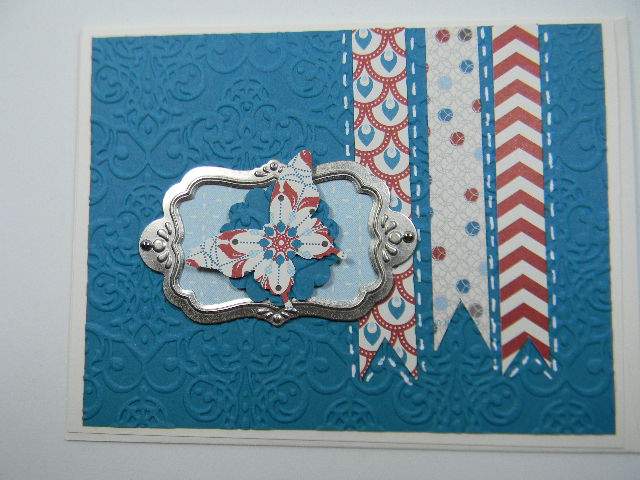
This is the other version of the little 4x6 notecards we made for our 3-D box.
We used some of the 1/8" Basic Black Taffeta Ribbon around the center of our DSP to create a sassy little addition to our card.  For both versions used the Perfectly Preserved Bundle from the Holiday Catalog and the Labels Collection Framelits die.  The Framelits Label was run through the Big Shot using the Perfect Polka Dots Folder and that gave our card just that little extra touch of texture.
 
This project was a total hit at the Fall Fest event and I can honestly see using this idea for some upcoming hostess gifts and birthday gift giving ideas.
 
I'll be back tomorrow to share a SERIOUSLY FUN Halloween card that we made at Fall Fest last Saturday.......Hope you can join me for that share.  We are also kicking off the long holiday weekend this evening with a back-yard BBQ at my daughter's house and I'll share pictures of that fun get together with you tomorrow morning.  Keep Living Your Dream!

Thursday, August 30, 2012

It's Christmas in the Heart Card

Happy Thursday My Blogger Friends!
No pictures to share with you today of my Little People.......We had a busy day of doctor appointments that we just didn't have the opportunity to connect up with them.  We will be getting together tomorrow night at Cup Cakes A-Go-Go to have cupcakes with my Doll Baby.   I'm sure I'll be sharing some yummy pictures of that fun get together.
My card share today is yet another card we made at Di Gibbs Fall Fest last Saturday. 
We used the "Heart of Christmas" stamp set from the Holiday Catalog........We stamped it out first in Crumb Cake and then again in Cherry Cobbler and then we cut out the Cherry Cobbler and created a banner to pop-up over our Crumb Cake stamped image.
We added a very thin piece of Gumball Green cardstock through one of the Round Designer Ribbon Slides.  We wrapped some Cherry Cobbler Bakers Twine above and below our Ribbon Slide piece and mounted that on top of our stamped Christmas image.  The other fun thing we did was cut a piece of Cherry Cobbler Scallop Dots Ribbon in half and added that to the top and bottom section of our Christmas stamped image.
 
LOVE the look of this card and will be making more of these cards for this years Chritmas Cards.  Thanks for joining me today - I'll be back tomorrow with a fun little 3-D project that we made at Fall Fest last weekend.  Hope you can join me for that share.  Keep Living Your Dream!

Wednesday, August 29, 2012

Fall Fest Trio of Fall Card

Happy Wednesday My Blogger Friends!..........
AND.......A Happy Happy Birthday to my daughter Cheryl!
Today I have a SUPER FUN FALL Card to share with you......It was another card that we made at last Saturday's Fall Fest and this one was the PERFECT card for this event.
We started out with a crumb cake base card and we used a small panel of the Howlstooth and Scaringbone Designer Series Paper across the bottom half of our card.  We added two tiny stripes of Tangerine Tango cardstock to the top and bottom edges of our DSP and that gave our DSP panel a real POP off the page.
We added three Autumn Accents Bigz Die fall leaves in More Mustard, Tangerine Tango and Early Espresso cardstock.  Each of the fall leaves were run through three different embossing folders (Woodgrain, Perfect Polka Dots and Square Lattice) and used dimensionals to pop each of the leaves off our card.
Each of the embossing folders added an amazing texture to our leaves and gave lots of dimension and character to our project.
We also added a Brushed Bronze Designer Button to our cluster of leaves and threaded some Early Espresso Baker's Twine to the center of our button.  I will FOR SURE be making more of these cards for family and friends this fall. 
And I leave you today with a fun little picture of my Doll Baby and her PopPop!
Thanks for joining me today - I'll be back tomorrow to share a pretty little Heart of Christmas holiday card with you - Hope you can join me for that share.  Keep Living Your Dream!

Tuesday, August 28, 2012

Fall Fest Lattice Card

Happy Happy Tuesday My Blogger Friends!
WELL FRIENDS..........we made it to Wisconsin yesterday afternoon and we arranged to have dinner with my two daughters.....my son......my son-in-law......and my youngest granddaughter. 
 
We had dinner at Noodles (one of our favorite places to eat in Madison, Wisconsin) and it included LOTS of LAUGHING.......PLENTY of SQUEALING.......and some AMAZING Story Telling.  I just love love love spending time with my kids and when I also get to spend time with my Little People.......It's a bonus.  Here's a good example of HAPPY!
Today I have another Fall Fest card to share with you.  Here's a recap of all the cards and projects we created last Saturday at Di Gibbs Fal Fest..........
 Today I will be sharing the gorgeous lattice work card that we made......
 I fell in LOVE LOVE LOVE with this card as soon as I took it out of our packets.
We used the Lattice Bigz die to cut out a crumb cake lattice image and added a piece of Festival of Prints DSP Stack as our background pattern paper.  I picked one of the chocolate chip patterns because I thought of my daughter when I was making this card.  Her birthday is tomorrow and I wanted to give her this card for her birthday.
We made the prettiest paper flower with THREE 2-3/8" Scallop Circles and ONE 1-3/4" Scallop Circle.  We filled our Stampin' Spritzer bottle with water and spritzed each of the scallop circles with water and then crumbled each of the scallop up real tight.  We layered all scallop together and added a vintage brad and then unfolded the layers until we created this amazing and OH SO PRETTY Cherry Cobbler Flower.  We added one of the new Brushed Bronze Designer Buttons for the center of our flower and we added some linen thread to our button and this pretty flower was COMPLETE!
 
I'll be back tomorrow to share a GORGEOUS fall card.  It honestly is one of those cards that just POPS with color and holds LOTS OF WOW FACTOR.  Hope you can come back and join me for that share. 
Keep Living Your Dream!

Monday, August 27, 2012

Fall Fest Projects Part One

HAPPY HAPPY MONDAY MY BLOGGER FRIENDS!
Countdown Till We See The Grandkids - TODAY!
We arrived in Mesa yesterday afternoon and settled into a fabulous Hotel for the evening and arranged a wake-up call at 4:30am.  We wanted to get us up and head over to Starbucks before our flight departs at 8:00am.  We have a direct flight.......so.....by 11am Arizona time.....I will be on Wisconsin soil and moments from hugging up my Little People. I'M ONE HAPPY CAMPER!
 
My share today is one of the cards we made at Fall Fest this past Saturday.  But first.....I want to share a picture of the galpals that I shared the day with.  Check out these six lovely ladies..........(BUT WAIT.........Isn't Black suppose to make you look SKINNY?  I promise all of you who know me......I HAVEN'T put ANY WEIGHT on - I'm thinking it's the way I'm standing......!)
A sweet lady who was sitting behind our table agreed to snap our picture and here we are after a FULL DAY of Fall Fest.  Me, Julie, Maureen, Linda, Pam and Abbie.  The day just flew by and I have to say that I'm looking forward to Spring Fling in February - Hope all these ladies will join me for the Spring Fling event that Di Gibbs will be putting on.
Here are all the cards and projects that we made at Fall Fest ....... It was a day packed full of projects and FUN and we walked away with all these completed cards and projects.....and.....a bag FULL of left over product that we will be able to create additional projects when we got home.
Our first card used the new Lacy Brocade Embossing Folder on a panel of Island Indigo.
We picked out three pattern paper from the Festival of Prints DSP packet......and we created banner flags to one end of each of the pieces of DSP and adhered those down to our embosse panel of Island Indigo cardstock.
The real WOW FACTOR to this card was the GORGEOUS Flourish Designer Frames on page 8 of the new Holiday Catalog.  We added a 1-1/4" Scallop circle and Elegant Butterfly to the top of our frame and called this one DONE!  Such a lovely card - and it came together SUPER FAST and packed a real NON-TRADITIONAL HOLIDAY PUNCH
 
Thanks for joining me today - We are meeting up with my daughters and son tonight for dinner and will be meeting at one of our favorite fast food places "NOODLES".  I'll be back tomorrow to share more Fall Fest cards/projects with you - Hope you can come back and join me for that share.
Keep Living Your Dream!


Sunday, August 26, 2012

August CrafterNooner Cards Part Two

Happy Happy Sunday My Blogger Friends!
Countdown Till We See The Grandkids - 1 Day!
WELL FRIENDS.......We plan to head up to Mesa this afternoon and spend the night close to the airport so we don't have to leave SaddleBrooke at the Butt-Crack of dawn to catch our 8:00 flight tomorrow morning.  You know of course.......that means I have to be packed and ready to go TODAY.  Since I'm coming off a MARATHON PLAY DAY yesterday.......and spending the last week kitting my Stamp Camp and Stamp Club packets for August - I honestly have not had a moment to think about packing and it ended up at the very bottom of my TO DO LIST!  SO.....that means this morning I'm going to be running around like a LUNATIC trying to get my bag packed and myself out the door before noon TODAY........(HONESTLY.....WISH ME LUCK!). 
 
So my post today will be a fast one........I'm going to share Part Two of my August CrafterNooner cards with you!
 First up is the card that Opal created.  HOW FUN is this little cutie.......
 Opal created a flower pot card that actually lifts out of the pot when you pull up on the flowers.
Opal met the color challenge and without a doubt ....... her flowers are SERIOUS 3-D.  Thanks Opal for creating your FUN FUN card for this challenge.
And here is the card I created.  My inspiration came from a card Kendra made for one of our SW Stampers Demo card exchange swaps.  I fell in love with the formula and wanted to use it on my August CrafterNooners card swap.  I used a Pool Party panel and punched a 1-3/4" hole in the upper top portion of that panel.  I embossed the panel with the Lacy Brocade embossing folder and wrapped a small piece of Pool Party and Peach Parfait ribbon around my Pool Party panel before adhering it down to my Very Vanilla card base.
I used Pool Party and Peach Parfait cardstock to punch out some flower dies I had in my stash and those fit perfectly in the little 1-3/4" circle that was created.  I added a small pearl to the center of my stacked flower and this card was DONE.  LOVE HOW THIS CARD TURNED OUT - and many thanks to Kendra for sharing this fabulous little recipe with me.
 
I'm off to finish my packing and then a quick drive up to Mesa to spend the night.  It's going to be a worldwind of fun coming up in the next 24 hours - so hopefully all goes well and I'm hugging up those little people of mine in Wisconsin soon.  Keep Living Your Dream!

Saturday, August 25, 2012

August CrafterNooner Card Swap Part One

Happy Happy Saturday My Blogger Friends!
Countdown Till We See The Grandkids - 2 Days!
I'm heading up to Mesa today with five of my SaddleBrooke Stamper Friends to PLAY.  We are attending a Fall Fest that Di Gibbs is putting on and will be spending the ENTIRE DAY creating and chatting.  Can't wait to see all the fun things we create at this event.....and yes......I'll try to post pictures next week of the projects we created.
 
For today, I want to share two cards that my fellow CrafterNooner friends made for our August card swap.  Our color challenge was Blue and Orange and we were to make a card that had a 3-D flower on it.  Here is what two of the ladies created.......
 Jan is first up with this OVER-THE-TOP GORGEOUS flower card.  Trust me when I say that the camera did not pick up all the WOW that this card has.
Jan's flower just popped right off the card with the help of some dimensionals and some amazing glossy layers.  SERIOUSLY a WOW-Card!
And Berta's card not only met the color challenge (this color orange is SERIOUSLY a Berta color) but her DSP is SUPER GLAM without being flashy.
Berta added some adorable colored flower brads to the center of her many layered flowers.  LOVE that Berta used three different flower punches to create her amazing cute flowers.

Thank You Jan and Berta for sharing your AWESOME flower cards with me.  I will share Opal and my card tomorrow.  Keep Living Your Dream!

Friday, August 24, 2012

Card From Kathy!

Happy Friday My Blogger Friends!
Countdown Till We See The Grandkids - 3 Days!
Today I'm running around like a LUNATIC and have a ZILLION things to get done before we leave on Monday.  My share today is from the help of my blogging friend Kathy Hanson.  Check out this lovely card she sent me.......
Kathy started out withBaja Breeze and Elegant Eggplant cardstock to create the base of her card.
She ran her Elegant Eggplant cardstock with the Big Shot using the Fancy Fan Embossing Folder.  She also used the new Essentials Paper-Piercing Pack to paper pierce the Apothecary Accents Framelits.
She used the Papillon Potpourri Stamp Set in Elegant Eggplant, Summer Starfruit and Baja Breeze ink for the three GORGEOUS butterflys she ran down the top layer of the Apothecary Accents Framelits die.
Her trusty Elegant Butterfly punch worked it's magic in punching out the perfect butterfly - EVERY TIME!
And the final touch Kathy added to this already BEAUTIFUL card was in the lower right hand corner she stamped the Itty Bitty Banners "For You" sentiment in Summer Starfruit and die cut out her banner with the help of the new Bitty Banners Framelits. 
Such a pretty pretty card and I was THRILLED beyond words when I received this card from Kathy. 
 
I'm off to try to finish up two more card packets for my September Stamp Camp - My goal is to have all the pieces for Camp cut out and packaged before we leave on Sunday.  Considering I'm heading up to Mesa tomorrow for an ALL DAY PLAY DATE with five of my stamping buddies......It's going to be SCREAMING HAIRY in my Studio today as I race to get 'er done!  Wish Me Luck Friends!
 
I'll be back tomorrow before I head out the door for Fall Fest up in Mesa ......... and I'll be sharing some of the cards my fellow SW Stamper Demo friends made for our August Meeting.  Hope you can join me for that share.  Keep Living Your Dream!

Thursday, August 23, 2012

August Stamp Club Card Projects

Happy Thursday My Blogger Friends!
Countdown Till We See The Grandkids - 4 Days!
I'm at ALL SYSTEMS GO.......and......FULL SPEED AHEAD today as I race around getting things in place for our upcoming trip back to Wisconsin.  LORDY.....there's lots to do!  I'm spending the day today with MANY of my SaddleBrooke GalPals and we are making Cards for the Troops with our Stamping Friend Maureen.  She hosts a yearly event in memory of her son Bill who was killed as a result of a hit and run accident.  This year we are prepping the card packets at the Little House and today is one of the three days I'm free to join in the fun. 

My cards today are those that we created at Stamp Club last Saturday.  Check these cutie out.....
First up is the Triple Time Stamping (or Multi Layer Stamping that my friend Kris calls it) that is all over the internet right now.  My club gals practiced this technique on Saturday.
We used Elegant Eggplant and Very Vanilla cardstock to create the layers for our card......and then we used Elegant Eggplant and Summer Starfruit ink to stamp our images.  Our images were stamped with the Everything Eleanor stamp sets........And this is one set which I am totally thrilled that I purchased fron the new catalog. 
We used the "A Word for You" stamp set for our sentiment and the Papillion Potpourri butterfly image was stamped in the Summer Starfruit and then punched out with the new SU Butterfly punch.  Love how this color combination turned out and think it was the favorite of the Club Gals too.
Our 3x3 flower idea came from fellow SU demonstrator Erin Gonzales. She made her card an A2 style card and I just wanted to create one of these fun little folded flowers and pop it on a 3x3 card. 
We folded eight 1" circles to create the petals for our flower and then stacked several scallop and circle layers to create the center of our flower.  On the very top layer we added an Embosslits Beautiful Wings Butterfly to the center 3/4" circle and our layered flower was complete.
We used the Itty Bitty Banners stamp set and framelits die to create our sentiment across the bottom of our card and added a couple of thin slivers of cardstock to the top petal of our flower and wrapped a pencil around the cardstock to create a curly piece coming out of our flower.  This card was lots of fun to make and the best part of it is you have lots of wiggly room at the center of your flower - because of all the circle layers that go into the center of your flower.  FUN FUN CARD!
 
Thanks for joining me today - I've got a SUPER BUSY day planned out today and plan to put my nose to the grindstone tomorrow in order to get all my last minute things DONE.  Hope you can join me tomorrow for more Kards by Kadie.  Keep Living Your Dream!


Wednesday, August 22, 2012

August Stamp Club 3-D Project

Happy Wednesday My Blogger Friends!
Countdown Till We See The Grandkids - 5 Days!
Today I have the 3-D Project that my Club gals made at our August Stamp Club meeting last Saturday.  Check out this ADORABLE little cuties............
We made these ADORABLE Floral Framelits Poppy Flowers for our 3-D project at Stamp Club.  The inspiration came straight out of the new catalog on Page 70.......But the HOW TO came from my fellow SU Demonstrator Karen who gave us a demo on how to make these fun little poppies at our SW Stampers meeting in July.
All you do is die-cut out three of your favorite colored cardstock with the "Floral Framelits" dies.  You cut out one of the petals from your diecut flowers and then fold over and join the petals to create these super fun 3-D poppy flowers.
We ended up using our White Gel Pen to stitch around the outer edges of our flowers before we glued them together.  We added a knotted piece of Lucky Limeade Ruffled Ribbon to the center of our Poppies and after doing that three times.....our flowers were DONE!
We created a tiny little hole at the base of our poppies and ran a piece of Floral Stem Wire through that hole and secured it into place with a glue dot.  We then added our piece of Lucky Limeade Ruffled Ribbon to the center of our Poppy Flower and our Poppy Vase creation was completed.
 Here's a close-up of the Poppy Flower that I created.
And what project wouldn't be complete without the added touch of some new 3-1/2" Scalloped Tulled Ribbon in Crumb Cake and Early Espresso.
MANY THANKS to Karen for sharing the How-To on creating these little cuties.....The ladies had fun creating their own Poppy Flower Vase and the entire project was a huge success!  I leave you today with a sneak peek at the two cards we created at Stamp Club last Saturday.  Hope you can join me tomorrow when I share those fun little creations with you.

Keep Living Your Dream!