Tuesday, July 31, 2012

Appetizer Recipe Swap

Happy Happy Tuesday My Blogger Friends!
Countdown Till We See The Grandkids - 27 Days!
I am traveling at a fast pace today and need to make this post quick ....... so here goes........
 My Monday Ranch PaperCrafting GalPals did another recipe swap and we were to make two different recipes and duplicate the scrapbook page 15 times.  This is the scrapbook page I turned in for the Appetizer Swap.
We were to make a SUPER QUICK appetizer dish and you honestly can't get any quicker than some Mini Nacho Dippers.  All you need to do is take a mini rice cake and add your "stuff" to the top of the rice cakes and serve them!  SUPER DUPER FAST and SUPER DUPER EASY! 
Our recipes are 8x8 in size and I started out with covering the top half of my scrapbook page with some DSP I had in my stash and added a scallop edge to the bottom portion of that DSP.  I knew I wanted to use the Top Note die for my recipe and picked a coordinating DSP pattern to create a second Top Note die that balanced out the bottom portion of my scrapbook page.   
I pulled out a retired SU punch and created three floral embellishments for my page.......... 
And my Appetizer Recipe Swap was done!  This swap took me NO TIME to complete and I am very happy with the way my recipe exchange turned out. 

Thanks for joining me today - I'm at a FULL RUN the next couple of days!  I'm hoping to have both my September Camp and Clubs done before we leave for our vacation.  That honestly means NON-STOP WORK in my studio for the next couple of weeks.  It's lots of pressure - but I know I will be THANKFUL to have both Camp and Club done for September and NOT feel the pressure when we return from Madison in early September to get things completed.  

Hope you can return back tomorrow for more Kards by Kadie creations.  Keep Living Your Dream!

Monday, July 30, 2012

Everything Eleanor Card

Happy Monday My Blogger Friends!
Countdown Till We See The Grandkids - 28 Days!
Last week I shared a fun little Angry "happy" Bird card that a fellow SU Demonstrator Frenchie created on her blog.  Another project that Frenchie has on her blog is an amazing video on how to do a One Step Layer Stamping project.  I've been seeing this technqiue all over the internet and my good friend Kris has agreed to do a Fun Shop and share with the SaddleBrooke Stampers how to do this technique (in another week).  This card is a result of that One Step Layer stamping technique. 
I started out with a card base of Primrose Petals cardstock.  I did all my stamping of my "Everything Eleanor" stamp set onto the stacked layers of Very Vanilla cardstock and used the Primerose Petals cardstock for my matted layers.
My sentiment was from the "Affection Collection" stamp set and I stamped it in Primrose Petals on Very Vanilla cardstock.  I used the Large Oval Punch and the Scallop Oval Punch to begin the layers of my sentiement and then added the Apothecary Accents Framelits die for my final layer. 
Each of the layers are stacked on top of each to create this truly amazing and beautiful background image card.  OH SO PRETTY....and OH SO EASY!
 A final touch as the Primrose Petal 3/8" Stitched Satin Ribbon and my card was DONE.
I can't wait for Kris to teach my fellow SaddleBrooke Stampers how to do this amazing technique  - I think this technique is PERFECT for those sympathy cards I struggle to make.  I can see sitting down one day and making several of these for just that purpose.

Thanks for joining me today - I'll be back tomorrow with some Kards to Kadie that I've received - Hope you can come back and join me for that share.  Keep Living Your Dream!

Sunday, July 29, 2012

Large Delicate Dollies Card

Happy Sunday My Blogger Friends!
Countdown Till We See The Grandkids - 29 Days!
My card share today is one that I created after receiving my second new catalog product delivery.  At one point I had all the new product out on my studio counter and I just began punching and stamping from all ther new product I had received and here is what I came up with............
I started out by grabbing up my International Bazaar DSP.......I love love love this DSP collection - the colors are SO RICH and BEAUTIFUL.  I will be using lots of this DSP this year!  I added a panel of that DSP to the bottom half of my Crumb Cake card.  I ran a piece of Whisper White through my Big Shot using the "Fancy Fan" embossing folder and adhered that to the top portion of my card.
My focal image was going to be the new "Large Delicate Dollies" die.  I will tell you something - there is a MAJOR TYPO in our new catalog on Page 191.....The sizes the new "Delicate Dollies" Sizzlits L dies cuts IS.....2-1/2, 1-3/4 and 1-3/8.  MAJOR DIFFERENCE from what is printed in the catalog.  SO....if you looked at those dies and thought...how cute....but how small.  NOT!  I used the largest dollie on my card and you can see it fits nicely on my card.
I also used the new "Papillon Potpourri" to stamp my largest butterfly and punched her out with the new Butterfly punch (the fit is PERFECT).  I used my "Beautiful Wings" embosslits die to cut out the two little butterflies that are within my Large Delicate Dollies die cut.
My sentiment is from the "Itty Bitty Banners" stamp set and I used Pacific Point ink and die it out with the new "Framelits Bitty Banner" die.  I mounted that banner onto a Pacific Point Large Oval Punched piece.
I also added a 1/2" piece of Chocolate Chip cardstock across the center of my card (to hide the seam of the DSP and embossed Whisper White piece) and used some White Bakers Twine to create a pretty little bow to the left hand side of my card.  I called this card DONE and it all came together in no time flat!
 
Thanks for joining me today - I'll be back tomorrow to share an Everything Eleanor card with you - Hope you can join me for that share.  Keep Living Your Dream!

Saturday, July 28, 2012

Postage Stamp Card

Happy Saturday My Blogger Friends!
Countdown Till We See The Grandkids - 30 Days!
Today's card is a layout I saw from both my good friend Mary Fish and my fellow Stampin' UP! demonstrators on our Stampin Connection website.  I knew from the moment I saw this card recipe it was going to be one that I would create and here is what I came up with.............
I started out with a Whisper White card base and added a panel of "Floral District" DSP right down the center of my card.  I added on top of that a piece of Gumball Green 3/8" Stitched Satin Ribbon and tied that around the center of my card.
My postage stamped images are from the "Lovely Little Labels" stamp set and I used Rich Razzleberry ink to stamp my images. 
I used several square punches to create my three layers and matted each of those punched square pieces onto a Gumball Green Postage Stamp Square Punch and popped all four squares onto a Rich Razzleberry base.
This card comes together in a snap and is the perfect card for any occasion.

Thanks for joining me today, I'll be back tomorrow to share a beautiful card I created using the Large Delicate Dollies Die.  Hope you can come back and join me for that share. 
Keep Living Your Dream!

Friday, July 27, 2012

Angry HAPPY Bird Card

Happy Happy Happy Friday My Blogger Friends!
Countdown Till We See The Grandkids - 31 Days!
My card share today is a DIRECT CASE from a very talented SU demonstrator Frenchie.  Her blog is http://www.frenchiestamps.com/ and she turned the new July promotional "Reason to Smile" stamp set into a SUPER DUPER FUN Angry "happy" Bird card.  Check this fun card out.......
Believe it or not - the "Reason to Smile" stamp set was used on this card.  Check out the cute little Angry "happy" Birds wings.  They were stamped and then cut out and trimmed down to make a set of wings for each of these adorable birds.
 I started with a Summer Starfruit base card and added three panels of Whisper White that were run through the Big Shot with the "Lots of Dots" embossing folder.  The birds were created with the Scallop Circle Punch and three different circle punches (1-3/8, 1-1/4 and 1").
If I recall correctly......This is the only part of Frenchies card that I did differently.  The "to my friend" sentiment was stamped from the "Friendly Phrases" stamp set in Midnight Muse and then punched out using the new "Ticket Duo Builder" punch.  I mounted that piece onto a circle layer in Summer Starfruit and a Midnight Muse "Labels Framelits Collection" die.
LOVE LOVE LOVE how Frenchie took a stamp set which you would NEVER THINK had the potential to create such a whimsical card........and created this sassy fun bird card.  THANK YOU Frenchie for thinking outside the box........LOVE YOUR CARD!

Many thanks for joining me today, I'll be back tomorrow to share a fun postage stamp card with you - hope you can swing back and join me for that share.  Until tomorrow.......Keep Living Your Dream!

Thursday, July 26, 2012

Holiday 3x3 cards

Happy Thursday My Blogger Friends!
Countdown Till We See The Grandkids - 32 Days!
Today's card share is seriously a CASE from my good friend Mary Fish.  I honestly LOVE LOVE LOVE every single thing she creates - and when I saw her posting last week of these little 3x3 holiday cards.......well let me tell you.....I immediately went to work creating this little cuties!
 Mary used (as I did) the new Scentsational Season stamp set and Framelits Dies to create these adorable little 3x3 notecards.  The made LITTLE TINY changes for my cards...........
First up is this ADORABLE Christmas Tree.  I stamped it in Gumball Green and the coordinating dies make it a SNAP to diecut out all the images to this amazing stamp set.  I also added a piece of the new "Festival of Prints" DSP Stack to the bottom of my card - and the final touch was adding some rhinestone bling to several of the branches of my tree.   My sentiment was stamped from the "Fabulous Phrases" stamp set.
 Next up is the Candy Cane card........HOW YUMMY IS THIS?  I am amazed at how awesome the images to this stamp set actually stamp out.  I stamped my candy canes in Cherry Cobbler and connected my two candy canes together with a little piece of Whisper White Bakers Twine.  I stamped my "make a wish" sentiment with the help of the AWESOME stamp set "Sweet Essentials".
This has to be my ALL TIME FAVORITE card - It totally reminds me of the tradition I have with my grandkids each year to make our December Gingerbread Houses.  The gingerbread man was stamped with Chocolate Chip ink and three pearls were added for his buttons.  I used the "Festival of Prints" DSP Stack for the bottom portion of this card ....... and before I called this one DONE - I grabbed my Cherry Cobbler Stampin Write Marker and added some stitching lines right above my DSP.
And my last Holiday mini card just SCREAMS Winter in Wisconsin to me.  A good cup of JOE and a festive "Christmas Cheer" message and your good to go.  I stamped my cup in the new Midnight muse In-Color and the Christmas Cheer was from the Sweet Essentials stamp set.

MANY THANKS to my good buddy Mary Fish for her card inspiration on this one and hope to create a bunch of these to go along with several holiday gifts I will be giving out this upcoming holiday season.

I'll be back tomorrow to share more new card creations with you - Hope you can come back and join me for that share.  Keep Living Your Dream!

Wednesday, July 25, 2012

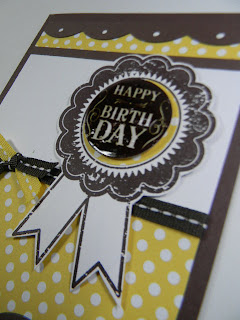
Happy Birthday Ribbon Card

Happy Wednesday My Blogger Friends!
Countdown Till We See The Grandkids - 33 Days!
Today I have another birthday card to share with you ............ Let's jump right in....
This card was created using the new "Blue Ribbon" stamp set and several circle layers.  I used Chocolate Chip ink to stamp my ribbon image onto a piece of Whisper White cardstock ...... and then used my paper snips to cut around the entire image and added some dimensionals to the back of the ribbon to pop it up off my card. 
I used two layers of circles (1-1/4" and 1-3/8") for the center of my ribbon image and I added Crystal Effects to my top circle image for a little added WOW FACTOR.  It made the HAPPY BIRTHDAY message very glossy and was perfect for the center of this ribbon banner.
I used the Polka Dot Parade DSP (Daffodil Delight) for my DSP and added an Edgelits Large Scallop Die to the bottom and top of my card.  I also added a piece of Chocolate Chip Stitched Ribbon across the center of my card and before I tied the knot to my ribbon a layered a very small piece of Daffodil Delight stitched ribbon to the center and finished knotting up my ribbon.  Turned out to be the PERFECT addition to this SUPER FUN birthday card.
I will get busy creating more of these cards for the MANY male birthdays I have coming up in August.  I think this card will end up being a favorite "GO TO BIRTHDAY" card for the guys on my birthday card list.

Thanks for joining me today - I'll be back tomorrow to share another new card creation with you - Hope you can come back and join me for that share.  Keep Living Your Dream!

Tuesday, July 24, 2012

Reason to Smile Birthday Card

Happy Happy Tuesday My Blogger Friends!
Countdown Till We See The Grandkids - 34 Days!
My post today was inspired by SU demonstrator Monica Gale.  She created an envelope card using the SU Two Tag die and I loved the layout - but went in and changed up the recipe by using the "Reason to Smile" SU promotional stamp set.  Here is what I created.......
I used the SU promotional stamp set "Reason to Smile" to create the two gorgeous flowers for the bottom right hand corner of my card.  This stamp set is only available during the month of July - and cost only $5 with a $50 Stampin' UP! order. 
 My envelope (Pretty in Pink) was cut out using the SU Two Tags Die and then run through my Big Shot using the "Lacy Brocade" embossing folder.  The two flowers were two step-stamped on Whisper White with Raspberry Ripple ink and then cut out.  I added one of the new "Dahlia Assortment Buttons" to the center of each of the flowers and popped them onto the bottom corner of my envelope.
I also wrapped a piece of Raspberry Ripple ribbon across the bottom of my card and this card was done and ready to give to someone for their birthday. 
I used the "Family Reunion" stamp set for my happy birthday message and the DSP that I used was from the "First Edition" collection.  Many thanks to Monica for her great inspiration for this card - I simply love how this card turned out and will probably make a few more of these for some upcoming birthday's I have in August.

Thanks for joining me today - I'll be back tomorrow to share more cards I've created using some of the new product I've received from both the new catalog and the new Holiday Mini catalog.  I hope you can come back and join me for that share. 

Keep Living Your Dream!

Monday, July 23, 2012

Birthday Gift to Opal

Happy Happy Monday My Blogger Friends!
Countdown Till We See The Grandkids - 35 Days!
Today I want to share a fun little birthday gift I made for my good friend Opal.  Opal celebrated her birthday on Saturday and here is what I hung on her front door at the ButtCrack of dawn on Saturday morning......
A SUPER DUPER FESTIVE BAG ....... for a super duper festive friend!  This bag was SO OPAL that I just couldn't resist using it for Opal's birthday gift.
 Here's the gift I made for Opal and tucked inside her festive birthday bag.
I started out with a VERY OLD (and very retired) Stampin' UP! set.  Opal's favorite color is PINK and I just knew that at least her card this year was going to be pink.  I stamped six candles on the center of her birthday card and then used my Simply Score Tool to create a double embossed frame around the outer edge of her card.  I also added some retired SU pink ribbon and called this one done.
 My gift to Opal was this darling little 6x6 box that I created and made into a charming little purse.
 Inside the purse held six scallop circle cards........
For whatever reason I grabbed up another very retired SU set and created six matching cards (two of each) to tuck inside Opal's birthday purse.  Here is the little birdie card.......
 And the beyond ADORABLE elephant card (just love the little balloon she is holding).....
 And this DARLING little skunk.
The two cards were each matching in every way ...... except for the coordinating retired SU 1/4" ribbon that I added to the top of each card.  I used Whisper White and Certainly Celery to add a little something something to each card.  I also added Crystal Effects to several parts of each of the cards for a little bling action.
 I decorated the front of each of the envelopes too and my gift to Opal was DONE!
Love how my gift to opal turned out and she reported back to me that she was thrilled to receive my gift.  Happy Birthday Opal and hope you had a FABULOUS BIRTHDAY!

I've been using LOTS of NEW PRODUCT from both the new catalog and the new holiday mini catalog (which you can begin ordering from on August 1st).  Hope you can join me tomorrow as I begin sharing all those fabulous creations with you.
Keep Living Your Dream!

Sunday, July 22, 2012

Stamp Camp July Part Three

Happy Happy Sunday My Blogger Friends!
Countdown Till We See The Grandkids - 36 Days
Today I have the final Christmas in July card to share with you.  Let's jump right in.......
The little 3x3 card we made in June used lots of new product that will be available in the new Holiday Mini Catalog and you can begin ordering from on August 1st.  This little 3x3 card uses both the new Ornament Keepsakes stamp set and the Framelits Holiday Ornament Die.
We started out with a Whisper White base card and wrapped some White Taffeta Ribbon and 1/8" Real Red Taffeta Ribbon around our card.  We then took the red flocked window sheet DSP that is in the "Candlelight Christmas" DSP collection and cut it down to a piece that measures 3x3.  We then slide that piece behind the ribbon and secured the window sheet to our Whisper White piece with some glue dots.
We used the new 1-1/4" Scallop Punch and the new Ornament Merry Minis Punch Pack and punched out a Whisper White piece of those two punches and backed it onto a 1-3/8" Real Red circle.  That circle piece fit perfectly on the inside lower right hand corner of our card.
We used Real Red ink and stamped the ornament which was then die cut with our Big Shot and the beautifully coordinating Framelits Ornament Die.  We used Bakers Twine to secure our ornament directly to the taffeta ribbon.
We added three Rhinestone Gems and popped our ornament up with the help of a single dimensional.
This little 3x3 is stunning and packs a real punch for such a little card.
Many Thanks for joining me today ....... I'll be back to begin sharing some of the card samples I've been making with many of my new stamp sets and toys.  Hope you can come back and join me for that share.  Keep Living Your Dream!