Wednesday, June 30, 2021

Thanks So Much

 Happy Wednesday My Blogger Friends!
My blog post for today is Wine-Down Wednesday.  My middle of the week card feature for today will hopefully offer you some inspiration and provide you with some motivation to keep you moving through your busy week.  Let's jump right in with my card share for today........
Who wouldn't just SQUEAL when they opened the envelope and pulled out this card!  It's the kind of card that just makes me HAPPY all over.
I started this card off with a Pale Papaya base card.
Before adhering down my White 5-1/4" x 5" panel to the front of my card ....... I prepared a total of seven 1" x 3-3/4" strips of card stock to adhere to the front of my White panel.  I used three different colors of card stock Polished Pink, Fresh Freesia and Pale Papaya.  But, before adhering each of those pieces down, I ran those pieces through my Die-Cut machine using the 'Animal Print' along with the 'Checks & Dots' Embossing Folders to give each piece of card stock some added texture.  Then it was a SNAP to just adhere each panel down to the front of that White panel.
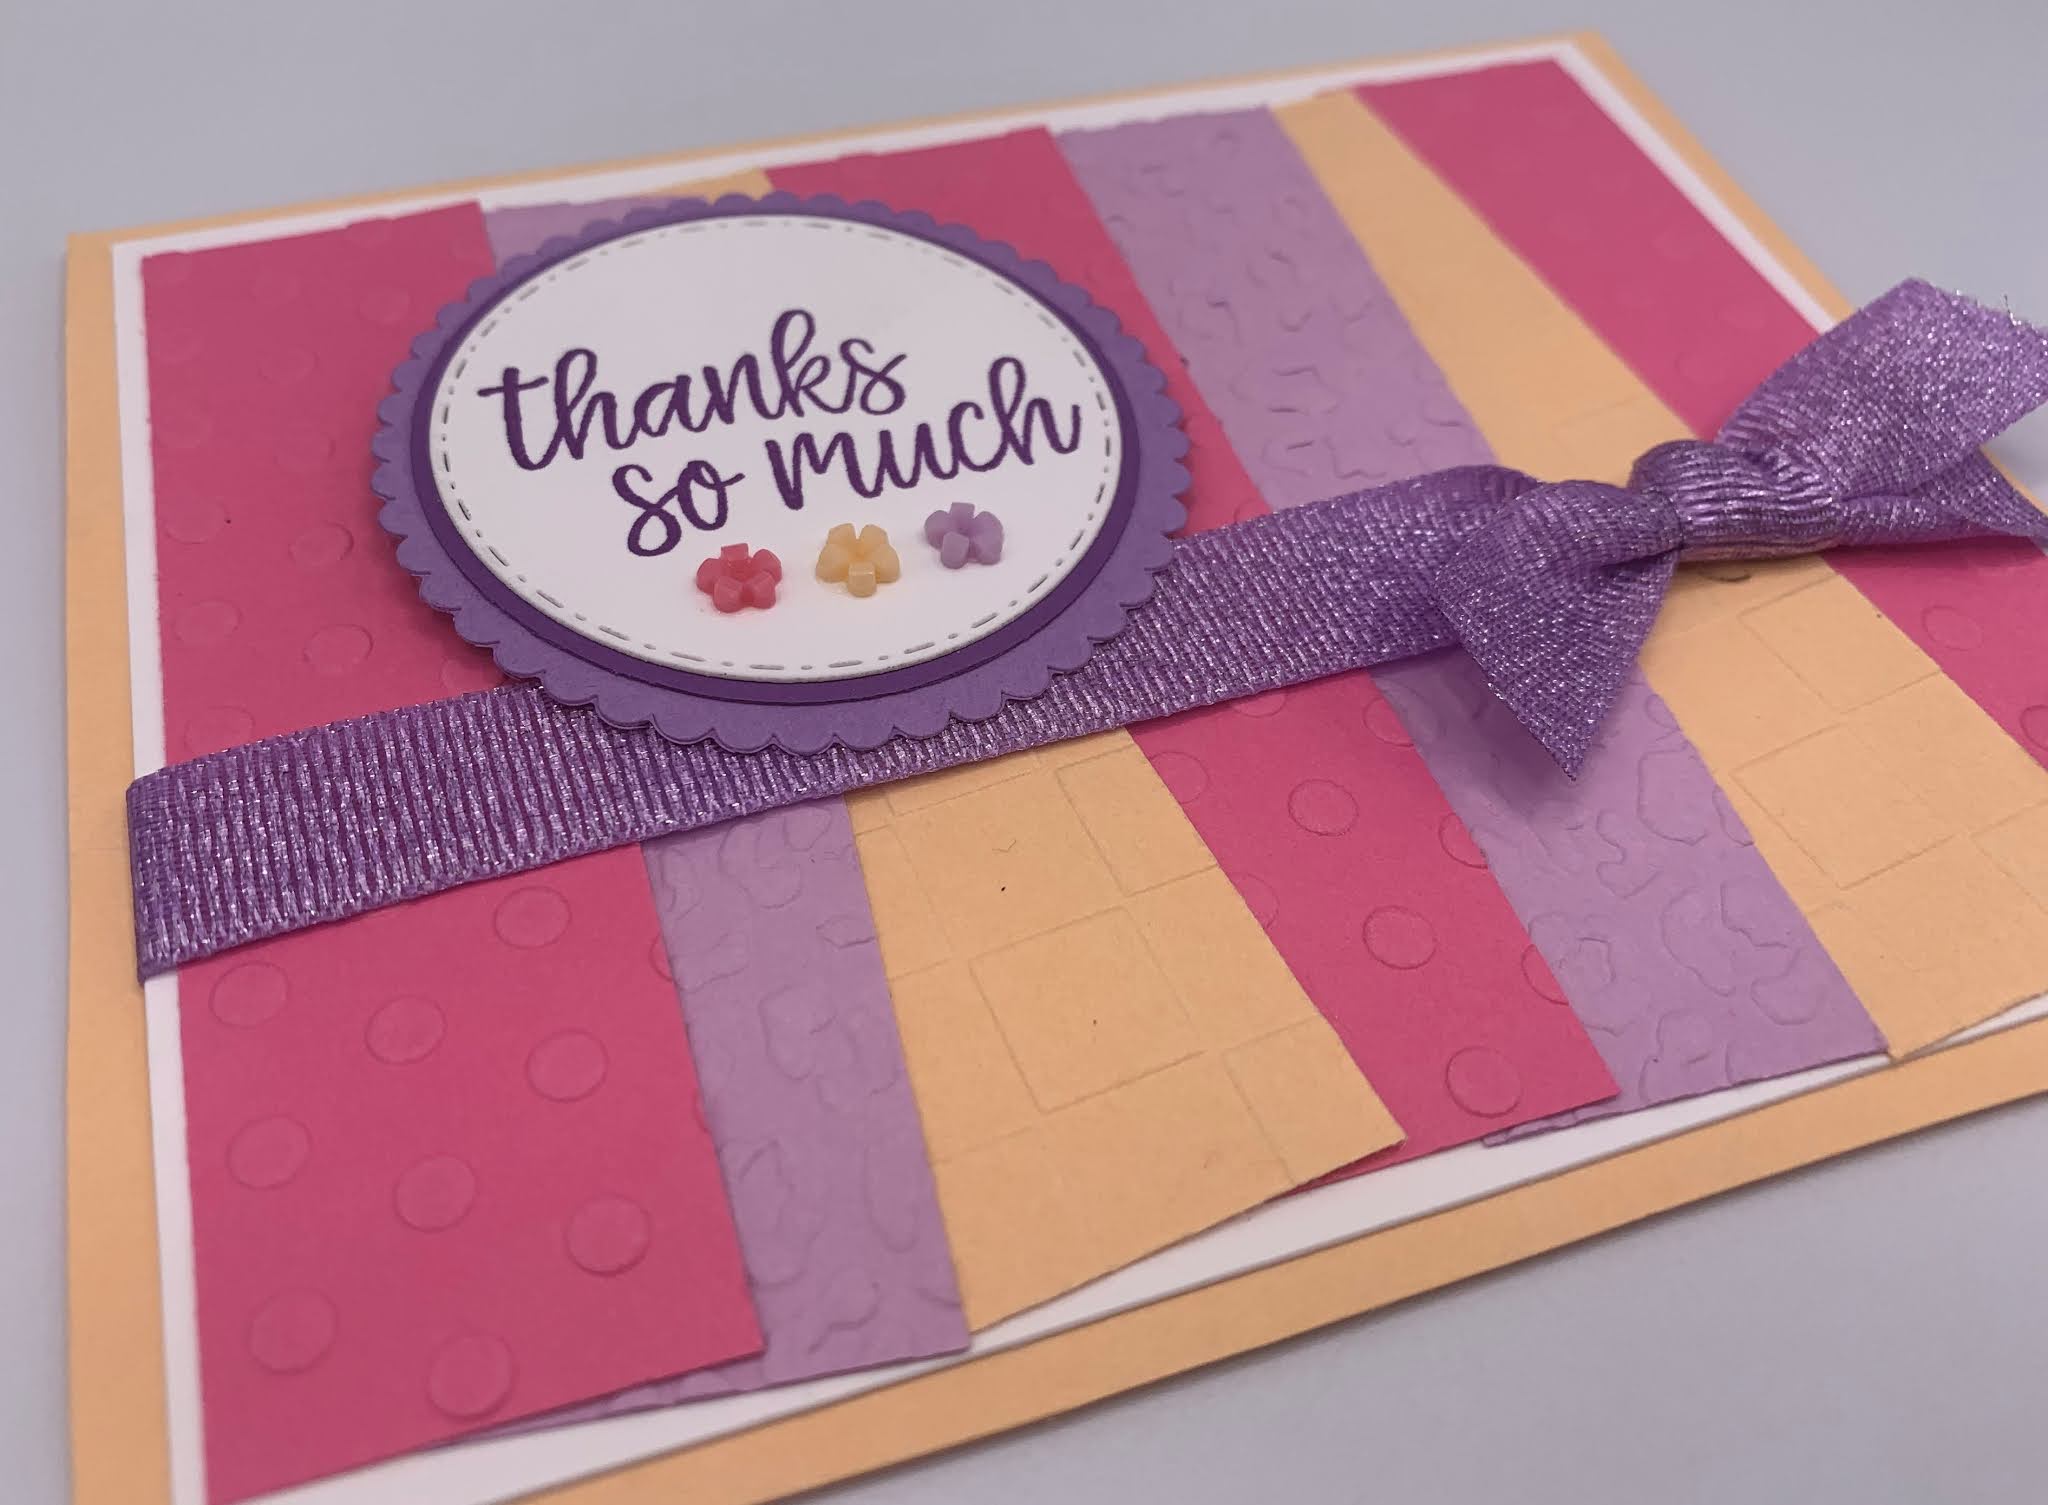
Before I adhered down that completed White panel.......I wrapped some 'Highland Heather 1/2" Grosgrain Ribbon' around it and tied it off into a pretty knot on the right hand side.
I then got busy and created my pretty sentiment piece.  For that I used the 'In Symmetry' set and stamped that onto a White 'Layering Circles' piece and layered it with two additional circles.  The finishing touch was adding three 'Loose Flowers' below my stamped sentiment ...... And called this card DONE!
So, what do you think my friends.......
Doesn't this card just make you SMILE!!!!

Thanks for joining me today!  I'll be back tomorrow with a Tag Thursday creation to share with you ........ Hope you can make plans to stop back and join me for that share.  Keep Living Your Dream! 

Tuesday, June 29, 2021

Ombre Downline Gift Bags

 Happy Tuesday My Blogger Friends!
My blog post for today is 'CASE IT TUESDAY'.  That means today I have a fun little 3-D project that I found on the internet ....... And I created a CASE of that project to share with you today.  This project was SUPER FUN to create and I want to jump right in and share that project with you now.
Today I have a fun little project that I CASE'd from the very talented Linda Heller at Stamping School.  She created a version of these Ombre Bags.........And I put my own spin on creating these fun 3D gift bags for my Downline Team members who participated in my Downline Challenge last month.  Each team member who pariticpated in our Downline Challenge received one of these little bags in the mail from me.
I used the new Stampin' UP! Ombre Bags for this little gift giving surprise.  I used the 'Dandelions 3D Embossing Folder on the outside of each bag and added a sweet sentiment from the 'Whiskey Business' set.
The inside of each bag included a FUN NEW Stampin' UP! Embellishment that had a pretty tag attached to it.......that tag was made from the 'Floral Squares Dies'.  This bag uses the Pale Papaya bag and tag.
Here's the Fresh Freesia bag........
And it was adored with an Evening Evergreen tag.
And check out the pretty Polished Pink bag.
And I used the same Polished Pink cardstock to create a pretty tag.
And the final bag was created using the Evening Evergreen Ombre bag.
And the tag for this bag was created using Polished Pink.
So there you have it friends.
My team members were THRILLED with the happy mail they received.

Thanks for joining me today!  I'll be back tomorrow to share a Wine Down Wednesday card with you ........ Hope you can make plans to stop back and join me for that share.  Keep Living Your Dream!

Monday, June 28, 2021

Oh Happy Days Upgrade

 Happy Monday My Blogger Friends! 
Today is Mix-It-UP! Monday, and I have an upgraded version of the card I shared with you yesterday.  I used the exact same product that was used to create yesterday's card ..... But I added a couple additional products found in the 2021-2022 Stampin' UP! Annual Catalog to bring this card up to the next stamping level.
Here's my Spot Light Sunday card from yesterday on the TOP.....
And my Mix-It-UP! Monday upgraded card for today on the BOTTOM.....
The biggest upgrade to my card for today ...... I changed from a standard top or side fold style card - to a flip up flap style card.  I started out with a Pale Papaya 4-1/4" x 5-1/2" base single card stock piece.  Then I got busy creating my flip up flap style portion of this card.
I started with a 6-1/2" x 3-1/2" piece of White card stock that was scored at 5-1/2".  That scored section would be adhered down to the center of my Pale Papaya base card.  Then I added a 3-3/4" x 5-1/2" panel of Calypso Coral card stock over that scored section and adhered it directly down to my Pale Papaya base card.  Now I have the flip up flap portion of my card ready.
I cut a piece of 'You're A Peach Designer Series Paper (3-1/4" x 5-1/2") and before adhering that down to the top of the White flip up panel ...... I wrapped some 'Pale Papaya 1/2" Ribbon' that was colored with my Calypso Coral Stampin' Blends and wrapped that around the DSP panel.
The only things left to do was stamp my goat (from the 'Way To Goat' set) onto a White 'Layering Diorama Dies' and coloring him in with my Stampin' Blends.  Then I layered that piece onto another 'Layering Diorama Dies' piece that was cropped out with Pale Papaya card stock.
And to finish off this upgraded version ...... I used the same 'Many Messges' stamp set to stamp my little "Oh Happy Day!" sentiment.

So what do you think my friends......
Two totally different card styles......
Using the same stamp set.
Do you have a favorite????

Thanks for joining me today!  I'll be back tomorrow to share a 3-D Tuesday creation with you ...... Hope you can make plans to stop back and join me for that share.  Keep Living Your Dream!

Sunday, June 27, 2021

Oh Happy Days

 Happy Sunday My Blogger Friends
Today is Spotlight Sunday ....... And I have a card I created using product from the 2021-2022 Stampin' UP! Annual Catalog.  This card uses several products from that new catalog ........ And I'm thrilled with the way it turned out.  Let's jump right in with my card share for today..........
I just have to SMILE BIG every single time I look at this card.  I started out with a Calypso Coral base card and worked from there.
I created my center panel first and then adhered it down to my card (and that is because I knew I was adding some ribbon to the top).  I started with a 3" x 5-1/2" panel of White card stock and adding a 2-3/4" x 5-1/2" panel of 'You're A Peach DSP' to the top.  
Next, I wrapped some 'Pale Papaya 1/2" Ribbon' to the top of that panel and tied it off into a pretty knot in the center.
Then, I got busy creating my little goat.  OH WHAT FUN!!!  He was stamped from the 'Way To Goat' set and that was stamped onto a White 'Layering Dioroma Dies' piece.  I used my Stampin' Blends to color that little cutie in.  Then, I layered that stamped Goat onto a 'Layering Dioroma Dies' piece that was cropped out using Pale Papaya card stock.
The finishing touch was adding my "Oh Happy Day!" sentiment to the side and that was created using the 'Many Messages' set.  So what do you think my friends......Isn't a HOOT!!!

Thanks for joining me today!  I'll be back tomorrow to share an upgraded version of this very card with you ...... Hope you can make plans to stop back and join me for that share.  Keep Living Your Dream!

Saturday, June 26, 2021

You're The Best

 Happy Saturday My Blogger Friends!
My blog post for today is Paper Pumpkin Saturday ........... And I would like to share with you the project I created using the May 'Batter Up' Paper Pumpkin kit.   Here's that project.......
This card turned out even BETTER than I had planned.  And the BEST PART ...... I used pieces from the May kit and only added 2-additional pieces of card stock to complete this card.
I used one of the base cards that came with this kit ...... And added a panel to the left hand edge of my card.  The DSP panel I created was using the striped paper that came with the kit ....... and I just layered that panel with some White and Pacific Point card stock.
My sentiment banner was created with another piece that came with the kit ...... and after snipping out a banner tail to one end of that sentiment ...... I added a piece of Real Red card stock behind it.
The pretty White Baker's Twine (also that came with the kit) created a fun little element to the top of my side panel ....... and those three little dots were also part of this kit.
Dare I say.......
This card really is a HOME RUN!!!!

Thanks for joining me today!  I'll be back tomorrow to share a Spot Light Sunday creation with you ........ Hope you can make plans to stop back and join me for that share.  Keep Living Your Dream!

Friday, June 25, 2021

Friends Friday Pics

            Happy Friday My Blogger Friends!
My blog post for today is Friends Friday.  On Friday's, I have the honor of spot-lighting some of the fabulous cards and projects that I received from Friends ....... Fellow Demonstrators ........ and Family.  Each of these creations are works of art........and it is with great pleasure that I share with you today some AMAZING projects that my sweet friend Jennifer Mennetti created.
I must admit ...... Jennifer has an AMAZING eye for creating cards and scrapbook pages ..... and this first card is an excellent example of her creativity.  I am just IN LOVE with this card!
This card has SO MANY fun elements to it.  And the dimension and texture on this card is AWESOME!
This card is simply BEAUTIFUL!!!
The design on this card is a real SHOW STOPPER!
And this layout is PERFECT in every way!

Thanks for joining me today!  I'll be back tomorrow to share a special Paper Pumpkin Saturday creation with you ........ Hope you can make plans to stop back and join me for that share.  Keep Living Your Dream!

Thursday, June 24, 2021

Birthday Turtle

            Happy Thursday My Blogger Friends!
My blog post for today is Tag Thursday.  Today, I will feature a tag I created and show you how easy it is to use minimal supplies to create a SUPER PRETTY TAG.  Now that you have the details for my Tag Thursday creation for this week ........ Let's jump right in with my tag share for today........
    How FUN would this tag look attached to any birthday gift!
I started this birthday tag off with a Real Red base tag that measured 2-1/2" x 4-1/4".
Next, I grabbed my 'Layering Diorama Dies' along with a White tag and 'Pattern Paper Designer Series Paper' tag.  I layered my Diorama Dies onto each of those pieces and cropped out the image.  Then I got busy and layered those to the top of my Real Red base tag.
I stamped a 'Turtle Friends' image and used the 'Turtle Punch' to crop that little guy out.  He was colored in with my Stampin' Blends and then adhered with Stampin' Dimensionals to the center of my tag.  My sentiment was stamped on a 'Rectangle Stitched Dies' using the 'Turtle Friends' set and some Poppy Parade ink.
To top off my tag ...... I grabbed some 'Petal Pink 5/8" Organdy Striped Ribbon' and added that to the top of my tag.
The finishing touch for this tag was adding some 'Shaker Shapes' embellishments to the front of my tag and topping my little turtle off with a 'Loose Flower Flourishes' that was colored in with my Poppy Parade Stampin' Blends.

Thanks for joining me today!  I'll be back tomorrow to share some Friends Friday creations with you ........ Hope you can make plans to stop back and join me for that share.  Keep Living Your Dream!

Wednesday, June 23, 2021

Love & Hugs Scraps

 Happy Wednesday My Blogger Friends!
My blog post for today is Wine-Down Wednesday.  My middle of the week card feature for today will hopefully offer you some inspiration and provide you with some motivation to keep you moving through your busy week.  Let's jump right in with my card share for today........
Looking for a FUN way to use up some of those scraps we have piled up (and you know who you are....No judging).  Well, I for one seem to have real issues just tossing out my Designer Series Paper.  Here's a way to make every single piece of DSP COUNT.
I started this card off with a White base card ....... And then got busy cutting up some of my left over pieces of 'Pattern Paper DSP'.  I cut each piece up into a 1/2" x 6" strip and used 3-different patterns to create this card.
All I needed to do was start in the upper left-hand corner of my White base card and position those strips of DSP across the front of my card ....... Heading downwards to the lower right-hand corner of my White base card.  As I went along ...... I snipped down each piece of DSP to create a fun uneven pattern across the front of my card.
My sentiment piece was created with the help of the 'Many Happenings' set ...... And I used the 'Painted Labels Dies' to layer up that sentiment piece.  To finish off my sentiment piece ...... I added a small Flirty Flamingo heart from the 'Messages Dies' and glossed it up with some 'Fine Tip Glue Pen'. 
And the finishing touch for this card was adding some 'Matte Black Dots' to the ends of three DSP panels ...... and this card was finished in no time flat.
So there you have it friends.......
A DARLING card that I am COMPLETELY in love with.

Thanks for joining me today!  I'll be back tomorrow with a Tag Thursday creation to share with you ........ Hope you can make plans to stop back and join me for that share.  Keep Living Your Dream!