Tuesday, January 31, 2012

January Stamp Camp Part Two

Happy Tuesday My Blogger Friends!  Today I have the other three cards from my January Stamp Camp to share with you ........ Let's ROCK!
First up is a fun little Double Dutch Fold Card that was on SplitCoast Stampers ...... Oh My Gosh Friends - The card is popping up all over the internet and when I saw how easy they were to make - I was IN!
You start with a base card of 9"x4-3/16" and you score at 5-1/2" to form the base of your card.  We used Riding Hood Red cardstock and ink ..... and the "You are Loved" stamp set.  I also had the ladies use the new Framelits Label dies (2nd and 3rd smallest ones) ........ and for a little WOW FACTOR we used the new Cherry Cobbler Dazzling Details.
The double dutch door portion of your card is created by starting with a 2"x8-1/2" piece of Whisper White cardstock and score at 2-1/8" and 6-3/8".  You then wrap that piece around the bottom portion of your card and you've created the dutch door portion of your card.  SERIOUSLY FUN CARD!
My next card share was a direct CASE from a card I received from my good friend Mary Fish (http://www.stampinpretty.com).  We used the new Framelits Labels Collection dies along with the new "You're My Type" stamp set.
To create the flower stem we used the Butterfly punch and to make the red flower we used both the Boho Blossom and Itty Bitty Circle Punch.  Our Happy Valentine's Day was stamped from the "Teeny Tiny Wishes" stamp set.  MANY THANKS Mary for your super duper fun card idea!
And my last card is a CASE from my SW Stamper friend Sue Smedley - She gave me this card at our January Stampers Meeting and I knew IMMEDIATELY that it would be a card that my Camp gals would be able to recreate in a snap.
We used Cherry Cobble cardstock and ink and our stamp set was "PS I Love You".  We used the new "Framlits Hearts" (2nd smallest) and the "Framlits Adorning Accents" along with the new "Adorning Accents Embossing Folder" to create a card that just blew the ladies out of the water.  Many Thanks Sue for your awesome Valentine's creation.......

I'm off to go join two of my FU group gals for a Valentine's Day Card class down at Real Deals.  We are going to head out to dinner before our class and I'm prepared to have a super duper fun night with these two friends.  I'll be back tomorrow to share a fun card that I made for our new neighbors - Hope you can come back and join me for that share.  Keep Living Your Dream!

Monday, January 30, 2012

January Stamp Camp Part One

Happy Happy Monday My Blogger Friends!  Hope you'all had a fabulous weekend - as you might remember ....... mine was spent cleaning out my garage and pantry.  While I was at it ..... I also straightened up a couple cabinets in my studio ...... got all my embossing powders in containers and sorted through a section of my closets (HOLY BUCKETS!  Does anyone else have a LOT of stuff?).  My hope is to have my studio cleaned out and in FUNCTIONING at HIGH PERFORMANCE LEVEL within the next couple of week!
My share today is two of my Stamp Camp cards from January - Let's jump right in ........
My first card is a 3-1/4"x6-1/2" size card - I made two versions of this card ......First up is the Cherry Cobbler version.  I used the new Framelits Heart Die (3rd largest size) and the smaller hearts are from the Heart to Heart punch
Here is the Real Red version.   
On both versions we used the new stamp sets "Take it to Heart" and "Sweet Cake".  We used white embossing powder to give our image that real WOW FACTOR that this card deserved.
This is the actual version we made in Camp.  We used the 1/4" Real Red Grosgrain Ribbon with a littlest piece of Chantilly Lace Ribbon along with the new Large Basic Pearls on our card.
 Seriously LOVE how beautiful the image stamped out by using white embossing powder.
 My second card share for today is our 3"x3" card. 
We used the new "PS......I Love You" stamp set - and that was stamped in Melon Mambo ink.  We used 1-1/8" squares in both Melon Mambo and Regal Rose and matted the four squares down on a piece of Whisper White frame that measured 2-1/2"x2-1/2".  We were able to punch our stamped "Sent with Love" image out with the help of the 1" circle punch and added a single dimensional to the back of each circle to pop all four circles off our card.

I'll be back tomorrow to share the other three cards from January Stamp Camp with you ...... Hope you can come back and join me for that share.  Keep Living Your Dream!

Sunday, January 29, 2012

This is the SECOND POST for today - I have had lots of request to link you'all to Dawn's video on the bookmarks that I created.  Here it is (posted January 23, 2011):
Happy Creating and Keep Living Your Dream!

Birthday Gift For Kris

Happy Sunday My Blogger Friends!  I am planning to spend the ENTIRE DAY not in my studio but in my garage.  YIKES - Do I Know How To Have FUN or What!  I have been putting it off for several months now - and right now it seriously looks like a BOMB went off in our garage so today is the day to jump in and GET THE GARAGE CLEANED OUT!
My share today is the sweet gift I made for my good friend Kris Holmes for her birthday - which was last Monday.
I started out with this fun little card (like the one I made for Jan).  I knew that Kris loves anything new from Stampin' UP! - so I pulled out not only the new SAB DSP packet - but also grabbed the new Ruffled Ribbon to create a super big and super fun card to go along with her gift.
I just love creating these fun 6x6 purses and bookmarks that my fellow Stampin' UP! demonstrator Dawn Griffin shared with her blog followers (http://dawnsstampingthoughts.net).  They come together in a snap and pack a real WOW FACTOR to those that are receiving them.
I made a 6x6 purse that holds 4-notecards and used the Designer Series Paper that is in the Stampin' UP! Sale-a-Bration catalog to decorate the purse and the notecards.  I also made a matching bookmark for Kris that uses the same DSP from the SAB Catalog.  Dawn has a video for both of these projects on her blog - (http://dawnsstampingthoughts.net).
The 6x6 purse comes together with the help of a 6x6 page protector (that is cut down) and a single sheet of white cardstock ..... and after you add some DSP and a couple Rosette's ..... your purse comes together in literally a SNAP!
I purchased the new Stampin' UP! Rosette's die and was able to create both of these super pretty rosette's in a FLASH!
The notecards were just Whisper White cardstock and some of the SAB DSP added across the bottom portion of the cards.
I had purchased this beautiful black journal book for Kris and made one of Dawn's super awesome bookmarks for it.
I just had to add a special little scallop birthday wish to the inside of the journal book for Kris.  And that completed my birthday gift for my good buddie Kris.
I had so much fun creating this birthday gift for Kris and I know first hand how much Kris loved every little thing I made for her.  Happy Birthday Kris!

I'll be back tomorrow to begin sharing my January Stamp Camp cards with you - Hope you can come back and join me for that share.  Keep Living Your Dream!

Saturday, January 28, 2012

January Crafternooners Swap

Happy Saturday My Blogger Friends! 

Today I have a special treat to share with you - It's my Crafternooners Swap project for January. 
Here is what I will be giving to each of them this weekend.
Our color challenge for January was Purple and Gold with an optional technique of Stickles.  I took the bookmark idea which Dawn Griffin had on her blog (http://dawnsstamingthought.net) and created these super fun bookmarks for my three Crafternooner lady friends.
I wasn't sure what size book the ladies would have - and know that each of them read PaperCrafters magazines and I had several old copies on hand - so I simply used those magazines as my guide for setting up the dimensions for the bookmarks I was going to make for my Crafternooner friends. 
I am reading "A Cry in the Night" right now ......... and made my bookmark to fit that book.  LOVE how pretty this bookmark turned out!
Here is a shot of the large scallop diecut with the Stampin' UP! rosette positioned right on top.
And all you need to do to open the bookmark is slide up the gold scallop to reveal the black ponytail holder which is positioned under the gold scallop........And then release the purple button from the black ponytail holder........
The two pieces seperate and that will allow you to reposition your bookmark to a new page of the book you are reading.
Here's a close-up of the yummy purple Stickles that I added to each scallop! 
Since I was pretty sure I would just be dropping the bookmarks off to each of the gals in my Crafternooner's group ...... I wanted to make sure I wrote up some basic instructions telling each of them how their bookmarks operated.  So I took a piece of white cardstock and put it over the cover of each of the PaperCrafters magazine and wrote up instructions for each of the ladies.

I'll be back tomorrow to share a special little gift I made my good friend Kris Holmes for her birthday this past Monday.  I hope you can stop back and join me for that share.

Keep Living Your Dream!

Friday, January 27, 2012

January Stamp Club

Happy Happy Happy Friday My Blogger Friends!  YAHOO - we made it through another week - HOT DAMN! It's now time to put your work shoes away and get your Stampin Groove going and let the party begin.  WELL......at the very least.....that is what this girl is going to do.  I have some serious plans to spend some QUALITY TIME in my studio with MYSELF.  Hope you are able to sneak off and do something that TOTALLY makes you smile this weekend.

Today I'm going to share what my Club Gals worked on last Saturday when they came over for Stamp Club.  Check these projects out ........
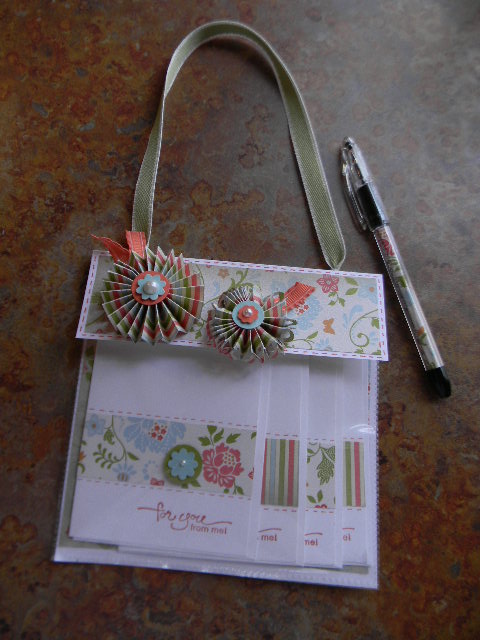
For Stamp Club we always make an A2 Card along with some type of 3-D project and a 3x3 card.  This month we incorporated our 3x3 card into our 3-D project and made them as a set.  Let me start out by sharing our 3-D project with you.
We embossed the Hello, Doily stamp onto Real Red cardstock - to both the front and the back of our box.  We added a small Rhinestone to the center of our stamped image to give a little bling to our box.
On the inside of our box we created these two adorable little 3x3 cards that tucked perfectly into our little box.  We used the Delicate Doilies stamp set and used clear embossing powder for the outer image and then stamped it a second time using white embossing powder and then punched out the center portion of our stamped image.  We added dimensionals to the white embossed portion to give some dimension to our little 3x3 card.
The clear embossing powder gave our Delicate Doilies image such a pretty shine and then by adding the white embossed image on top just created a whole new look for our stamped image.
We used the Decorative Label punch for the closure to the top of our little box.  And with the help of a Mini Library Clip and a tiny piece of 1/8" Real Red Taffeta Ribbon our box closure was complete.
 Our A2 card came straight from the Occasions Mini Catalog on Page 7.
We used the new Large Sizzlits Die for our A2 card.  Honestly........this die creates the most intricate doily design and help us to create the most amazing focal point for our card.
We die cut out the Beautiful Butterflies Bigz Die and then used the Vintage Wallpaper Embossing Folder to create a beautiful embossed image on our butterfly.
 And here's another close-up look at the Doily image that was die cut using the Large Sizzlits Die.
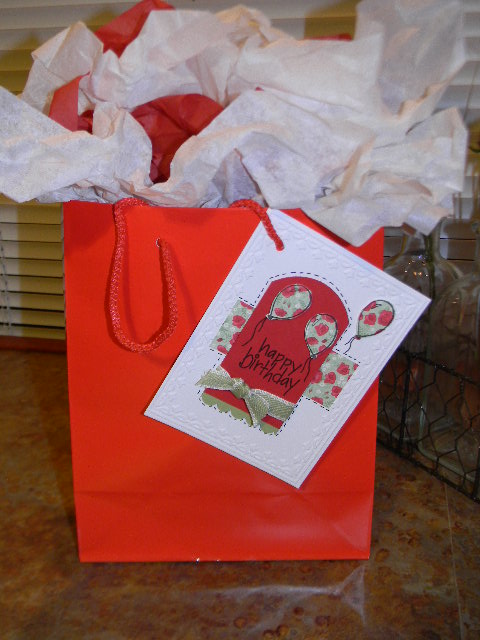
And one last look at all three of the projects!  All three projects turned out amazing and even though there were lots of steps and moments of tension with the embossing and folding of the box - all in all these projects turned out super cute and I think the gals had a good time at our first Stamp Club of 2012.

I'll be back tomorrow to begin sharing some of the cards that we made at Stamp Camp in January - Hope you can come back and join me for that share.  Keep Living Your Dream!

Thursday, January 26, 2012

Happy Birthday Jan!

Happy Happy Thursday My Blogger Friends.  It's Jan's Birthday today!
Today is my best friend Jan's birthday - and it's an extra special birthday at that.  She is turning 60 years young today!  (If you are reading this Jan - Head out to your mailbox and you will find your birthday bag hanging on your mailbox ........ Happy Birthday OLD FRIEND!)
I didn't make Jan a card - however, I did make her a tag that hung from the bag that I stuffed all my birthday goodies into.
 I know that Jan's favorite color is RED - so I started out with a bright red bag!
The birthday tag hung perfectly from one side of Jan's birthday bag.
On the inside I created two extra special gifts for Jan.  I can't take ANY of the credit for the gifts that I made for Jan ....... they were both created by Dawn Griffin at Dawn's Stamping Thoughts (http://www.dawnsstampingthoughts.net/).
 The first gift was a fun little 6x6 notecard purse holder that Dawn created a couple weeks ago.  She did an amazing video on this project - which made it super duper easy to create.  (LOVE Dawn's video Library)
I purchased the new Stampin' UP! Designer Rosette die that is in the Mini catalog and the rosette's for this project come together in a snap using that die.
The inside of the purse holder has four little notecards tucked inside .....
SERIOUSLY CUTE! 
 I used the "A Word for You" stamp set from Stampin' UP! for each of my notecards.
 I even decorated the barrel of a RSVP Pen to help coordinate Jan's entire gift.
Dawn also shared on her blog how to create a super duper fun bookmark.  AWESOME AWESOME PROJECT and with the help of some ribbon and diecut/punches this bookmark came together in a snap.
 I used the Designer Rosette die again to add a pretty rosette to my bookmark.
Here is how the bookmark comes apart.  All you need to do is release the button and the ribbon is released from the scallop closure and you are then able to reposition your bookmark location.
I just love how I was able to coordinate all the pieces to this fabulous birthday gift for Jan and seriously think she is going to love love love her gifts.
I managed to adhere a special little scallop birthday message to the inside cover of Jan's journal book before I wrapped it all up.
Sure hope Jan loves her birthday gift - It was created with lots of love and without a doubt - Is the perfect color for Jan and her new studio.  Happy Birthday Friend!

I'll be back tomorrow to share some cards that I've received - Hope you can come back and join me for that share.  Keep Living Your Dream!