Thursday, December 31, 2015

Tag Thursday Thank You Tag

Happy Thursday My Blogger Friends!
My blog post for today is Tag Thursday.  Today, I will feature a tag I created and show you how easy it is to use minimal supplies to create a SUPER FUN HOLDAY THANKS TAG.  Now that you have the details for this weeks Tag Thursday ....... Let's jump right in with my tag share for today.
I made several of these fun snowmen tags and attached them to my December customer orders.
I stamped my 'thank you' sentiment with VersaMark ink and used White Embossing Powder to give my tags a little WOW FACTOR.
My snowman came together with just a couple punches.....
And a pretty scarf was created with some 5/8" Chevron Ribbon.
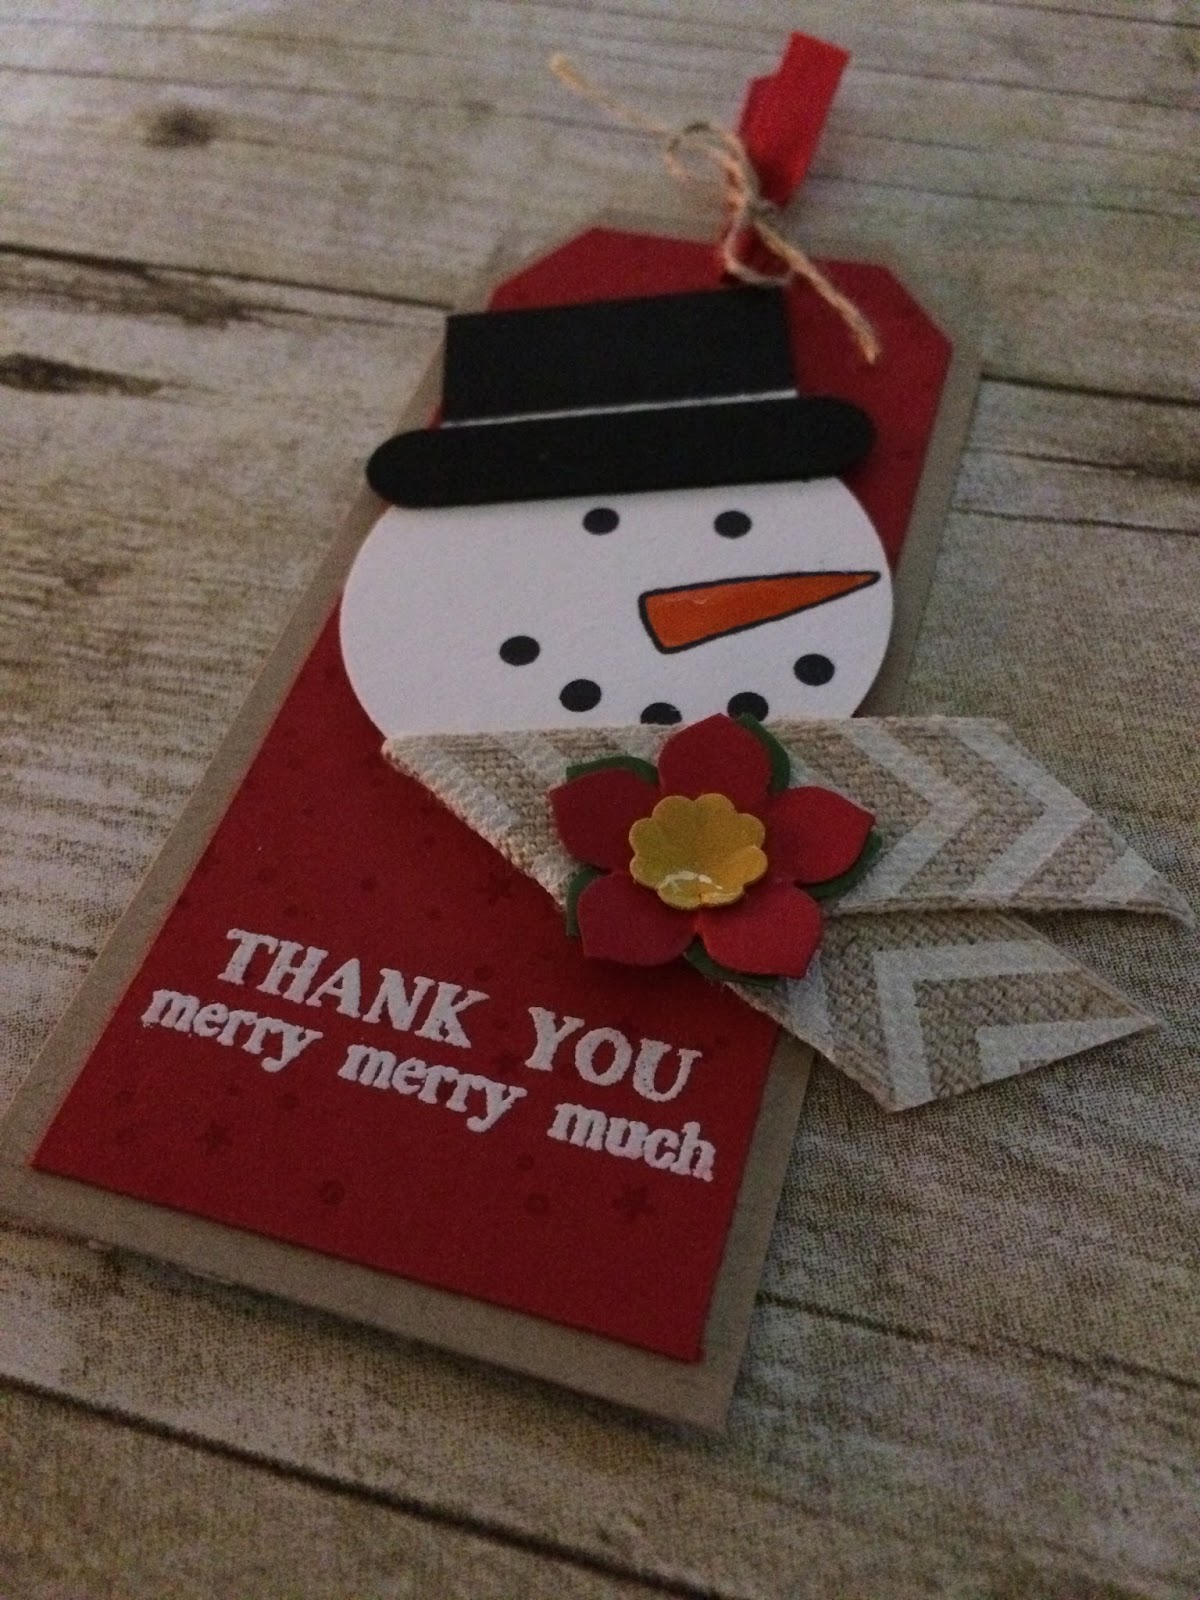
One final touch was adding a pretty poinsettia that was created with the help of the 'Petite Petals' punch and some Crystal Effects.
 
Thanks for joining me today!  I'll be back tomorrow to share some Friends Friday creations with you ........ Hope you can make plans to stop back and join me for that share.  Keep Living Your Dream!

Wednesday, December 30, 2015

Wine Down Wednesday Going Global Card

Happy Wednesday My Blogger Friends!
My blog post for today is Wine-Down Wednesday.  I'm hoping that my middle of the week card feature for today will offer you some inspiration and provide you with some motivation to keep you moving through your busy week.  Let's jump right in with my card share for today........
This is a card front that we made over at the San Diego OnStage Event.
We used the new 'World Traveler' Textured Impressions Embossing Folder on a panel of Sahara Sand.  We didn't run our Sahara Sand cardstock through the Big Shot.......Rather we inked up the folder and then placed our cardstock into the folder and used our fingers to press the embossed image onto our Sahara Sand cardstock.
After that we used the "Big Dipper" image from the 'Going Global' set and stamped that directly onto our cardstock.
We also used the globe image from this same set and stamped that onto a piece of the "Going Places" Designer Series Paper Stack.  We used the 2" circle punch to punch out our globe image.
The sentiment was stamped onto a piece of Very Vanilla cardstock from the "Going Global" stamp set.
All that was left to do was add two different panels of DSP from the "Going Places" stack and this card was done.
It honestly is a quick and easy card and makes for a wonderful masculine card (which we are always in need of).

Thanks for joining me today!  I'll be back tomorrow to share a Tag Thursday creation with you ........ Hope you can make plans to stop back and join me for that share.  Keep Living Your Dream!

Tuesday, December 29, 2015

3-D Tuesday Light Bulb

Happy Tuesday My Blogger Friends!
My blog post for today is 3-D Tuesday.  That means today I have a fun little 3-D project to share with you.  This project was SO MUCH FUN to not only make.....but to give away to a few people on my Christmas list.  It features lots of product from both the Stampin' UP! Annual Catalog as well as the Holiday Catalog.  Let's jump right in with my project share for today.
How's this for a fun packaging idea......
It's a plastic light bulb that unscrews from the top and you can add all kinds of treats and treasures to the inside.
I stamped a fun little sentiment from the 'Oh, What Fun' stamp set (in the Holiday Catalog) ....... And then I punched it out with the Decorative Label punch and adhered that to a 2" Real Red circle.
To pretty up the packaging of my light bulb ........ I attached some Tip Top Taupe 1" Dotted Lace Trim around the neck of my light bulb.......
And then attached some of the Real Red Pompom Trim and Cherry Cobbler Baker's Twine to the front.
Talk about a real SHOW STOPPER kind of packaging ........ Every single person I gave this gift to just fell in love with it.
 
Thanks for joining me today!  I'll be back tomorrow to share a Wine Down Wednesday creation with you ....... Hope you can make plans to stop back and join me for that share.  Keep Living Your Dream!

Monday, December 28, 2015

Mix It UP! Monday Botanical Blooms Upgrade

Happy Monday My Blogger Friends!
Today is Mix It UP! Monday and I have an upgraded version of the card I shared with you yesterday.  I used the exact same product that was used to create yesterday's card ....... but added a couple additional products to bring this card up to the next stamping level. 
Here's a recap of my Spot-Light Sunday card on the left..........
And my Mix-It-UP! Monday card on the right.
My card today is a traditional A2 card ....... and it opens landscape style.
I used the 'Botanical Gardens Designer Series Paper' to create my largest flower from the 'Botanical Builder Framelits Dies'.  The center for my flower uses Hello Honey cardstock and the center is stamped with Cajun Craze ink.
I repeated the Hello Honey border on my Whisper White panel......
And that Whisper White panel sits on top of my 'Botanical Gardens Designer Series' panel.
I added a panel of Cajun Craze cardstock and Mossy Meadow cardstock to the left hand section of my card .........And separated the fibers from the Hello Honey 5/8" Striped Cotton Ribbon and added that around Cajun Craze panel.
My sentiment was stamped with the 'Something to Say' set and a finishing touch was adding three Crushed Curry Candy Dots right below my stamped sentiment.
So there you have it friends ......... Two Botanical Bloom cards that basically uses the same product but result in two different types of cards.  Which one do you like the best?

Thanks for joining me today!  I'll be back tomorrow to share a 3-D Tuesday project with you ........ Hope you can make plans to stop back and join me for that share.  Keep Living Your Dream!

Sunday, December 27, 2015

Spot Light Sunday Botanical Blooms

Happy Sunday My Blogger Friends!
Today is Spotlight Sunday ....... And I have a card I created using product from the new 2016 Stampin' UP! Occasions Catalog.  This card uses several new products that will be available on January 5, 2016 when the 'Handmade from the Heart' Occasions Catalog is released.  Let's jump right in with my card share for today.......
How FABULOUSLY BEAUTIFUL is this card!
I started out by creating my botanical flower with the help of the Botanical Builder Framelits Dies.
My flower was made with Cajun Craze cardstock that was stamped with one of the stamps in the 'Botanical Blooms' set.  My center flower was created with Hello Honey cardstock and received a pretty Cajun Craze center.
My sentiment is from the new 'Rose Wonder' set.....And I created a stamped border for the top and bottom section of my card with Hello Honey ink.
I adhered a piece of the Botanical Gardens Designer Series Paper to the inside of my card ....... And grabbed the 'Botanical Blooms' set to fill in each of the pieces on this 'fill-in' Designer Series Paper.
Here's a close-up of my Designer Series Paper.  As you can see.........there are several coordinating stamps that help you fill-in the centers of this Designer Series Paper.
This card does not open as a traditional A2 card.......But it is a traditional A2 card size.  I trimmed off approximately 3" from the front of my card and had the card open to the right.  The small 2-1/2" white section is where I will write my message for this card.
So there you have it friends.......A happy card that just screams 'beautiful blessings'.

Thanks for joining me today!  I'll be back tomorrow to share a Mix-It-UP! Monday version of this card with you ........ Hope you can make plans to stop back and join me for that share.  Keep Living Your Dream!

Saturday, December 26, 2015

Paper Pumpkin Saturday OCTOBER Kit

Happy Saturday My Blogger Friends!
My blog post for today is Paper Pumpkin Saturday ........... And do I have a fun card to share with you!  This card was made with the October Paper Pumpkin kit.  I thought outside the Paper Pumpkin box on this card ........ And I'm thrilled with the way this card turned out.  Let me share that card with you now....... 
I used a Sahara Sand base card to create this card.
My 'Thanks' sentiment was stamped with Smoky Slate ink.....
And I used the floral DSP panel that was included in this kit to punch out my 1" circles.
Then I matted each of the circles with a Basic Gray 1-1/4" circle and topped each off with a 1-3/8" circle.  I used Calypso Coral, Crushed Curry and Old Olive to punch out my 1-3/8" circles.
This is one of those cards that you can make a whole bunch up ........ And not stamp the sentiment until you need a card for a special occasion.
 
Thanks for joining me today!  I'll be back tomorrow to share a Spot Light Sunday card creation with you ........ Hope you can make plans to stop back and join me for that share.  Keep Living Your Dream!

Friday, December 25, 2015

Friends Friday Christmas Cards

Merry Christmas My Blogger Friends!
My blog post for today is Friends Friday.  On Friday's, I have the honor of spot-lighting some of the fabulous cards that I received from Friends ....... Fellow Demonstrators ........ and Family.  Each of these card creations are works of art........and it is with great pleasure that I share them here with you.  Let me share some Christmas cards I received from a few of my VERY TALENTED friends.......
 First up is the GORGEOUS card I received from my good friend Mary Fish.
Next up is the FABULOUS card I received from my good friend and fellow demo Lynn Gauthier. 
 And here's the inside of Lynn's card.
 Check out this SUPER PRETTY card that my stamping friend Liz made.
And my last card share today is this OVER THE TOP WOW CARD that my best buddy Debbie Hill made for me.

Thanks for joining me today!  I'll be back tomorrow to share a Paper Pumpkin Saturday card with you ......... Hope you can make plans to stop back and join me for that share.  Keep Living Your Dream!

Thursday, December 24, 2015

Tag Thursday - Traditional Tag

Happy Thursday My Blogger Friends!
My blog post for today is Tag Thursday.  Today, I'm featuring a SUPER FUN HOLIDAY TAG that is easy to put together ........ and looks SUPER AWESOME on your holiday packages.  Let's jump right in with my tag share for today.
How's this for a great traditional holiday tag?
I began with a traditional Real Red 2"x4-1/4" tag.
I added a panel of 'Season of Cheer' Designer Series Paper across the center of my tag......
And used the 'Perfect Pines' Framelits Dies to die-cut out my Old Olive tree.
To top off my tag ....... I used some Whisper White 1/4" Cotton Ribbon and tied it off with some Old Olive Baker's Twine.
 
Thanks for joining me today!  I'll be back tomorrow to share some Friends Friday creations with you ........ Hope you can make plans to stop back and join me for that share.  Keep Living Your Dream!

Wednesday, December 23, 2015

Wine Down Wednesday - Pocket Card

Happy Wednesday My Blogger Friends!
My blog post for today is Wine-Down Wednesday.  For this weeks middle of the week card feature, I will offer you some inspiration and provide you with some motivation to keep you moving through your busy week.  Let's jump right in with my card share for today........
How about making some of these pocket cards this holiday season ........ And spreading some holiday cheer along the way.
The best part of this pocket card is you can make the pocket any depth that you want.
I made my pocket approximately 1-1/2" deep - and that allowed me to tuck a gift card into the bottom of my 'Merry Christmas' insert and still have plenty of room to write a fun little Christmas message.
I punched my Santa out from the 'Home for Christmas' Designer Series paper ....... and matted my Santa with a Real Red circle.
 These pocket cards come together quickly ....... For some last minute gift giving fun.
 
Thanks for joining me today!  I'll be back tomorrow to share a Tag Thursday creation with you ........ Hope you can make plans to stop back and join me for that share.  Keep Living Your Dream!