Friday, March 31, 2023

There's No One Like You

Happy Friday My Blogger Friends!
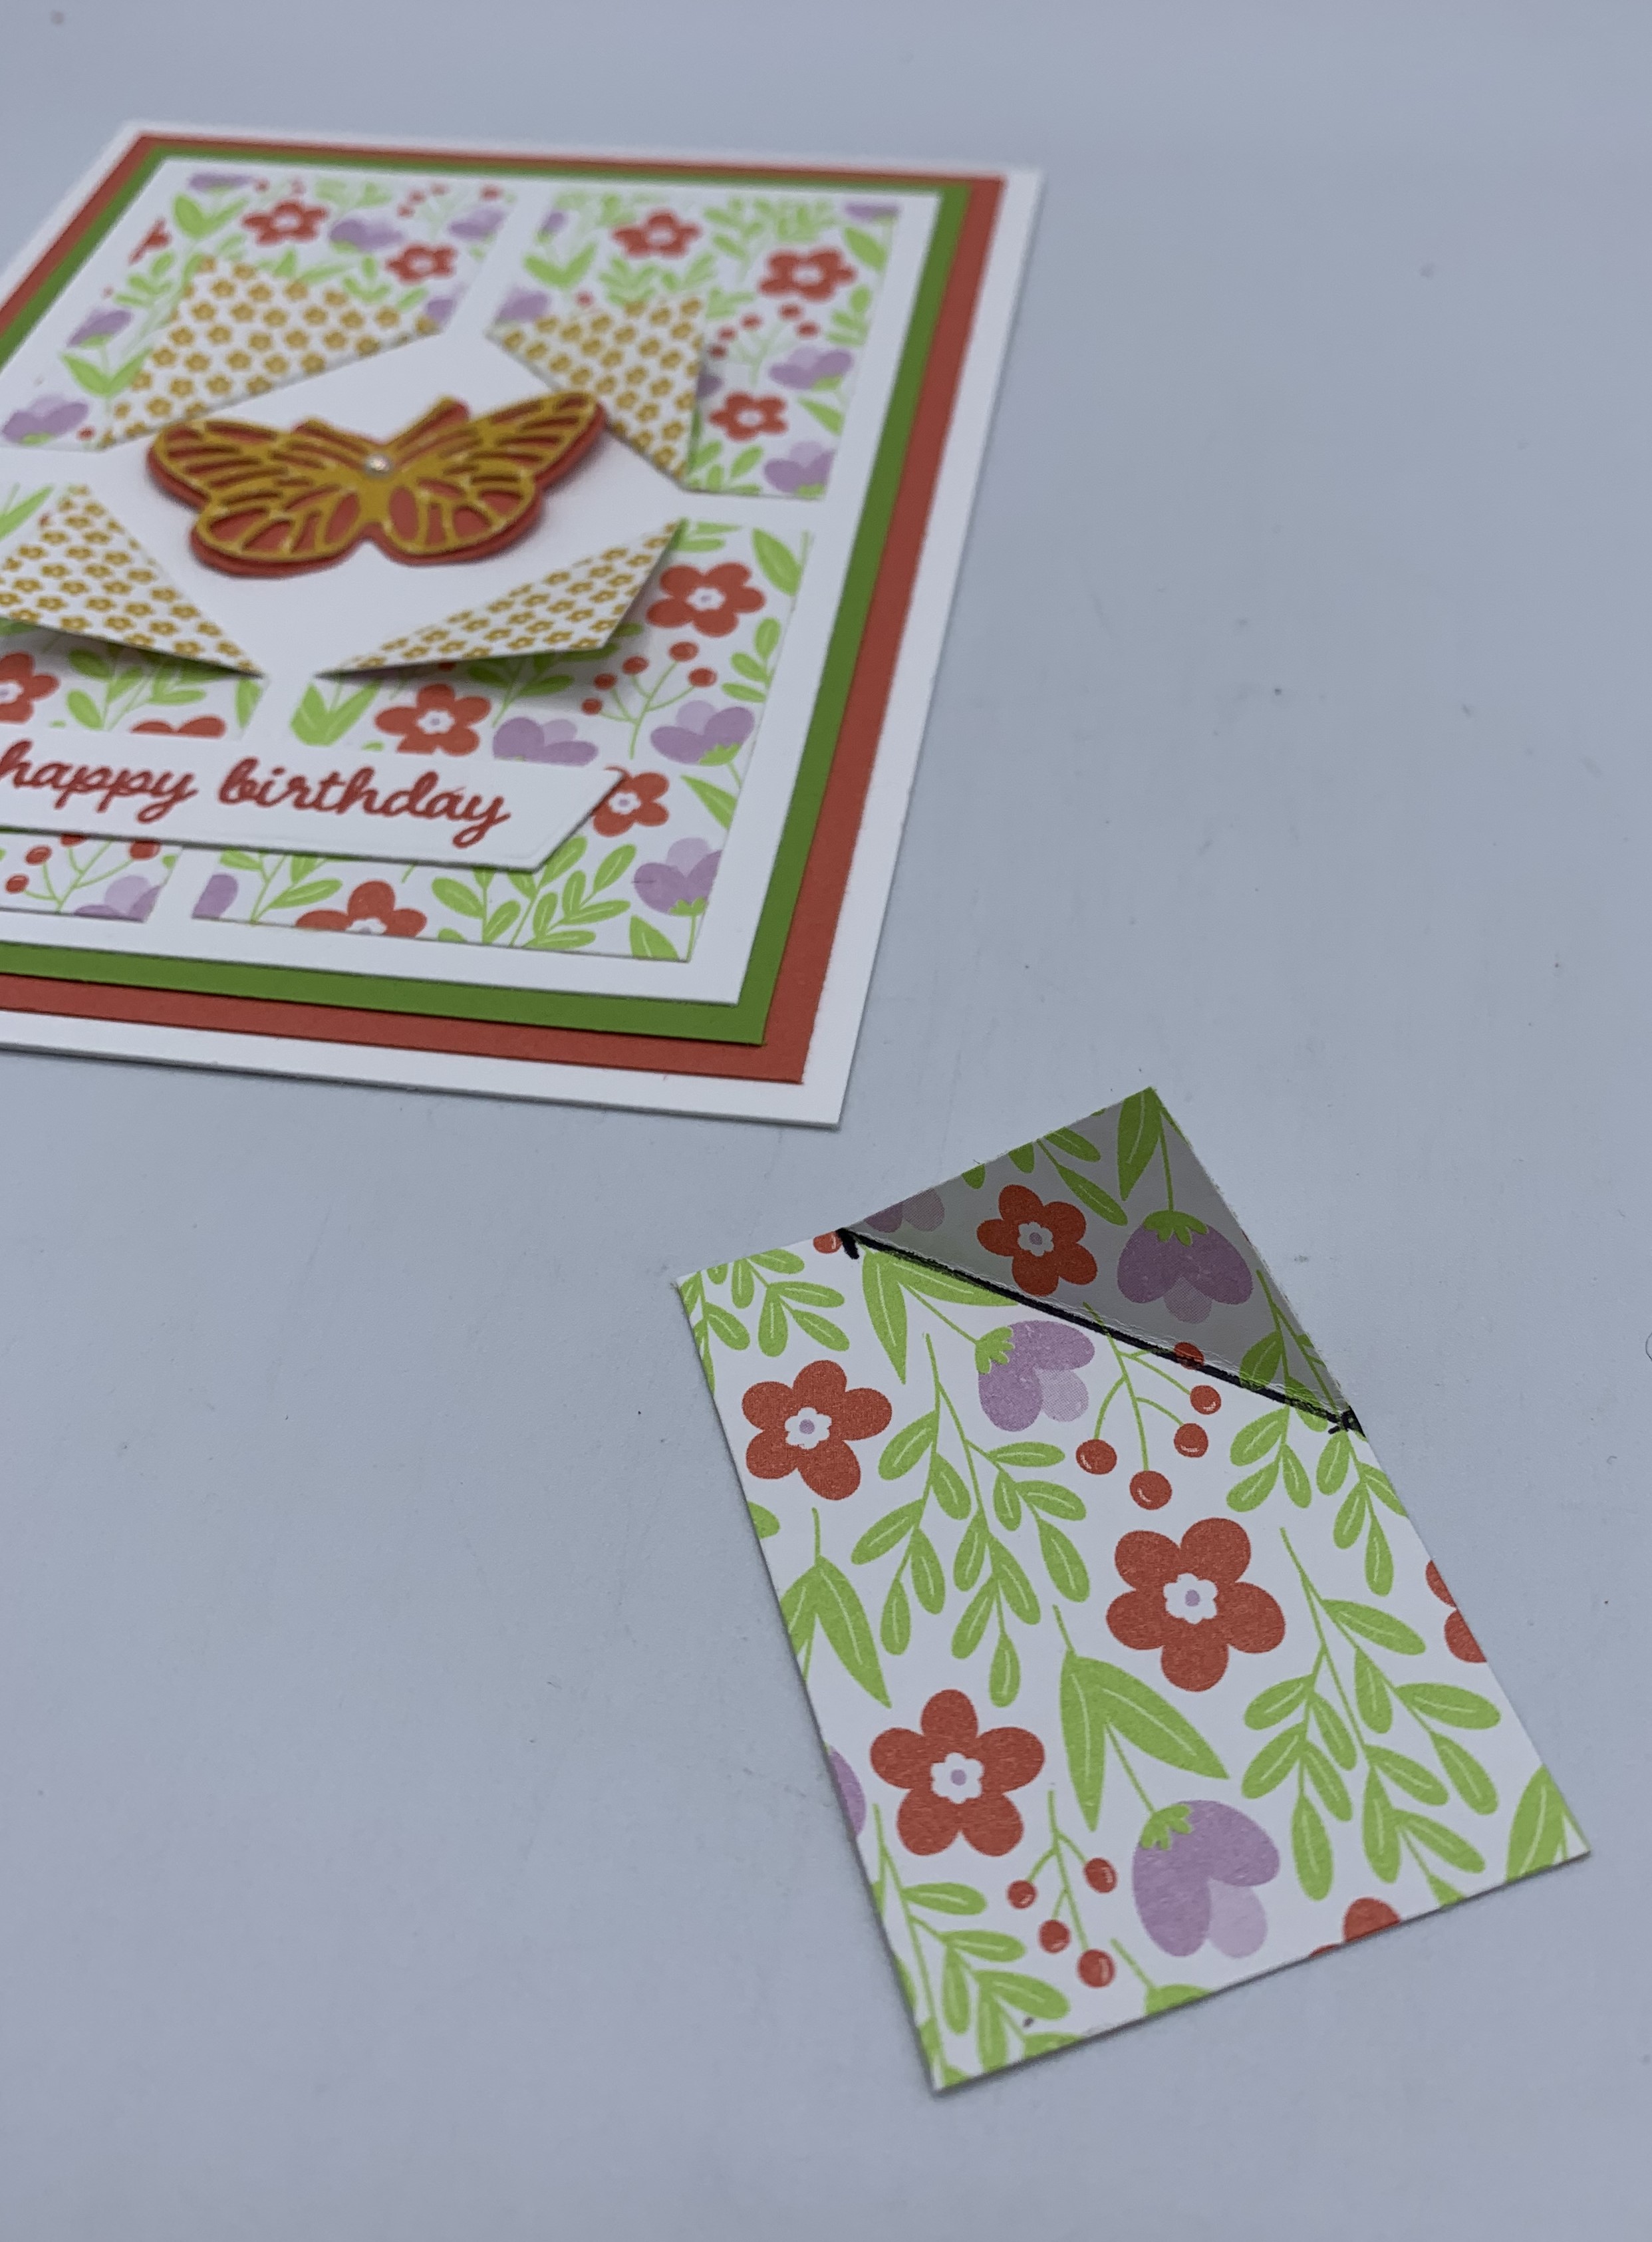
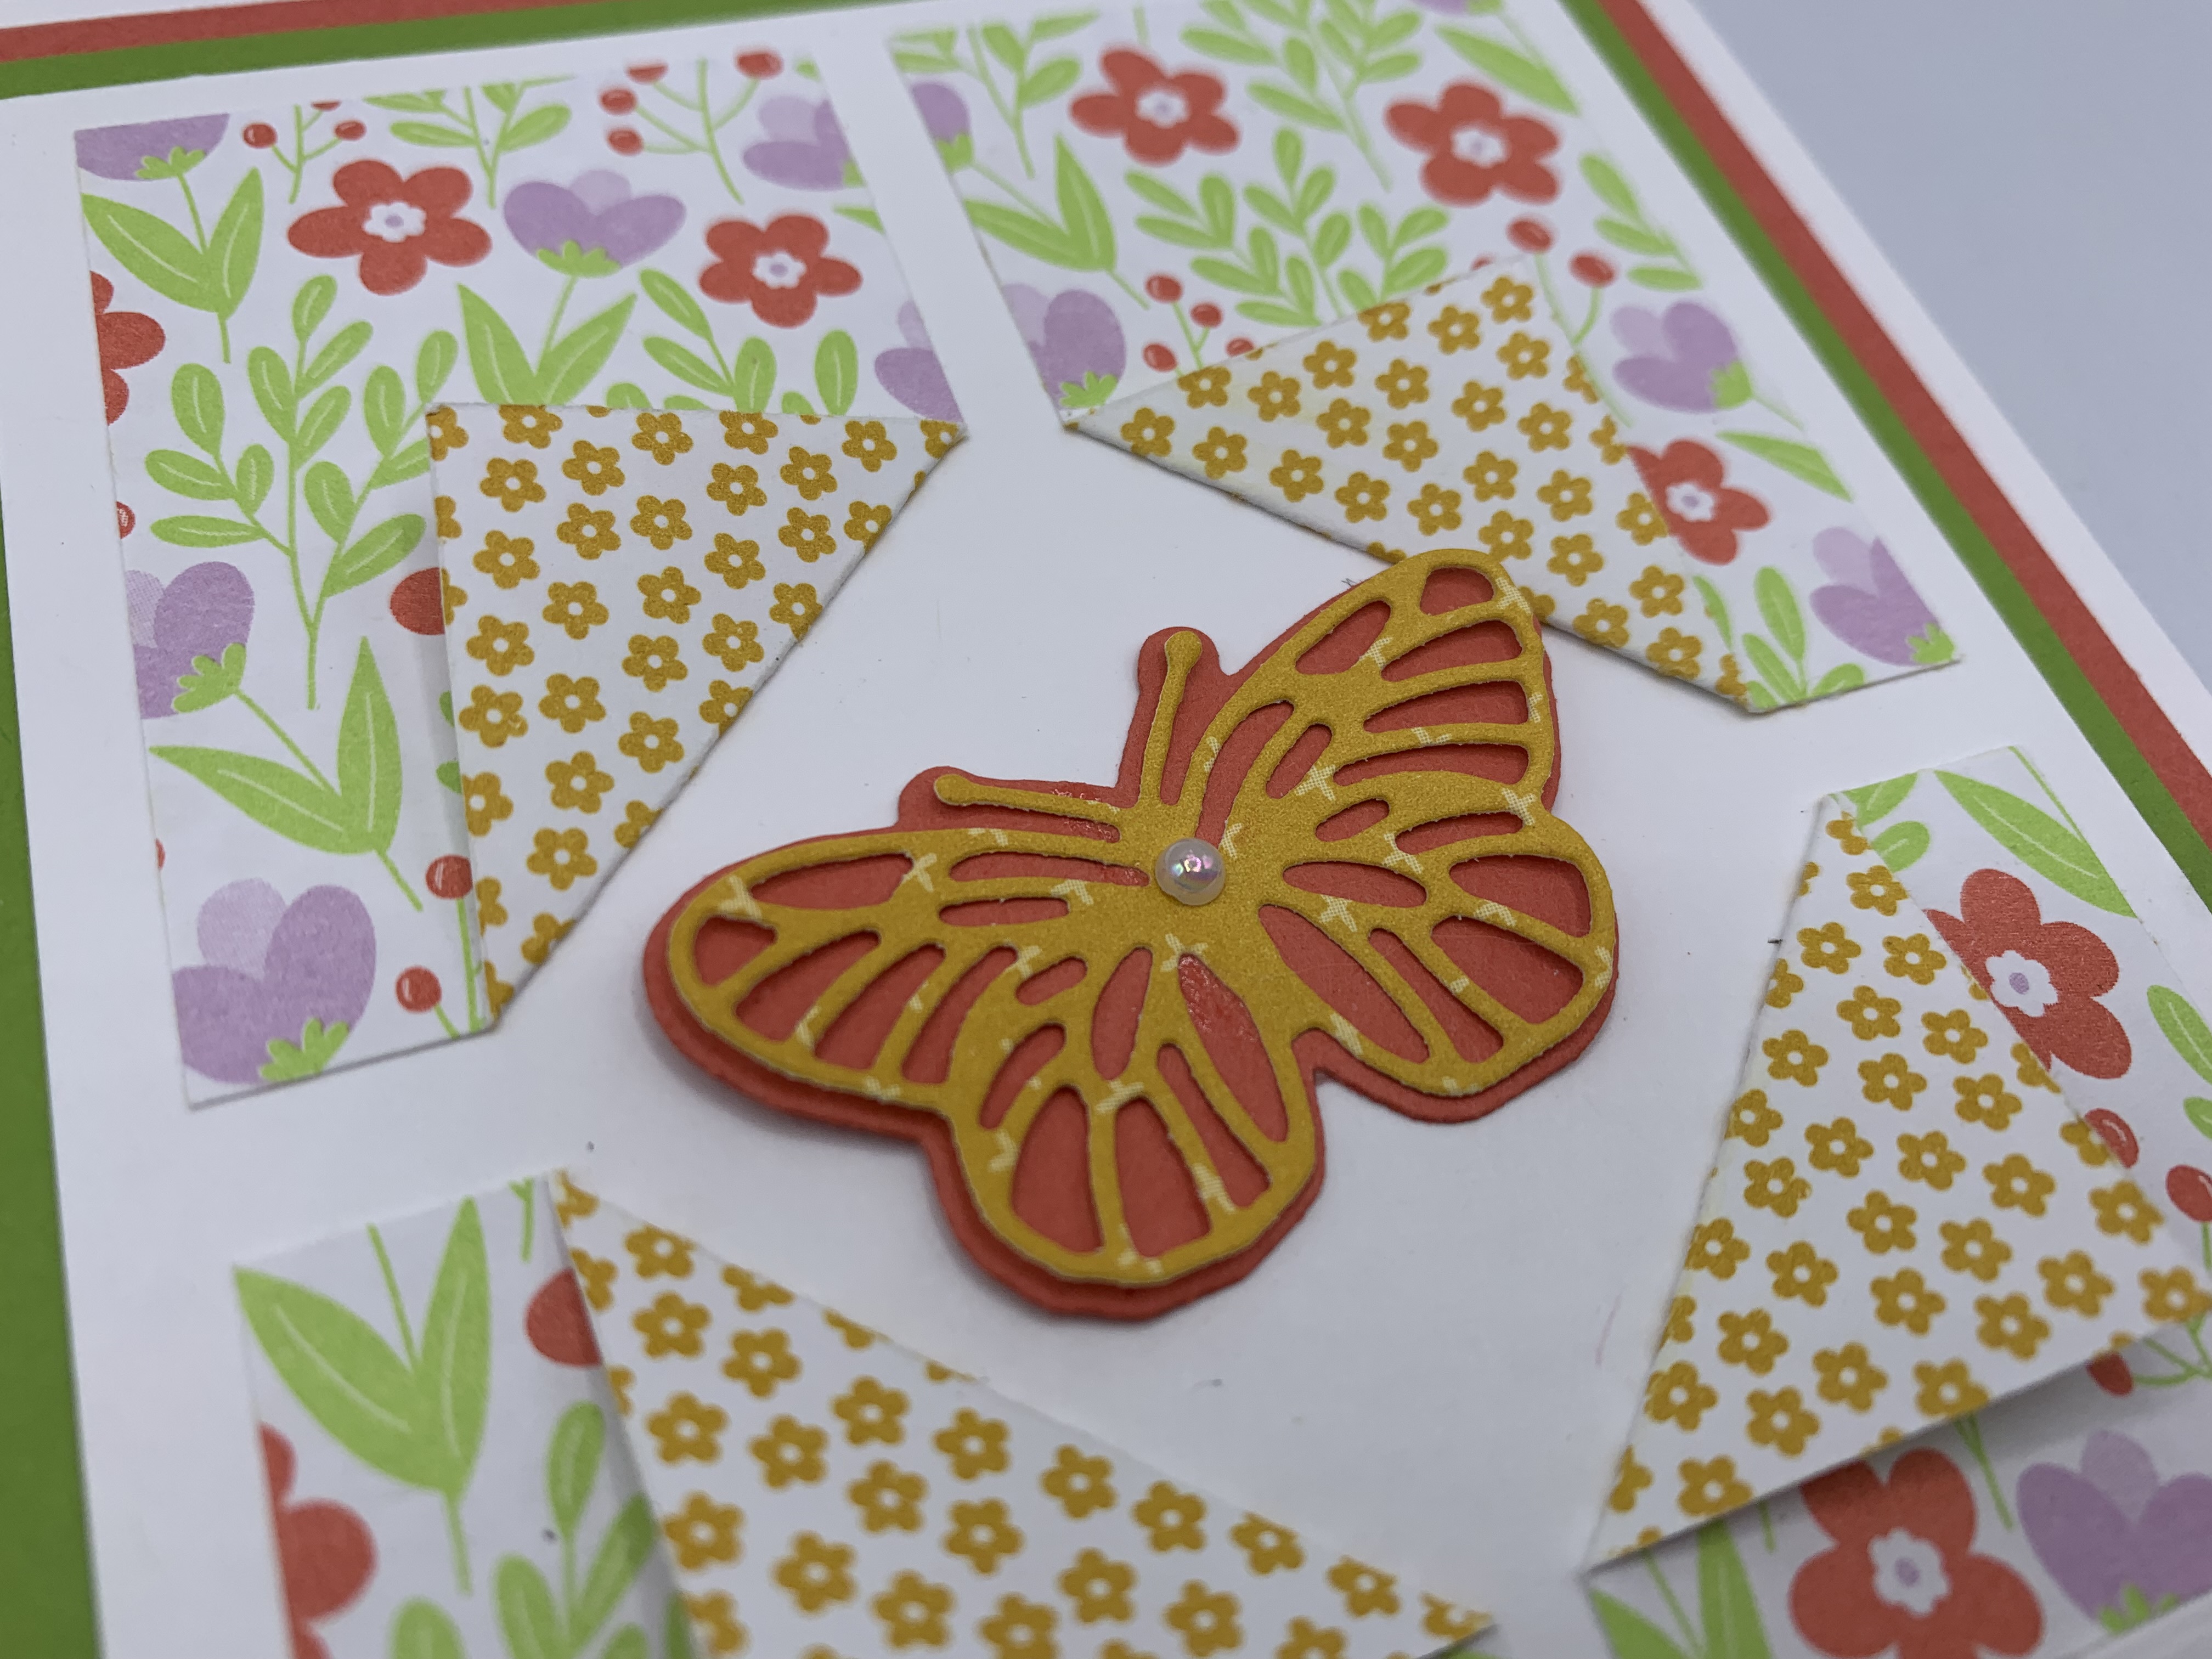
Today is Fun Fold Friday and that means I have a special little Fun Fold Card to share with you. Let's kick off this Fun Fold Friday share right now.........
Might just be the fact that I LOVE LOVE LOVE anything PINK ...... Or it might be that I'm LOVING how this Fun Fold card turned out.  Either case ...... I couldn't be HAPPIER with the way this card turned out.
I started off with a Polished Pink base card that was 5-1/2" x 11".  I scored that piece at 1-3/4", 3-1/2", 5-1/4" and 7".
I used both White cardstock and 'Awash in Beauty Designer Series Paper' on my entire project.
My sentiment was stamped from the 'Happy Labels' set.....
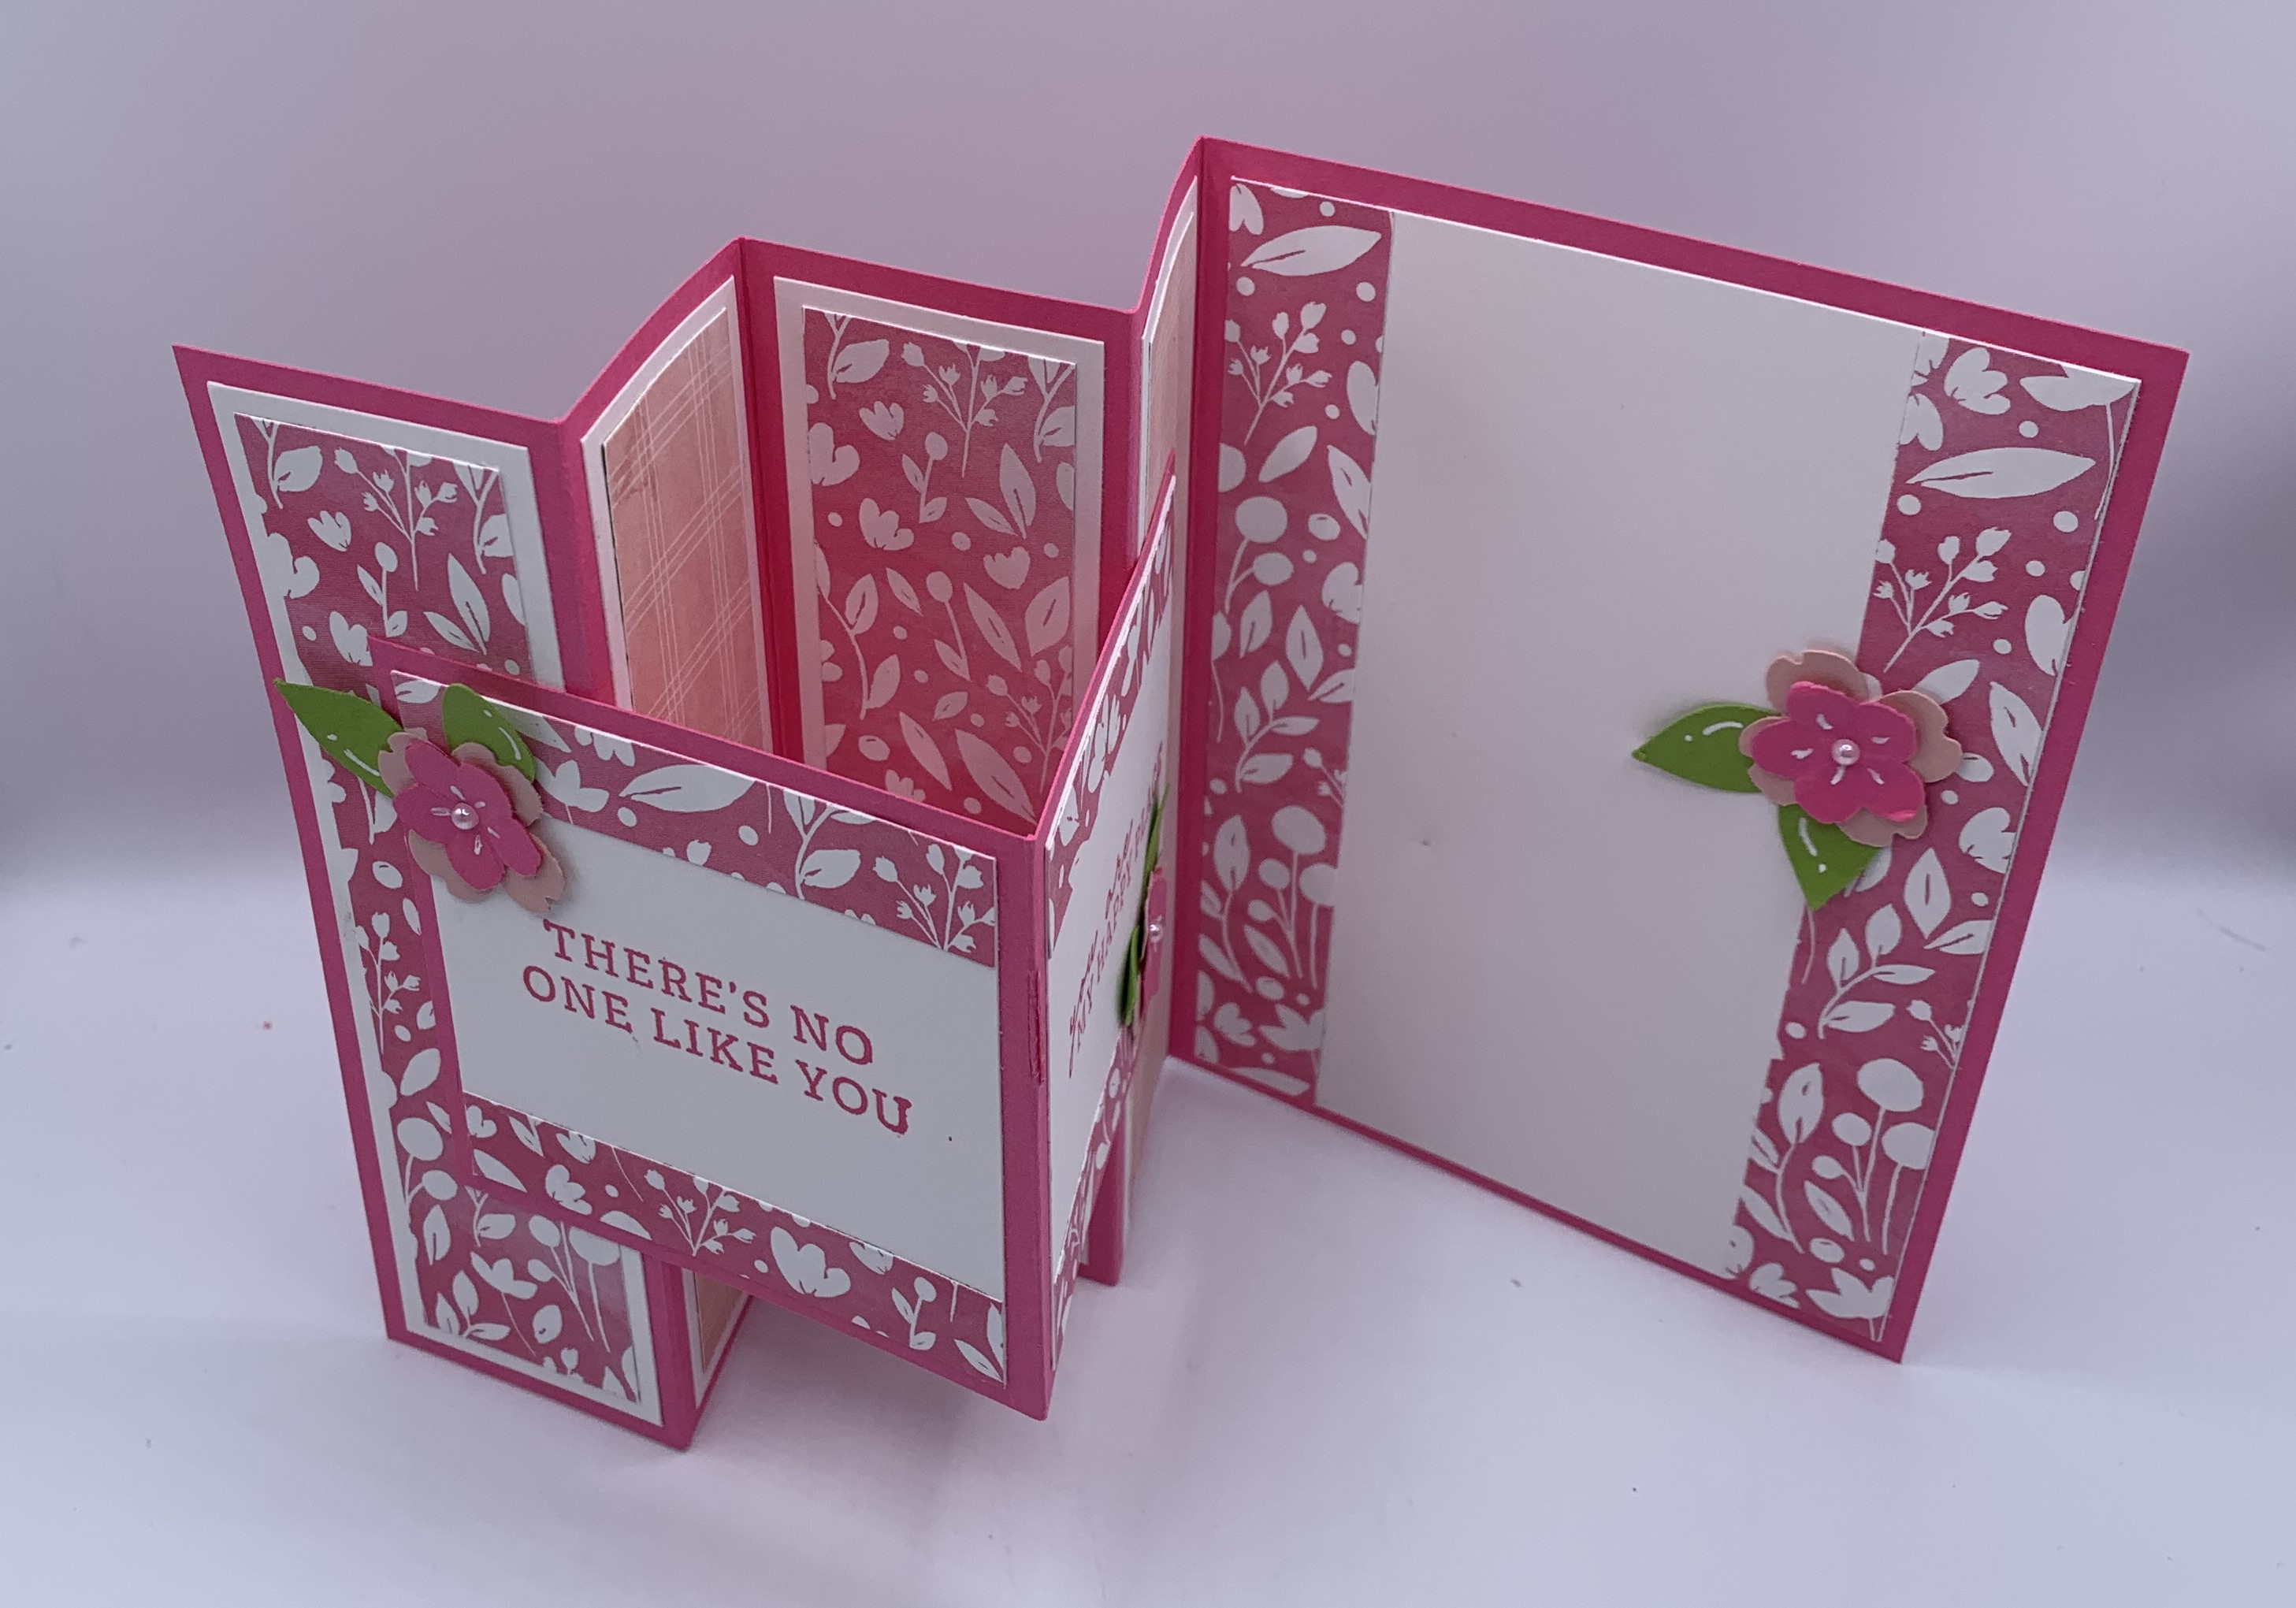
And here is how the card looks when it is opend up.
My sentiment piece is reveals on the front of my card....
And I used that same set to add an additional sentiment on the inside of my card.
The secret behind this card is adding the center panel only to the front and inside folded flap.
SO ..... What do you think my friends.
Hope you give this card a try.......
And you have FUN making one of these.

Thanks for joining me today!  I'll be back tomorrow to begin sharing a special new Sweet Treat Saturday release with you ........Hope you can make plans to stop back and join me for that share.  Keep Living Your Dream!

Thursday, March 30, 2023

Life Is Better Tag

           Happy Thursday My Blogger Friends!
My blog post for today is Tag Thursday.  Today, I will feature a tag I created and show you how easy it is to use minimal supplies to create a SUPER PRETTY TAG.  Now that you have the details for my Tag Thursday creation for this week ........ Let's jump right in with my tag share for today........
I started this tag off with a 2-1/2" x 4" White base.  I cut strips of the 'Country Floral Lane Designer Series Paper' into 1/2" x 2-1/2".  I ended up cutting a total of 8-pieces of this DSP and then got busy adhering them to the front of my tag.
Each panel was stacked directly over the DSP below it ..... And I did this until I had my entire tag covered with DSP.
Then I pulled out my 'Peekaboo Farm' stamp set and stamped my sentiment directly onto the 2nd and 5th DSP.
I did crop out a total of 7-hearts from the 'Give It A Whirl' dies and arranged those onto the front of my tag.  To finish off each heart ..... I added thin layer of 'Fine Tip Glue' to the top and that gave me the PRETTY WOW FACTOR I was looking for.
I topped my tag off with some 'Sweet Sorbet 1/8" Metallic Woven Ribbon' and this tag was DONE in NO TIME FLAT!!!!
SO....What do you think my friends!!!!

Thanks for joining me today!  I'll be back tomorrow to share a Fun Fold Friday creation with you ........ Hope you can make plans to stop back and join me for that share.  Keep Living Your Dream!

Wednesday, March 29, 2023

Birthday Card

Happy Wednesday My Blogger Friends!
My blog post for today is Wine-Down Wednesday.  My middle of the week card feature for today will hopefully offer you some inspiration and provide you with some motivation to keep you moving through your busy week.  Let's jump right in with my card share for today........
There are times when I make a card and I just stand back and think ...... HOW WONDERFUL!!!!  My card share for today captures that very moments.
I started off with a White base card that was 4-1/4" x 11" and is scored at 5-1/2".  And I added a panel of Night of Navy (4" x 5-1/4") to the top. 
And then I added a layering panel of White cardstock (1-1/2" x 5-1/4") and topped that piece off with a Night of Navy panel (1-1/4" x 5-1/4") and positioned that panel towards the bottom portion of my card.
The finishing layers were two panels of White cardstock (1-1/8" x 3-1/8") and topped both pieces off with a 1" x 3" panel of 'By The Bay Designer Series Paper'.
My sentiment is from the 'Something Fancy' stamp set and that is stamped directly onto a circle that was cropped out using the 'Stylish Shapes Dies'.  All that was left to do was add three 'Adhesive-Backed Milky Dots' to the bottom of my stamped sentiment.
And this card was called DONE!!!!
What do you think my friends.

Thanks for joining me today!  I'll be back tomorrow with a Tag Thursday creation to share with you ........ Hope you can make plans to stop back and join me for that share.  Keep Living Your Dream! 

Tuesday, March 28, 2023

Just For You Box

Happy Tuesday My Blogger Friends!
My blog post for today is '3D TUESDAY'.  That means today I have a fun little 3-D project that I created and want to share with you.   This project was SUPER FUN to create, and I want to jump right in and share that project with you now.
This box was created to hold the 'Baker's Twine Pack' in the new Mini Catalog.  To create the base I used at 5" x 6-1/2" piece of Pool Party cardstock.  I scored that piece at 1" on all four sides.
For the top portion of my box ..... I used a piece of White cardstock and that was scored at 4-1/16" x 5-1/2".  I used the 'Hand-Drawn Dots Big Stamp' to get the fun polka-dot pattern onto that piece.
I used the 'Tailor Made Tags' Dies for my tag  ..... And the 'Celebrating You' stamp set for my sentiment.
I wrapped some 'Pool Party Grosgrain Ribbon' that was colored with my Bermuda Bay Stampin' Blends around the top of my box and tied it up into a pretty bow.
When the ribbon is slipped off ......
You receive the REAL FUN ..... A package of YUMMY Baker's Twine on the inside.
So ..... There you have it friends.....
Don't you just LOVE IT!!!

Thanks for joining me today!  I'll be back tomorrow to share a Wine Down Wednesday card with you ........ Hope you can make plans to stop back and join me for that share.  Keep Living Your Dream!

Monday, March 27, 2023

Happy Birthday Upgrade

Happy Monday My Blogger Friends! 
Today is Mix-It-UP! Monday, and I have an upgraded version of the card I shared with you yesterday.  I used the exact same product that was used to create yesterday's card ..... But I changed things up to bring this card up to the next stamping level.
Here's my Spotlight Sunday card from yesterday on the TOP...
And my Mix-It-UP! Monday upgraded card for today on the BOTTOM....
For my upgraded card I kept the White base card (5-1/2" x 8-1/2" scored at 4-1/4") but I added three additional layers to the front of my upgraded card.
I added a Calypso Coral panel (4" x 5-1/4") and a Granny Apple Green panel (3-3/4" x 5") and topped it all off with a White panel (3-1/2" x 4-3/4").
I used that White panel to build my 'Butterfly Kisses' Designer Series Paper' onto.  Each DSP panel is 2-1/8" x 1-1/2" and each one is folded over at one corner to create a flap opening in the center of my card.
Here is a close-up of how each DSP was folded.  I measured down 1" on the two sides of each DSP panel ...... and used that as my guide to create the flap on each DSP panel.
The flap opening allowed me to add a layered 'Brilliant Wings Dies' piece right in the center.
Here's a close-up of the BEAUTIFUL butterfly I added to the center of my card.
My sentiment was stamped onto a banner flag from the 'Something Fancy Dies' and I used the 'Timeless Tulips' stamp set to create that sentiment.
So, what do you think my friends....
Do you have a favorite???

Thanks for joining me today!  I'll be back tomorrow to share a Wine Down Wednesday card with you ........ Hope you can make plans to stop back and join me for that share.  Keep Living Your Dream!

Sunday, March 26, 2023

Happy Birthday

Happy Sunday My Blogger Friends
Today is Spotlight Sunday ....... And I have a card I created using product from the 2023 Stampin' UP! Mini Catalog.  This card uses several products from that new catalog ........ And I'm thrilled with the way it turned out.  Let's jump right in with my card share for today..........
I started my card off with a White base that measures 5-1/2" x 8-1/2" and is scored at 4-1/4".  
I added a 4" x 5-1/4" panel of Calyso Coral cardstock to the top of that base card....
And then I added a panel of Granny Apple Green (2-1/2" x 5") and a panel of the 'Butterfly Kisses Designer Series Paper' (2-1/4" x 5") to the top of that.
Before I adhered that panel down to the top of my card .... I wrapped some 'White 1/4" Crinkled Seam Binding' that was colored with my Calypso Coral Stampin Blends.
My sentiment is from the 'Timeless Tulips' set and that was stamped onto a panel of White cardstock and I used Calypso Coral ink.
I cropped out three butterflies from the 'Brilliant Wings Dies' and I used the 'Butterfly Kisses Designer Series Paper' for each of those.
So, there you have it friends.....
What do you think???

Thanks for joining me today!  I'll be back tomorrow to share an upgraded version of this very card with you ...... Hope you can make plans to stop back and join me for that share.  Keep Living Your Dream!

Saturday, March 25, 2023

Easter Carrot Chocolate Treat Holder

Happy Saturday My Blogger Friends!
Today I have another Saturday Sweet Treat packaging idea to share with you.  This project is a SUPER YUMMY, sweet treat packaging.  Let me jump right in with my share.
My project for today was my version of the holder I spotted on either Pinterest or UTube.  I know the original was shared by Elvira Hortne (???) but I can't seem to locate a link.  I will do my best to duplicate the steps for this DARLING treat holder.
I started with a piece of Pumpkin Pie cardstock that measured 5-1/2" x 8-1/4".  I scored with the 5-1/2" side at the top at 3/4" on both ends.  Then I scored on the 8-1/2" side at 2-1/4", 3", 5-1/4" and 6".
I added a White cardstock panel to the top flap of my holder .... And that measured 3-7/8" x 2-18".
My sentiment piece uses the 'Easter Bunny' stamp set and that is layered onto several pieces cropped out from the 'Stylish Shapes Dies'.
I used the 'Brilliant Wings Dies' to crop out the ticket opening on the top flap.....
And that allowed an opening for my butterfly to assist in opening this box.
Once you pinch together the butterfly wings .... I allows you to slip open your treat holder.  Once that is opened .... It reveals a 'Stylish Shapes Dies' window. 
I tucked four YUMMY chocolate carrot treats inside and they fit PERFECTLY inside.
Here is a template of how my 5-1/2" x 8-1/4" piece of Pumpkin Pie looks when I got all the cutting done.
And there you have it friends.  It's one of those treat holders that is a tad bit fussy to get together.  But once you create a template.....you will be cranking these little cuties out in SUPER FAST MOTION.

Thanks for joining me today!  I'll be back tomorrow to share a Spotlight Sunday creation with you ........ Hope you can make plans to stop back and join me for that share.  Keep Living Your Dream!