Thursday, January 31, 2013

My Birthday Card to Jack

Happy Thursday My Blogger Friends

Today I've made plans to take a road trip with my good friend Kris  We are heading down to Blue Moon Scrapbooking to see what amazing and fun new product they have in stock.  I'm totally LOVING the new Pop n Cut Sizzix Dies and my fingers are crossed that they might have some in stock ....... and I can pick up a few new toys.

My share today is the birthday card I made Jack for his 80th Birthday.  Check out this SUPER FUN and SUPER HAPPY Birthday card..............
I got this FUN birthday card idea from Connie Stewart......
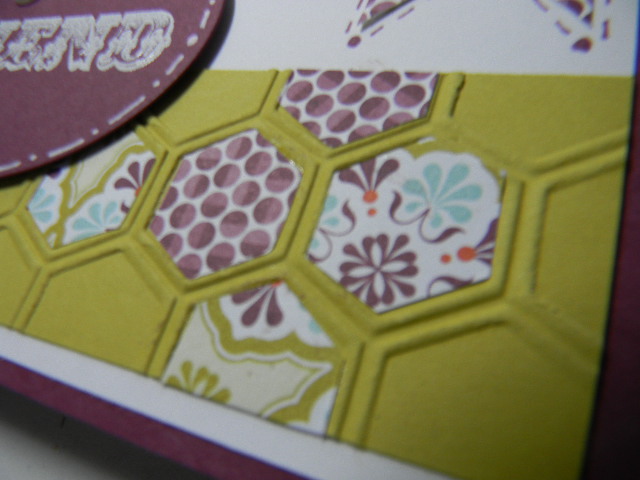
I made my card with a panel of Old Olive cardstock that was run through the Big Shot using the Perfect Dots Embossing Folder......
I then grabbed the ....... BRIGHTS DSP pack and pulled out FIVE bright colors and created some banners.....
Each was secured around a piece of White Baker Twine and the three banners in the center of my card had small stars stamped/punched and secured to the center of those banners.
I use the stamp set "Sassy Salutations" to create my Happy Birthday sentiment and was able to call this one DONE in a FLASH!  Such a fun and happy card and without a doubt.....Jack SMILED when he opened his card.
 
Thanks for joining me today.....I'll be back tomorrow to share more of the birthday cards that Jack received ....Hope you can join me for that share.  Keep Living Your Dream!

Wednesday, January 30, 2013

New Product Card #7

Happy Wednesday My Blogger Friends!
Todays card is another new product share card......and one using LOTS of new product from the Spring Catalog.  If there is one product that I could not be able to trade in from the Spring Catalog......it would be the new Honeycomb Embossing Folder.  I totally LOVE that folder and have all things crossed in hopes that our new catalog will have a SNAPPY Hexagon punch (or better yet....Framelits Die) that coordinates with it. 

My card is a Whisper White base card and I added a panel of Real Red to the upper half of my card.......that was run through the Big Shot with our new HoneyComb embossing folder.
I used the new Core'dinations Real Red cardstock and with the help of the new Stampin' Sanding System.....I was able to really make the imprint of the honeycomb POP.
I also grabbed the new Bitty Butterfly punch and punched out THREE bitty butterflies for the top portion of my card........and added ONE Elegant Butterfly to the bottom section of my card.
My "Thanks So Much" sentiment was stamped from the new "Oh Hello" stamp set in Real Red.
I also added around the seam of my Real Red and Whisper White cardstock some 3/8" White Taffeta Ribbon with our 1/4" Real red Stitched Grosgrain ribbon over the top of it.
Here's a close-up of my Butterflies.  I punched my Bitty Butterflies out of our new More Amore DSP.
LOVE how this card turned out and I will for sure be making more of these cards for different occasions very soon.
 
Thanks for joining me today....I'm off to work on cutting up the last of my Stamp Club projects today.  It feels so good to have one of my February events DONE and READY.  I'll start cutting up material for February's Stamp Camp tomorrow.  Keep Living Your Dream!

Tuesday, January 29, 2013

New Product Card #6

Happy Tuesday My Blogger Friends
Today I not only have a new product card to share with you....but it's also the sample card (CASE from Page 13 of our new Spring Catalog) I made for my Stamp Club challenge for January.  Each month for Club.....I give the ladies the opportunity to participate in my Club Challenge and for January I put together a fun little packet of new product.  Here's the card I made with the supplies that were in my Club Challenge packet.....

My packet started out with a Pool Party base card.....and included a White Tea Lace Paper Doilies, some Sale-a-Bration Sycamore Ribbon.....More Amore DSP and two coordinating pieces of cardstock (Pool Party and Primrose Petals).  The Club Challenge was to add at least ONE Embellishment and ONE Stamped image to my finished challenge project.
I cut my White Tea Lace Paper Doilies in half and wrapped my Pool Party SAB Sycamore Ribbon across the top of my Paper Doilies.
I used my new Hearts A Flutters framelits die to cut out a banner with my More Amore DSP and tucked that under the knot of my ribbon.  I also needed to add One Embellishment to my card ....... So, I punched out the new Bitty Butterfly punch with all the DSP I was given and arranged them across the side of my card.  I added a small pearl to the center of each butterfly and fluffed up their wings to make them look like they were in flight.  EMBELLISHMENT ADDED!

My final challenge was to add a stamped sentiment and I used the new "Wishes Your Way" stamp set.  I stamped "you are headed in the right direction" right above my Pool Party ribbon with Black Statz On ink.  STAMPED IMAGE ADDED!
 
I was able to use some of all the product I was given in my January Club Challenge packet and I simply can't wait to see what my Club gals come back with in February for their completed challenge.
 
I'll be back tomorrow with another new product share card.....Hope you can make plans to join me.  Keep Living Your Dream!

Monday, January 28, 2013

New Product Card #5

Happy Monday My Blogger Friends!
Today's card comes straight out of the new Spring Catalog on Page 3.  It uses all new product and is a super fun card to create.  Let's jump right in with my card share for today.........

I didn't change much on this card.....If you check the new Stampin' UP! Spring catalog you will find this card in all it's glory on Page 3.  The only change I made on my card was adding a few Rhinestones.......but all the design and paper selections remained the same as Stampin' UP! original creation.
I started with a Certainly Celery base card and added a piece of "Tea for Two" DSP to my base card.  I stamped the You're Invited from the new "Oh Hello" stamp set with Island Indigo ink.  I also stamped off in Early Espresso the Rose and that created a softer rose image for the front of my card.  I added three small Rhinestones to the center of my rose (for a little added something something!).
I grabbed my new Finish Touches Edgelits dies to create the beautiful eyelet border edge for my Tea for Two DSP and then I added a piece of the new Delicate Lace Tape across the bottom portion of my DSP to add a lace edge to my DSP panel.
The two banners I created at the top of my card were cut out from the "Tea for Two" DSP and all I did was add a Rhinestones to the point of each of the banners.

Here's a close-up of what the You're Invited sentiment and Delicate Lace Tape looked like on the front of my card.

As most of you know.....I've been fighting off joining the Shabby/Chic bandwagon....but I have to say that I think I might be HOOKED on this fabulously sweet design.  I will be sharing more of the Shabby/Chic card design cards I've designed with you on upcoming blog post.
 
Thanks for joining me today......I'll be back tomorrow to share another New Product Card with you - Hope you can join me for that share.  Keep Living Your Dream!

Sunday, January 27, 2013

New Product Card #4

Happy Sunday My Blogger Friends!
It's PLAY-DAY at the Fisher/Labadie household today!  My plans are to spend the ENTIRE DAY playing in my studio with my NEW STUFF.   I have SOOOOO much new product and I still have LOTS I want to create with my "NEW STUFF".   SO......today's share is spot-lighting the new stamp set "Amazing Family and Hearts a Flutter" and the new Hearts A Flutter Framelits dies.  Let's JUMP right in with today's share.......

I started out with a base card of Calypso Coral and stamped the striped banner from the "Hearts a Flutter" stamp set twice along the left hand edge of my base card.  I wanted a little background design....but didn't want to cover the entire Calypso Coral cardstock with DSP.
I then added several of the banner dies from the Hearts A Flutter Framelits.  I die cut out the two center banners with the In Color 2011-2013 DSP stack and the two outer banners I stamped and die cut out using Calypso Coral cardstock.
 
I used the Calypso Coral Bakers Twine to string my banners onto a Whisper White frame and added several embellishment flowers to the center of each banner using the 1/2" Circle Punch and Bitty Circle from the Itty Bitty Punch Pack.  I used Baja Breeze and Daffodil Delight cardstock to create my embellishment flower pieces.
 
Here's a close-up of what the Calypso Coral cardstock looks like after I used one of the "Hearts a Flutter" stamps as a background image for one of my banners.
I stamped the FRIEND sentiment from the "Amazing Family" stamp set and added it to the bottom right hand corner of my card.

I also added my signature Signo White Gel Pen stitching lines around my Whisper White center frame.  
 
This card would make a darling "thinking of you" or "thank you" card and the color combination are ENDLESS........I'm planning to recreate more of this card......so don't be surprised if you see it again on my blog soon.
 
Thanks for joining me today.  I'm still trying to learn all the new bells and whistles on the new laptop that Jack bought me this past week.  It uses Windows 8 and I have to tell you.....my old laptop was almost 16 years old and I have to say that I've not only moved up to the BIG TIME with this new laptop but also switched into the FAST LANE and I'm loving it.  I do have to say that there is a learning curve and that in itself is slowing me down just a tiny bit.  Hopefully......I will be up to speed and all systems will be firing at "Kadie Speed" very soon (I hate running in the slow lane!).
 
I'll be back tomorrow to share yet another new product card with you.....hope you can make plans to stop back and join me for that share.  Keep Living Your Dream!

Saturday, January 26, 2013

New Product Card #3

Happy Saturday My Blogger Friends!
Today I have a special new product card to share with you.  I've used LOTS of new product on this card and can't wait to share this card with you.  Let's jump right in.........

This card uses the new "Amazing Family" stamp set that is in the new Spring Catalog.
I used the "Friend" stamp (from the Amazing Family set) and used White ink and White Embossing powder to create a BEAUTIFUL stamped image on a piece of Rich Razzleberry cardstock.......
I used the new Honeycomb Embossing Folder on a piece of Summer Starfruit and then grabbed the Sycamore Street DSP and embossed a small piece of that through the Honeycomb Embossing Folder so I could then go back and cut several of the honeycomb embossed pieces out and glued them into the Summer Starfruit embossed sections.
My two Sycamore Street DSP banners were added to the top right hand section of my card.....and another KADIE TOUCH was to do stitching lines around each of the banners with my Rich Razzleberry Stampin' Write Marker.
I also added one of the Extra Large Pearls to the stamped "Friend" sentiment (which was cut out using the new Oval Framelits)......and it was the DOT for the "i" in my Friend.  Adding some dot and dash lines around the Rich Razzleberry oval just added that little something something this sentiment was needing.
 
Thanks for joining me today......I have another new product card to share with you tomorrow....I'm hoping that you can come back and join me for that share.  Keep Living Your Dream!

Friday, January 25, 2013

New Product Card #2

Happy Friday My Blogger Friends!
Today I have another New Product Card to share with you......and this card is using the new stamp set "Hearts a Flutter" and "That's the Ticket".  I originally saw this card on my Stampin Connection website for SU demonstrators and knew the minute I saw it......I was going to CASE it.  I did add a few "Kadie Touches"...but the layout is a true CASE. 
I started out with a card base of Real Red cardstock.  I used the new "Hearts a Flutter" Framelits dies to create the two Real Red banners on both ends of the front of my card......
I also used the new NeedlePoint Border Folder to create the pretty embossed scallop and needlepoint edge across the center of my card.
My heart was stamped with the "Hearts A Flutter" stamp set in Real Red ink......and the Valentine's Day ticket was stamped also in Real Red using the new "That's the Ticket" stamp set.  I also added a half paper Dollies to the center of the card and stacked all my stamped heart and ticket pieces on top of the new SU paper dollies.
For that special KADIE TOUCH....I used my White Signo Gel Pen and added stitching lines around the Banners and Dollies edge.....and I also added white dots with my Signo Gel Pen across the Needle Point embossed edge.
 
I'm thinking this might make the perfect Valentine's card for one of my darling little grandkids.
 
Thanks for joining me today.....I'll be back tomorrow to share another new product card with you.  Hope you can make plans to join me for that share.  Keep Living Your Dream!

Thursday, January 24, 2013

Oh Hello Card

Happy Thursday My Blogger Friends!
I've been busy working the last couple of weeks on making LOTS of cards with all the new product that I purchased from the new Spring Catalog.  Today, I want to begin sharing those cards with you.  Let's JUMP right in with a FUN and HAPPY "Hello" card........

I started out with a Very Vanilla card base and ran the front panel of my card through my Big Shot using the new Honeycomb Embossing Folder.......
I then used the "Print Poetry" DSP and ran a small piece of that DSP through the same Honeycomb Embossing Folder and then with the help of my trusty Paper Snips......I cut out several of the embossed Honeycombs and glued them right into the Honeycomb section of my front panel.  (It's amazing how when you use the Honeycomb embossing folder on a piece of the DSP.....Your honeycomb image is transferred to the DSP and makes the cutting out of each little honeycomb a SNAP with your Paper Snips.)
I then took a piece of the "Tea for Two" DSP and created a center panel for my card and used my Paper Snips to cut "fringe" at the bottom of my DSP panel.  I wrapped a piece of the new 7/16" Natural Ribbon Trim right above the snipped fringe portion of this panel.......SERIOUSLY creating a SUPER FUN element to my card.
I stamped my "Oh Hello" sentiment onto a torn piece of "Tea for Two" DSP and distressed the edges of my DSP with Early Espresso ink.
I added one of the new Designer Builder Brads to my sentiment panel......and have to say I was guessing if I really wanted to buy these brads or wait.....and now I'm HAPPY that I bought two packages of the Designer Brads.
I made sure that I distressed all the edges of my center sentiment panel....and used the new SU Distressing Tool (AWESOME NEW TOOL) to create this shabby/chic look.
I love how this card turned out and without a doubt my all time favorite new product in the Spring Catalog is the Honeycomb Embossing Folder.  LOVE LOVE LOVE that folder.  Now.....If only Stampin' UP! is listening....I'm hoping they will release a Honeycomb/Hexagon punch in our new catalog coming out in July.
 
Thank-You for joining me today.....I'll be back tomorrow to share another new card that I created using all new product from the Spring catalog.  Hope you can make plans to join me tomorrow for that share.  Keep Living Your Dream!

Wednesday, January 23, 2013

Stamp Club 3x3 Card

Happy Wednesday My Blogger Friends!
Today I have the special little 3x3 card that my Club Gals made this past Saturday at our first Stamp Club for 2013.  Check out this cute cute little card they made........
Our 3x3 card for January uses the card layout that my good friend Mary Fish taught me.  You take a 3"x7" piece of Whisper White cardstock and score both ends on the 7" side at 2".  This will create your two side fold flaps.
We then added a piece of the Print Poetry DSP Stack to both side panels and created the front of our card.  On the left hand side we used a 1-1/4" circle punch and punched out the circle from our DSP panel.  We were then left with a circle in our DSP panel that was perfect to add one of the 5/8" flowers from the new Vanilla Flower Trim.
As you can see from this photo.....the left hand panel of our card swings open........
And the right hand panel also swings open......Leaving you the entire inside of this little notecard to write your special little love note........
Here's what all four samples look like......I designed two of each sample with the flowers they way they come in the package.....and the other two samples I used my ink pad and a sponge and rubbed some ink right over the flower and gave it some color (Raspberry Ripple in this case).
This sample has the flower colored in very lightly with some ink......
And this one also has been inked around the edges of the flower......
But this one was left the way it comes in the packaging.....
And this one too has not inking done to the flower.
Here's a close-up of the 5/8" Vanilla Flower Trim and also the Designer Builder Brad that was added to the 1-1/4" circle punched out section.
The closure for each of the cards was done using the Petite Curly Label Punch.
We used two new stamp sets for our Petite Curly Label Punch.......We used Ciao Baby and the Sale-a-Bration Pretty Petites stamp sets.  We stamped our image on a piece of Raspberry Ripple Cardstock and then added Silver Embossing Powder to give our closure a real POP.
 
Super Fun Card to create and the two stamps sets we used allowed us to create the perfect little 3x3 card......for just about any occasion.
 
Thanks for joining me today....I'll be back tomorrow to begin sharing some of the card samples I've been busy creating with all the new product I've bought.  Hope you can make plans to come back and join me for that share.  Keep Living Your Dream!