Thursday, August 31, 2023

Thank You Tag

Happy Thursday My Blogger Friends!
My blog post for today is Tag Thursday.  Today, I will feature a tag I created and show you how easy it is to use minimal supplies to create a SUPER PRETTY TAG.  Now that you have the details for my Tag Thursday creation for this week ........ Let's jump right in with my tag share for today........
Thought I would change things up a tiny bit for my tag this week.  It's a 3" circle tag.  I used my 'Stylish Shape Dies' to create my Tahitian Tide base tag ..... And I added a White layering piece to the top of that.
I stamped the DARLING little bird from the 'Bird's Eye View' set into the center of that White layer.
And after coloring him ...... I added some 'Fine Tip Glue' to gloss up his over-sized glasses.
My sentiment was stamped onto several banner flag layers from the 'Stylish Shapes Dies'.  And I used the 'Go To Greetings' for my sentiment.
I think my FAVORITE part of this tag creation is the braided ribbon topper I made.  I used the 'Tahitian Tide Metallic Woven Ribbon' and just braided it until I have the PERFECT look.
So, What do you think my friends????/
Can't wait to make more of these for the
Christmas Holiday Season.

Thanks for joining me today!  I'll be back tomorrow to share a Fun Fold Friday creation with you ........ Hope you can make plans to stop back and join me for that share.  Keep Living Your Dream!

Wednesday, August 30, 2023

I Like You

Happy Wednesday My Blogger Friends!
My blog post for today is Wine-Down Wednesday.  My middle of the week card feature for today will hopefully offer you some inspiration and provide you with some motivation to keep you moving through your busy week.  Let's jump right in with my card share for today........
This BEAUTIFUL card starts off with a 4-1/4" x 11" White base card.
I used the 'Time Worn Embossing Folder' to create some texture on the entire front portion of my base card.
Next, I created a banner panel.  That piece measures 4-1/2" x 2-1/2".
I used the 'Irresistible Blooms' set to stamp my sentiment across the bottom of that panel.  The bottom edge was cropped out using the 'Around The Bend Dies'.
Then I used the heart dies from the 'Give It A Whirl' die set and cropped out several heart on that panel.  I used some colorful cardstock to add behind each of the hearts to add some WOW FACTOR to my hearts.
And there you have it friends.....
What do you think????

Thanks for joining me today!  I'll be back tomorrow to share a Tag Thursday cretaion with you ........ Hope you can make plans to stop back and join me for that share.  Keep Living Your Dream!

Tuesday, August 29, 2023

Santa Treat

            Happy Tuesday My Blogger Friends!
My blog post for today is '3D TUESDAY'.  That means today I have a fun little 3-D project that I created and want to share with you.  This project was SO FUN to create .... and I want to jump right in and share that project with you now.
This ADORABLE treat holder was shared by Julie Gilson back in 2020.  I made a few modifications to my version ...... And would like to share that project with you today.
I started with a piece of Real Red cardstock that was 4-1/2" x 6".  That piece is scored on the 4-1/2" side at 1 & 3-1/2" ...... Then it is turned on the 6" side and scored t 2-1/2" and 3-1/3".  This piece will create the box portion of my holder.  I used a piece of 11" x 2" Real Red cardstock for the wrap around piece ..... And that piece was scored at 5" & 6".
Next, I created a belly band section to wrap around the center of my holder.  It is a White cardstock piece that is 1-1/2" x 7-3/4" and that piece is scored at 1-1/4", 2-1/2", 5" and 6". 
I used the 'So Very Merry' set to create my Santa image ..... And I used my Stampin' Blends to color him in.
I topped my tag off with some Red & Gold Dottted Ribbon ..... And this treat holder was done in no tme flat.  What do you think my friends!!!!

Thanks for joining me today!  I'll be back tomorrow to share a Wine Down Wednesday card with you ........ Hope you can make plans to stop back and join me for that share.  Keep Living Your Dream!

Monday, August 28, 2023

Be Jolly Upgrade

Happy Monday My Blogger Friends! 
Today is Mix-It-UP! Monday, and I have an upgraded version of the card I shared with you yesterday.  I used the exact same product that was used to create yesterday's card ..... But I changed things up to bring this card up to the next stamping level.
Here's my Spotlight Sunday card from yesterday on the TOP....
And my Mix-It-UP! Monday upgraded card on the BOTTOM....
The first upgrade I made to my card for today was to change up the orientation from a landscape style card to a portait style card.  I kept the same Basic White base and added several layers to the upgraded version.
I kept the same red truck for the front of my upgraded card .... but for this version ..... I used the 'Stylish Shapes Dies' to a spotlight that little truck.
My sentiment was added to the top of my card ......
And I used the same Metallic Ribbon to add some FUN to that sentiment piece.
So, what do you think my friends....
Do you have a favorite???

Thanks for joining me today!  I'll be back tomorrow to share a Wine Down Wednesday card with you ........ Hope you can make plans to stop back and join me for that share.  Keep Living Your Dream!

Sunday, August 27, 2023

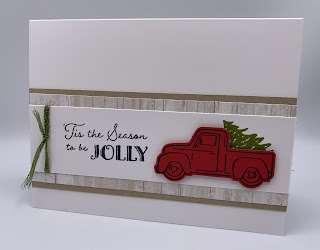
Be Jolly

Happy Sunday My Blogger Friends
Today is Spotlight Sunday ....... And I have a card I created using product from the 2023 Stampin' UP! Mini Catalog.  This card uses several products from that new catalog ........ And I'm thrilled with the way it turned out.  Let's jump right in with my card share for today..........
I started this card off with a Basic White card base.  It measures 5-1/2" x 8-1/2" and is scored at 4-1/4".
Next, I added a panel of Soft Suede and topped it off with Designer Series Paper from the 'One Horse Open Sleigh' to the top.
My sentiment is stamped from the 'So Very Merry' set.
And I added some 'Parakeet Party 1/8" Metallic Woven Ribbon' around the left-hand edge of that piece.
My cut little truck was cropped out using the new truck stamp set and the coordinating punch.
So, there you have it friends.....
What do you think???

Thanks for joining me today!  I'll be back tomorrow to share an upgraded version of this very card with you ...... Hope you can make plans to stop back and join me for that share.  Keep Living Your Dream!

Saturday, August 26, 2023

Thinking of You

Happy Saturday My Blogger Friends!
Today I have another Saturday Sweet Treat packaging idea to share with you.  This project is a SUPER YUMMY, sweet treat packaging.  Let me jump right in with my share.
This DARLING Ghirardelli treat holder reminds me of the matchbook holders we made YEARS AGO.  They come together so FAST......And make the PERFECT little something for someone special.
It starts off with a packaging holder.  That is a piece of Calypso Coral cardstock that measures 2-3/4" x 7-3/8".  It is scored on the 7-3/8" side at 3", 3-1/2" and 6-3/4".  I used the 'Hello, Irresistible Designer Series Paper' to cover my holder.
My sentiment is from the 'Go To Greetings' and that is stamped onto a frame cropped out using the 'Something Fancy Dies'.
I used the same DSP and cropped out two flowers from that Designer Series Paper .... and used the 'Hello, Irresistible Dies' to crop both of those out.
I created the insert for the inside of my holder.  That's a piece of Calypso Coral cardstock.  It measures 2-3/8" 5-3/4".  It is scored on the 5-3/4" side at  1/4", 1/2", 3/4", 3", 3-1/4" and 3-1/2".
I decorated the insert with the same 'Hello, Irresistible Designer Series Paper'.
The insert fits a Ghirardelli Chocolate square PERFECTLY!!!
So, there you have it friends.....
What do you think???

Thanks for joining me today!  I'll be back tomorrow to share a Spotlight Sunday creation with you ........ Hope you can make plans to stop back and join me for that share.  Keep Living Your Dream!

Friday, August 25, 2023

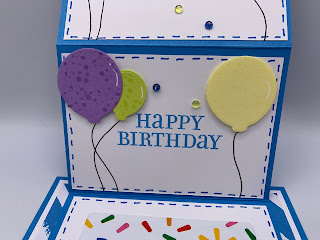
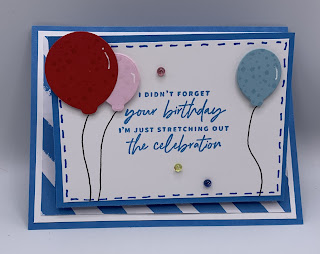
It's Your Birthday

Happy Friday My Blogger Friends!
Today is Fun Fold Friday and that means I have a special little Fun Fold Gift Card Holder to share with you. Let's kick off this Fun Fold Friday share right now.........
This SUPER FUN FOLD was inspired by Heidi Collins.  She shared this card on her blog and I knew I wanted to create it for someone special.
It starts off with a 5-1/2" x 4-1/4" Azure Afternoon base.  I added both a White panel and Azure Afternoon DSP panel to the top of that ..... 
I added a Azure Afternoon 9-3/4" x 4-1/2" cardstock panel.  I scored that on the 9-3/4" at 3-1/4" and 6-1/2".  This created my waterfall center section.
I did add a 3" x 4-1/4" White panel to each of the three center sections.  And used the 'Something Fancy' stamp set......
Along with the 'Celebrate with Tags' stamp set.
And the final section is the spot for a gift card.
The gift card section is a piece of DSP that is 1-3/4" x 4-1/4" and matted onto both White and Azure Afternoon cardstock.
Just doesn't get any EASIER.
Hope you have fun making these!!!

Thanks for joining me today!  I'll be back tomorrow to begin sharing a special new Sweet Treat Saturday release with you ........Hope you can make plans to stop back and join me for that share.  Keep Living Your Dream!

Thursday, August 24, 2023

Happy Holidays

Happy Thursday My Blogger Friends!
My blog post for today is Tag Thursday.  Today, I will feature a tag I created and show you how easy it is to use minimal supplies to create a SUPER PRETTY TAG.  Now that you have the details for my Tag Thursday creation for this week ........ Let's jump right in with my tag share for today........
I started my tag off today with a 3" x 4-1/4" White base tag.  I added a 2" x 4-1/4" panel of the 'CountrySide Inn Designer Series Paper' right down the center.
My sentiment piece is stamped onto a 1/2" piece of White cardstock.  I used the 'Brightest Glow' stamp set to create my sentiment.
My trio of snowflakes was created using the 'Stylish Shapes Dies' to crop out three White and Night of Navy circles ...... And then I added one of the 'Adhesive Backed Snowflakes' to the center.
I also added the 'Tinsel Gems' to the end of my sentiment panel.....
And also one of those gems to the center of each snowflake.
I finished my tag off by addig some 'Night of Navy Bordered Ribbon' to the top ...... And secure it with some 'White Baker's Twine' into a pretty bow.
And there you have it friends.....
What do you think????

Thanks for joining me today!  I'll be back tomorrow to share a Fun Fold Friday creation with you ........ Hope you can make plans to stop back and join me for that share.  Keep Living Your Dream!