Saturday, December 24, 2022

Happy Holidays Treat Box

Happy Saturday My Blogger Friends!
I'm starting something NEW for my Saturday share and will continue sharing my Saturday Sweet Treat packaging idea with you until the end of the year.  These Saturday projects will be some form of a YUMMY sweet treat packaging.  Here is what I created for today.
Looking for a LAST MINUTE Hostess Gift ..... You can stop looking ...... Because I have a pretty QUICK gift to share with you today.
The base of this treat box starts with a 5-1/2" x 8-1/2" piece of Cherry Cobbler Cardstock.  It is scored with the 5-1/2" side at the top of your Simply Score Board at 1-1/4" and 4-1/4".  Now turn your cardstock to the 8-1/2" side and score at 5-1/4" and 6-1/2".
For the top section you will cover that piece with an Old Olive Cardstock piece that is 5" x 2-3/4" and add a piece of 'Boughs of Holly Designer Series Paper' that is 4-7/8" x 2-5/8".
The bottom section is a Old Olive Cardstock piece that is 2-3/4" x 1-7/8" and the 'Boughs of Holly Designer Series Paper' is 2-1/2" x 1-5/8".
I used the 'Stylish Shapes Dies' for my banner flag piece.  And that piece was stamped with the 'Trimming The Tree' set.
All that was left to do was fill a cello bag with some Hershey Santa Hats and I tied it up with some 'Old Olive Twill Ribbon'.
My To/From tag was created with the 'Pretty PillowBox Die' and I used the 'Spruced Up' set to stamp my sentiment.
And there you have it friends.......
A QUICK AND EASY Hostess Gift.

Thanks for joining me today!  I'll be back tomorrow to share a Spotlight Sunday creation with you ........ Hope you can make plans to stop back and join me for that share.  Keep Living Your Dream!

Friday, December 23, 2022

Santa Gift Card Holder

Happy Friday My Blogger Friends!
Today is Fun Fold Friday and that means I have a special little Fun Fold Gift Card Holder to share with you. Let's kick off this Fun Fold Friday share right now.........
These DARLING Santa Pants just couldn't be any EASIER to create.  
You start off with two of the LARGEST scallops from the 'Layering Circles Dies'.  I cut two white and two red..  Both of these are cut in half and one each are taped together to form the Santa Pants. 
I adhered the edges together and left the top section open ...... And that is how the gift card slides into the Santa Pants.
The "Merry Christmas" sentiment is from the 'Peaceful Deer' set ..... and the To/From on the backside is from the 'Celebrate With Tags' set.
I did use a 1/2" piece of Black cardstock for the belt ..... And a 1" x 1" square of Silver Foil to complete the belt.
So ..... What do you think my friends.....
SUPER EASY or WHAT!!!!

Thanks for joining me today!  I'll be back tomorrow to begin sharing a special new Sweet Treat Saturday release with you ........Hope you can make plans to stop back and join me for that share.  Keep Living Your Dream!

Thursday, December 22, 2022

Candy Cane Tag

Happy Thursday My Blogger Friends!
My blog post for today is Tag Thursday.  Today, I will feature a tag I created and show you how easy it is to use minimal supplies to create a SUPER PRETTY TAG.  Now that you have the details for my Tag Thursday creation for this week ........ Let's jump right in with my tag share for today........
How FUN is this ADORABLE candy cane tag!
I started my tag off with a 5" x 3" Real Red base tag.  Then I added a 4-3/4" x 2-3/4" White tag to the top of that.
Before I adhered that White tag down ..... I ran it through my Embossing Machine using the 'Wintry 3D Embossing Folder'.
I stamped a set of Candy Canes with the 'Sweet Candy Canes' set and cropped those out with the 'Sweet Candy Cane Dies'.  I secured those down onto my embossed White tag with Stampin' Dimensionals.
My sentimet is stamped onto a tag from the 'Candy Canes Dies' and was stamped from the 'Sweet Candy Canes' set.  I wrapped some 'Mini Ruffled Ribbon' through that sentiment piece ..... and secured it to the front of my tag.
And the finishing touch was topping my tag off with some more of the 'Mini Ruffled Ribbon'.
So ..... What do you think my friends???

Thanks for joining me today!  I'll be back tomorrow to share a FUN Gift Card Holder with you ........ Hope you can make plans to stop back and join me for that share.  Keep Living Your Dream!

Wednesday, December 21, 2022

May Your Days Be Happy

Happy Wednesday My Blogger Friends!
My blog post for today is Wine-Down Wednesday.  My middle of the week card feature for today will hopefully offer you some inspiration and provide you with some motivation to keep you moving through your busy week.  Let's jump right in with my card share for today........
I started my card off for today with a Cherry Cobbler base tag measures 4-1/4" x 11" ..... and that piece is scored at 5-1/2".
I used a Very Vanilla panel that measures 4" x 5-1/4" and arranged three panels of the 'Festive Foils Designer Series Paper' to the bottom of that panel.  Each of those three DSP panels measured 1-5/16" x 3-1/4".
I added a Cherry Cobbler cardstock strip across the top of the DSP and that piece measures 1/2" x 4"........
And to finish off that cardstock piece .... I wrapped some 'Very Vanilla Baker's Twine'  around it and tied it into a pretty bow.  The finishing touch was adding two 'Flat Jingle Bells' to it.
And my sentiment was stamped directly onto the top of that Very Vanilla panel ..... And I used the 'Very Best Occasions' set and Cherry Cobbler ink.
There you have it my friends.....
What do you think????

Thanks for joining me today!  I'll be back tomorrow with a Tag Thursday creation to share with you ........ Hope you can make plans to stop back and join me for that share.  Keep Living Your Dream! 

Tuesday, December 20, 2022

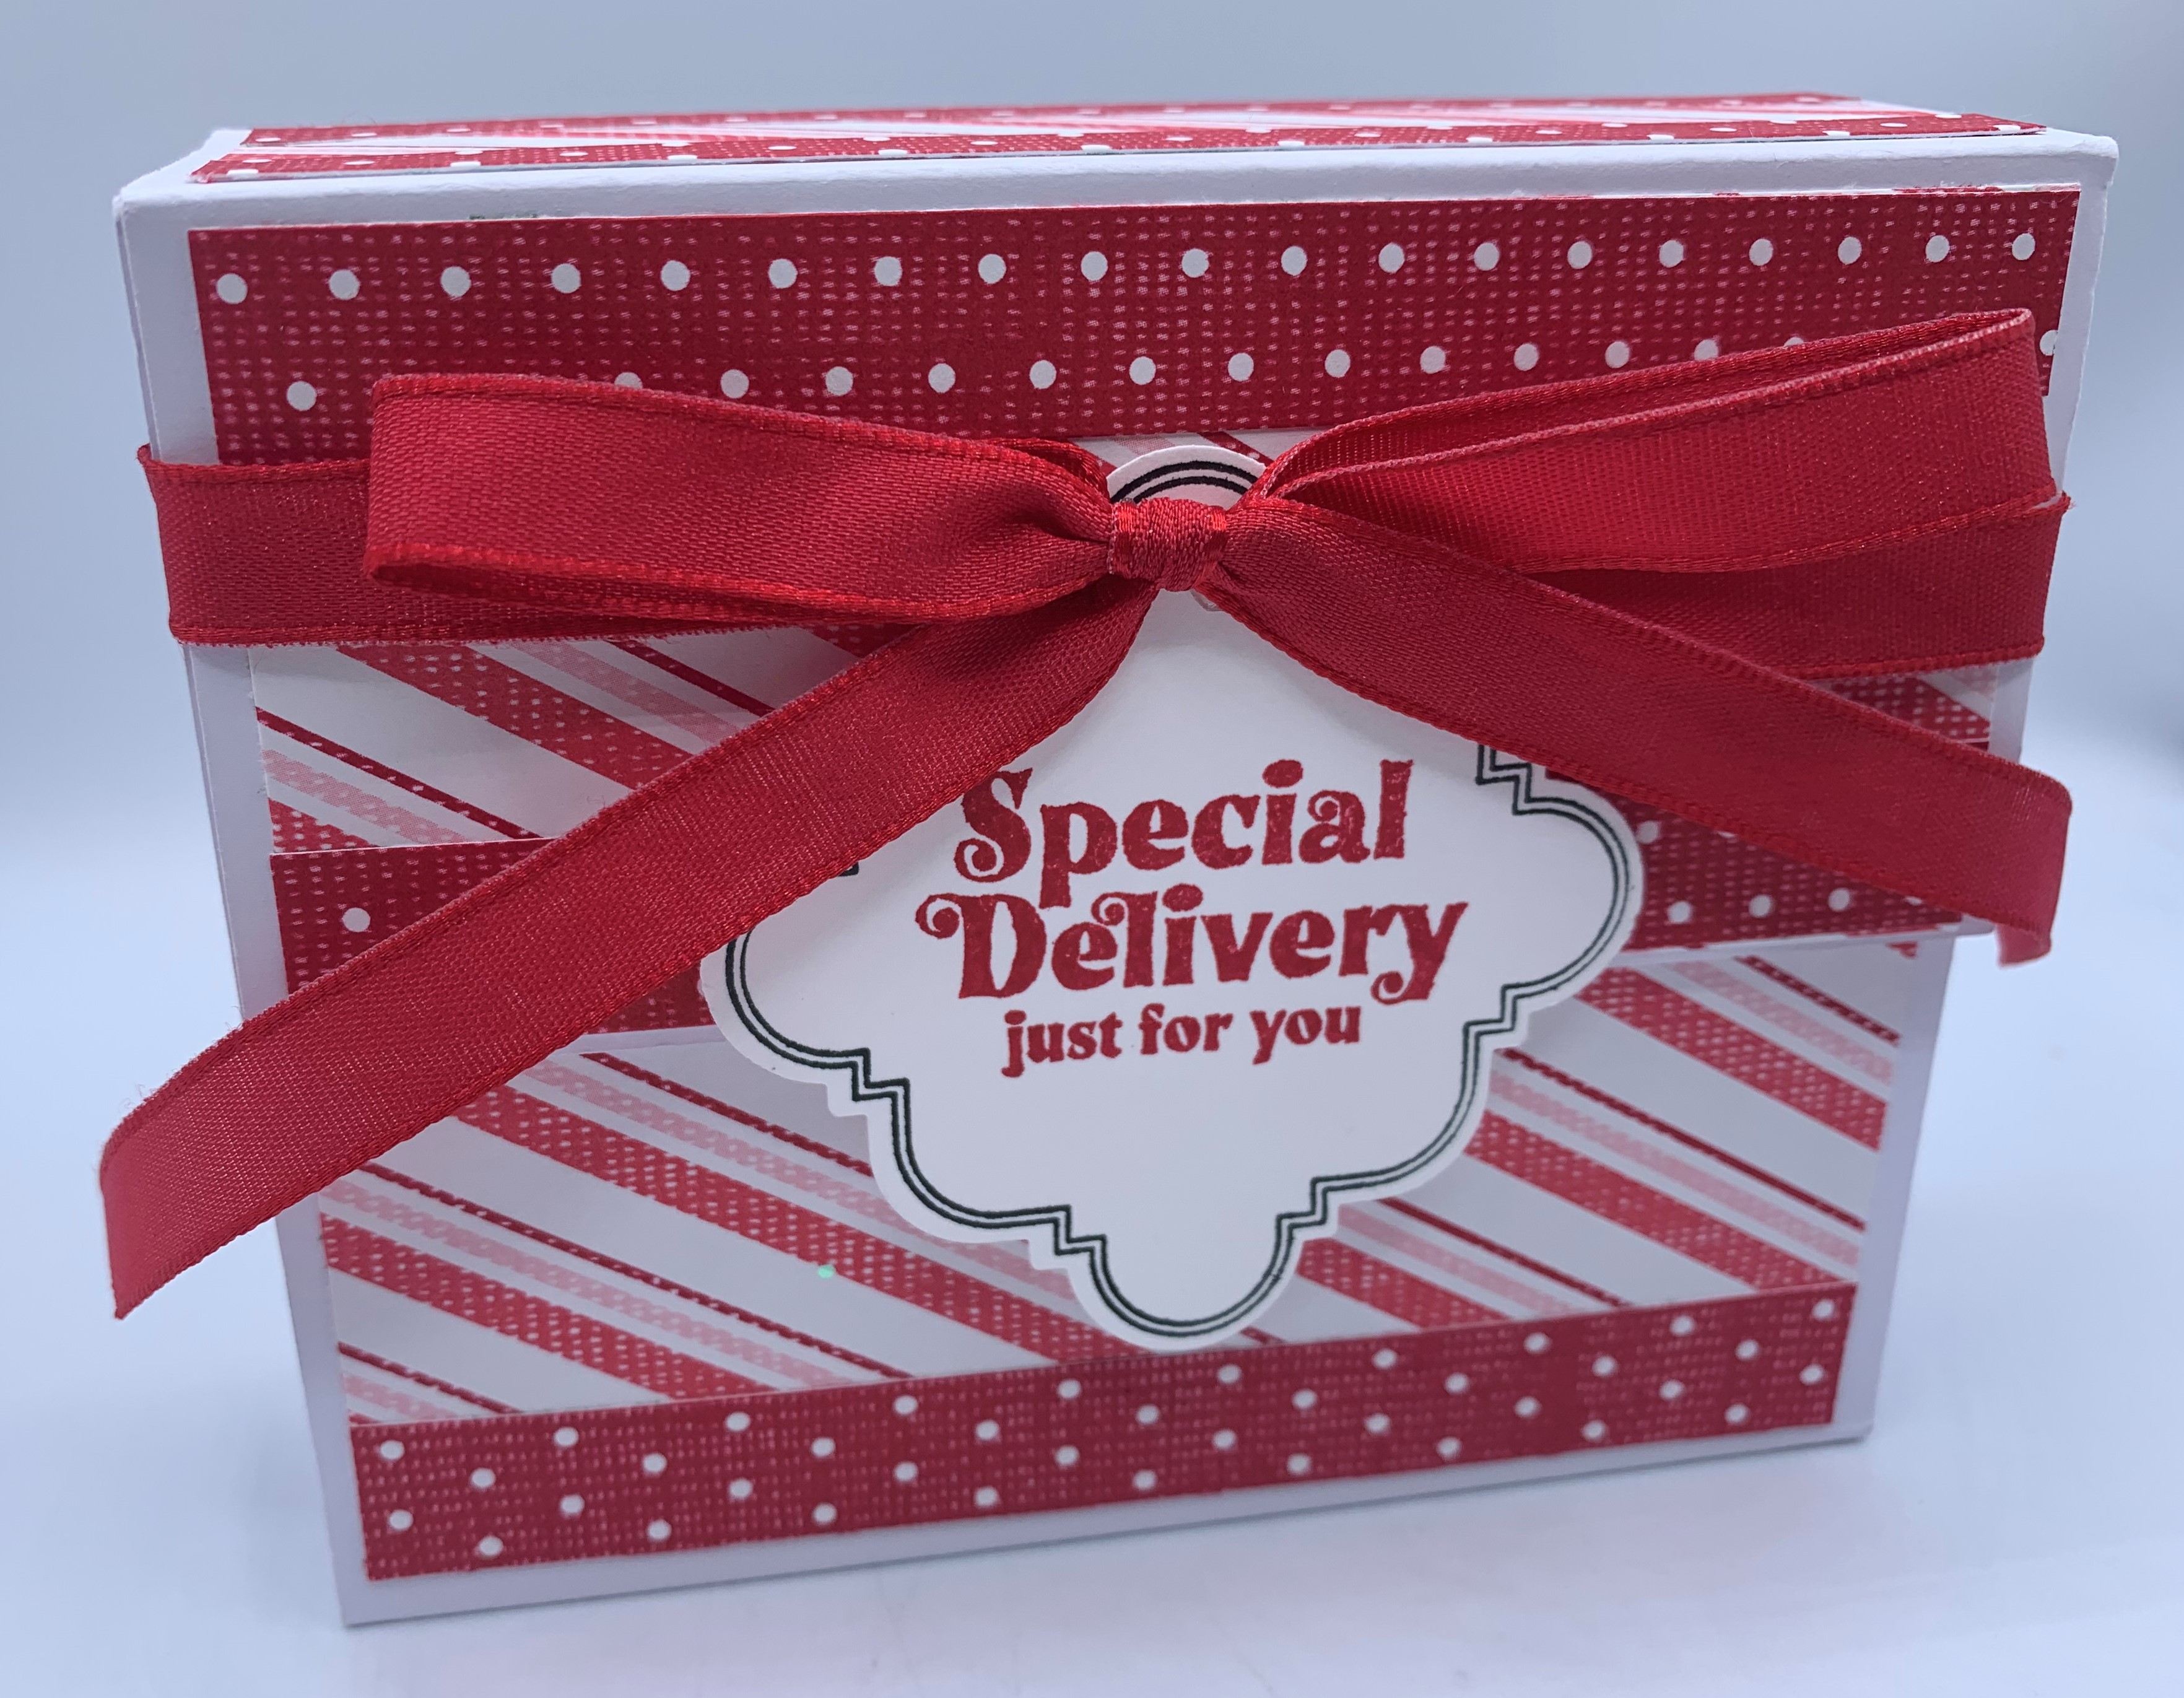
Special Delivery Gift Box

Happy Tuesday My Blogger Friends!
My blog post for today is '3D TUESDAY'.  That means today I have a fun little 3-D project that I created and want to share with you.  This project was OH SO MUCH FUN to create ...... And I want to jump right in and share that project with you now.
This sweet little 3" x3" notecard box was inspired by Angie Pyjas who shared her version of this holder on her blog back on July 24, 2022.  Here is a link to Angie's Video:  Christmas Card Box and Treat Box (All in One) - YouTube
The main box is made from a piece of White cardstock that measure 12" x 4-1/2".  That piece is scored on the 12" side at 2", 3-1/4", 7" and 8-1/4".  
Here's a look at the side and back of the box ...... There are two little boxes inside this box to secure my notecards and envelopes.
It's secured together with a piece of 'Red 3/8" Ribbon Combo' and tied it into a pretty bow in the front.
I used the 'Sweetest Christmas Designer Series Paper' to decorate the front and inside of my box.
And here is what the inside looks like when it's opened.  The inside boxes (Qty 2) are White cardstock that measures 7-1/2" x 4-1/2" and those pieces are scored on the 7-1/2" side at 3-1/2" and 4".  And on the 4-1/2" side it's scored at 1/2" and 4".
The two little boxes inside are postioned at the top and bottom section ..... And this is the home for my 10 little 3" x 3" notecards and coordinating envelopes.
And here's how the little notecards and envelopes tuck nicely inside those two internal boxes.
I made a total of 10 little 3" x3" notecards using the 'Sweetest Christmas Designer Series Paper'.
And each one uses the 'Handmade Tag Punch'.....
And the 'Santa Delivery' sentiment.
So ...... There you have it friends.
I think it is the PERFECT little Hostess Gift 
to have on hand this holiday season.

Thanks for joining me today!  I'll be back tomorrow to share a Wine Down Wednesday card with you ........ Hope you can make plans to stop back and join me for that share.  Keep Living Your Dream!

Monday, December 19, 2022

From Our House Upgrade

Happy Monday My Blogger Friends! 
Today is Mix-It-UP! Monday, and I have an upgraded version of the card I shared with you yesterday.  I used the exact same product that was used to create yesterday's card ..... But I added a couple additional products found in the 2022-2023 Stampin' UP! Annual Catalog to bring this card up to the next stamping level.
Here's my Spotlight Sunday card from yesterday on the TOP....
And my ix-It-UP! Monday upgraded card for today on the BOTTOM....
The biggest upgrade for my card today is I created a Z-Fold style card.
The base of my card is a 4-1/4" x 11" Shaded Spruce card.  It is scored at 4" and 6.
The bottom section of my card was covered with a 4" x 4" panel of 'Santa Express Designer Series Paper'.
And the center section was covered with a 4" x 2-1/2" White panel.  I used the 'Sweet Gingerbread' set to stamp my sentiment.
The top section of my card was covered with another 4" x 4" 'Santa Express Designer Series' panel.
I cropped out a 'Snowflake Vellum' circle and created my sweet llittle house with the help of the 'Gingerbread House Dies' and 'Sweet Gingerbread' set.
All I had to do is assemble the pieces for the house and adding it to the center of my vellum circle.
And the finishing touch was adding my 'Stylish Shapes' banner die piece to the front of my card and added two little hearts to that banner piece.
So ..... There you have it friends....
Do you have a favorite????

Thanks for joining me today!  I'll be back tomorrow to share a 3-D Tuesday creation with you ...... Hope you can make plans to stop back and join me for that share.  Keep Living Your Dream!

Sunday, December 18, 2022

From Our House

Happy Sunday My Blogger Friends
Today is Spotlight Sunday ....... And I have a card I created using product from the 2022 Stampin' UP! Mini Catalog.  This card uses several products from that new catalog ........ And I'm thrilled with the way it turned out.  Let's jump right in with my card share for today..........
How FUN is this sweet little card.  Best part......It comes together SO QUICKLY!!
I started off with a Shaded Spruce base card that measures 4-1/4" x 11".  I scored that base at 5-1/2".  Next, I added two 'Santa Express Designer Series Paper' panels to the top.  The red panel is 4" x 3-1/2" and the green panel is 4" x 1-3/4".
My sweet home was cropped out using the 'Gingerbread House Dies' and the 'Sweet Gongerbread' set.  I mounted that onto a 'Stylish Shapes Die' circle and positioned it to the center of my base card.
And then I cropped out a White banner flag from the 'Stylish Shapes Dies' and stamped my sentiment onto it.
I used the 'Sweet Gingerbread' set to stamp that sentiment ..... And I used Shaded Spruce ink to stamp that sentiment.
And that's all it took to put this card together.
What do you think my friends.

Thanks for joining me today!  I'll be back tomorrow to share an upgraded version of this very card with you ...... Hope you can make plans to stop back and join me for that share.  Keep Living Your Dream!