Wednesday, May 31, 2023

Thinking of You

Happy Wednesday My Blogger Friends!
My blog post for today is Wine-Down Wednesday.  My middle of the week card feature for today will hopefully offer you some inspiration and provide you with some motivation to keep you moving through your busy week.  Let's jump right in with my card share for today........
I started this card off with a Smoky Slate base card that is 5-1/2" x 8-1/2" and is scored at 4-1/4".
Next, I added a 3-1/2" x 3-1/2" Basic Gray cardstock panel and topped it off with a 3-1/4" x 3-1/4" Smoky Slate DSP panel.
Before I adhered that panel down to the front of my base card ..... I wrapped some 'Baker's Twine Essential Pack' twine around the far left-hand side and tied it up into a pretty bow.
I cropped out a Basic Gray tag from the 'Cracker & Treat Box dies ..... And added a single red heart that was also cropped out from that same die set.
I also added three 'Classic Matte Dots' to the bottom right-hand corner ..... And the finishing touch for this DSP panel was adding some White stitching lines around the outer edges.
The finishing touch was stamping my sentiment directly onto my base card ..... And I used the 'Go To Greetings' set to stamp that with Basic Gray ink.
And this card was called DONE!!!!
What do you think my friends.

Thanks for joining me today!  I'll be back tomorrow with a Tag Thursday creation to share with you ........ Hope you can make plans to stop back and join me for that share.  Keep Living Your Dream! 

Tuesday, May 30, 2023

3-Boxes for Floating Shelves

Happy Tuesday My Blogger Friends!
My blog post for today is '3D TUESDAY'.  That means today I have a fun little 3-D project that I created and want to share with you.   This project was SUPER FUN to create .... and I want to jump right in and share that project with you now.
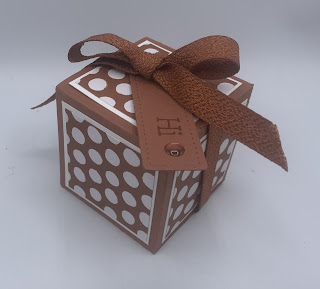
It's time to get my three floating shelves decorated.  I used the new 2023-2025 In-Color collection for each of my little boxes.
All three boxes were created with a 8-1/4" x 7" piece of Copper Clay, Wild Wheat and Boho Blue cardstock.  I scored on the 7" side at 1/2", 2-1/2", 4-1/2" and 6-1/2".  Then I scored on the 8-1/4" side at 2, 4, 6 and 8.  This is the Copper Clay box.....
And here is the new Boho Blue box.....
And the Wild Wheat box.
I did use the new 2023-2025 In Color DSP to cover my boxes...
And each box has the new coordinating Ribbon wrapped around it....
And each box has a Tag that was created from the 'Tailor Made Tags' dies .... And I used the 'Easter Bunny' set to stamp my sentiment onto each tag.  I also used a single coordinating new 2023-2025 In Color Dot at the end of each tag.
These boxes look GREAT on my floating shelves.....
What do you think my friends!!!!

Thanks for joining me today!  I'll be back tomorrow to share a Wine Down Wednesday card with you ........ Hope you can make plans to stop back and join me for that share.  Keep Living Your Dream!

Monday, May 29, 2023

Hello Upgrade

Happy Monday My Blogger Friends! 
Today is Mix-It-UP! Monday, and I have an upgraded version of the card I shared with you yesterday.  I used the exact same product that was used to create yesterday's card ..... But I changed things up to bring this card up to the next stamping level.
Here's my Spotlight Sunday card from yesterday on the TOP...
And my Mix-It-UP! Monday upgraded card for today on the BOTTOM...
The first upgrade I made to my card for today was change up the orientation from a Landscape Style card to a Portrait Style card.  I also changed the base card from White to Black.
I also added two additional cardstock layers to the front of my card.
I used the same floral stamp set to stamp my three colored cardstock strips (that measured 1-1/8" x 4-3/4").  Each of those strips were stamped with VersaMark Ink and then sprinkled with 'Clear Embossing Powder'.  After all three strips were cooled......I flipped them over and taped them together. 
Before I adhered those three panel to the front of my card .... I wrapped some 'Parakett Party Metallic Ribbon' around that panel and tied it up into a pretty bow.
The last step was adding my upgraded "Hello" messages.  Those were stamped onto a stitched circle and adhered directly down to a stitched square.
I arranged those sentiment pieces to the front of my card using 'Stampin' Dimensionals'.  And finished all three pieces with a single 'Loose Daisy Embellishment'.
So, what do you think my friends....
Do you have a favorite???

Thanks for joining me today!  I'll be back tomorrow to share a Wine Down Wednesday card with you ........ Hope you can make plans to stop back and join me for that share.  Keep Living Your Dream!

Sunday, May 28, 2023

Hello

 Happy Sunday My Blogger Friends
Today is Spotlight Sunday ....... And I have a card I created using up my product from the 2022-2023 Stampin' UP! Annual Catalog.  This card uses several products from that catalog ........ And I'm thrilled with the way it turned out.  Let's jump right in with my card share for today..........
I started my card off for today with a White base.  That piece measures 5-1/2" x 8-1/2".  It is scored at 4-1/4".
I started off with a White panel that was 4" x 5-1/4".  This piece was used to adhere my five colored cardstock panels down.
My five colored cardstock panels were stamped with the 'Hello Ladybug' stamp set to create a FUN back-ground image on each panel.  My five cardstock panels measured 1-1/8" x 4-3/4" .... And I adhered those panels down to the front of my White panel.  I altered those panels so a square of White cardstock would appear at the top or bottom of my cardstock panels.
Next, I took two strips of 1/4" x 5" Black Cardstock and added that piece to the top and bottom of my card front.
I embellished those black strips with a single 'Loose Daisy Embellishments' across the top and bottom of that piece.
The finishing touch was adding my SWEET little "Hello" into each of the White sections above and below the Colored Cardstock panels.  I used the 'Cottage Wreaths' set to stamp each sentiment.
So, there you have it friends.....
What do you think???

Thanks for joining me today!  I'll be back tomorrow to share an upgraded version of this very card with you ...... Hope you can make plans to stop back and join me for that share.  Keep Living Your Dream!

Saturday, May 27, 2023

Thinking of You Today

Happy Saturday My Blogger Friends!
Today I have another Saturday Sweet Treat packaging idea to share with you.  This project is a SUPER YUMMY, sweet treat packaging.  Let me jump right in with my share.
This ADORABLE Ghirardelli Chocolate holder was shared by Rachel Tessman back in Sept 2014.  I say ...... What's OLD is NEW again.
This holder starts off with a 11" x 2-3/4" piece of cardstock.  It is scored at 2-3/4", 3" and 6-7/8".
The front is decorated with DSP and a sentiment.  I used the 'Simply Fabulous' stamp set to decorate my holder.
The magic is when you lift up the front DSP (it's adhered with only 3-Stampin' Dimensionals on the left-hand side) and then the center flip piece is revealed.
I used the 'Flowering Tulips' set for my inside flap.
When that center flip piece folds over.....
To reveal the special sweetness inside.
Just couldn't be ANY SWEETER.
Thanks Rachel for this DARLING project.

Thanks for joining me today!  I'll be back tomorrow to share a Spotlight Sunday creation with you ........ Hope you can make plans to stop back and join me for that share.  Keep Living Your Dream!

Friday, May 26, 2023

Beauty in Everything

Happy Friday My Blogger Friends!
Today is Fun Fold Friday and that means I have a special little Fun Fold Card to share with you. Let's kick off this Fun Fold Friday share right now.........
I've been seeing this fun fold style card all over Pinterest ..... So, I thought I would give it a try.  TALK ABOUT A SUPER EASY CARD TO CREATE ..... THIS IS IT!!!!
The base of this card is 4-1/4" x 11" and is scored at 5-1/2"  You will measure down 1-1/2" on the front section of your card and cut that completely off.
Here is what you are going to end up having.  A LOVELY card that the front flap folds over.
I stamped the inside of my card with the 'Simply Fabulous' set ..... and I added two panels of the 'Design A Day Dream Designer Series Paper'.
To add a tiny bit of WOW FACTOR to the inside of my card ..... I added several trio dots.
The front of my card is decorated with more of th 'Design A Day Dream Designer Series Paper' ..... And my little girl was stamped using the 'By My Side' set.
Just doesn't get any EASIER.
Hope you have fun making these!!!

Thanks for joining me today!  I'll be back tomorrow to begin sharing a special new Sweet Treat Saturday release with you ........Hope you can make plans to stop back and join me for that share.  Keep Living Your Dream!

Thursday, May 25, 2023

Songbird

 Happy Thursday My Blogger Friends!
My blog post for today is Tag Thursday.  Today, I will feature a tag I created and show you how easy it is to use minimal supplies to create a SUPER PRETTY TAG.  Now that you have the details for my Tag Thursday creation for this week ........ Let's jump right in with my tag share for today........
This tag just makes my heart HAPPY!!!
I started off with a 2-1/2" x 4-1/4" White base tag.  The first thing I did was stamp my birds nest from the 'Sweet Songbirds' set at the bottom of my tag.  I then cut along the top edge of the stamped nest to give my bird a place to be tucked in.
I punched out my SWEET little bird with the help of the 'Songbird Builder Punch' and nested him right in the opening I created at the top of my nest.  It was a PERFECT fit!
My next step was to stamp my sentiment.  That was also from the 'Sweet Songbirds' set.
I topped my tag off with a PRETTY triple bow ..... And I used the 'Tahitian Tide Metallic Ribbon' for that PRETTY bow.
The finishing touch was adding my signature stitching lines along with a few trio dots.
And that's all it took to create this
OH SO LOVELY tag.

Thanks for joining me today!  I'll be back tomorrow to share a Fun Fold Friday creation with you ........ Hope you can make plans to stop back and join me for that share.  Keep Living Your Dream!