Monday, August 22, 2011

August Stamp Club - Card Pojects

Happy Monday my Blogger Friends and today I will be sharing the cards we created at our August Stamp Club..........
My August hostess was Carol and she wanted me to use the Delicate Doilies stamp set to give her some ideas on how to use this set.  SO...we started out the whole shabby chic Stamp Club with the Fliratious Specialty DSP and used one of the doily laser-cut designs for the base of our card.
We used the white side of the doily laser-cut and stacked it with layers of circles and the Boho Blossom punch and topped it all off with a Glimmer Brad right in the center of our creation.
We wrapped a piece of linen thread around the largest circle and stamped a "thanks so much" message from the Tiny Tags stamp set onto a piece of Tangerine Tango cardstock.  We then punched this sentiment out using the jewelry tag punch and securing it onto the linen thread.
The lace border was created using the Eyelet Border punch.  We used Tangerine Tango cardstock and trimmed it perfectly to create a lace border for each side of our card.
Our last card was inspired by Lisa Young at http://addinkandstamp.blogspot.com/
Lisa created this card using so many different SU products......and the one that was perfect for Carol's Stamp Club month was the use of the Delicate Doilies stamp set.  Here is a picture of the Butterfly punch that has been stamped with one of the Delicate Doilie stamps as a background for the wings. 
And with the help of several circle punches and the Doily Triple Layer punch this card came together with very little effort.
The base of our card was run through the Big Shot using the "Framed Tulips" Textured Impressions Embossing Folder and then we layered another piece of Whisper White cardstock that fits perfectly into the center of our embossed frame.  We used the "Petite Pairs" stamp set to create the perfect message for our adorable card.  LOVE LOVE LOVE how this little number turned out.  Can you image how fabulous this card will look in  the birthday girl/boys favorite colors....STUNNING!

Thanks for joining me today - I'm heading off to Wisconsin tomorrow morning for a little QUALITY TIME with my kids and favorite little people in the world (Jared.....Hailey....Brooke and Steven).  I'll try to not go missing in action - but if I do......Know that I'm totally enjoying myself.  Keep Living Your Dream!

Sunday, August 21, 2011

August Stamp Club - 3D Project

Happy Sunday my Blogger Friends and Thanks for joining me today.  Yesterday was my Stamp Club and do I have a fabulous 3D project to share with you today.  This original idea came from the Stampin UP! Demonstrators website and I also saw it over at Angie's blog (http://www.mychicnscratch.com/).  If you want to click over to her blog and check out her amazing (over 300) free video's.......she will AMAZE you with her talent.

I purchased the BigZ XL Bitty Box and Envelope die in July (*mainly because as a Stampin' UP! demonstrator, I receive an ADDITIONAL BIG DISCOUNT - in addition to the already amazing demonstrator discount I receive - on one item during my birthday month and I knew that during my birthday month (July) I would be making this BigZ Die my birthday gift from SU to me) ............and my first use of this BigZ XL die would be to use it for a Club project.  Check this fun little creation out.......
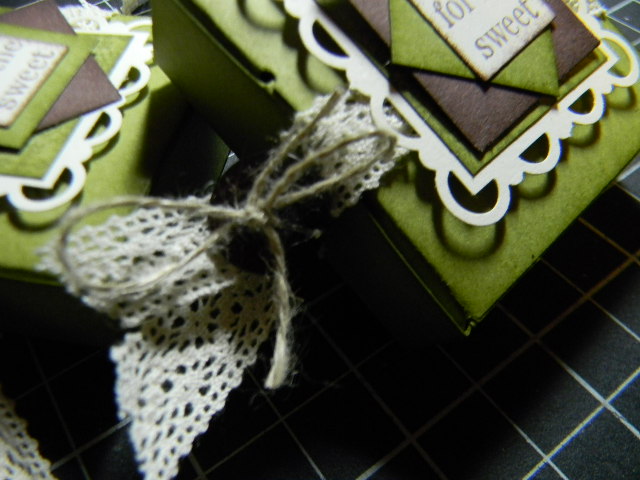
We used Old Olive for our base box and tucked four hersey nuggets inside (of course those nuggets didn't go into our box naked) ....... we wrapped our little nuggets up with a 1" x 3/4" stripe of Old Olive DSP.........
The top of the box was created by using a 2"x2" square of Very Vanilla Cardstock.  We put each of the four corners into the Scallop Trim Corner punch and punched out the perfect scallop edge to our 2"x2" piece.  We then layered a 1-3/8" Old Olive square - and then a 1-1/4" Chocolate Chip square and topped it off with a 1" Old Olive square......the "Sweets for the sweet" was stamped in Chocolate Chip on a 3/4" square using the "Sweets for the Sweet" stamp set.
We added a piece of 5/8" Victoria Crochet Trim (LOVE this trim) around the box and tied it off with a Chocolate Chip Button and some linen thread.  This makes a perfect closure for the box and allows the person receiving the box to not have to tear the entire box apart to get to the inside..........all they need to do is slide the Crochet Trim over the side of the box and the top pops open and the entire box opens up.
Here's another view of the squares all layered onto a punched out 2"x2" Scallop Trim Corner piece.
And we topped our "Sweets for the sweet" label off with a Mini Library Clip in Chocolate Chip ......And called this one DONE!  Love how this little treat box turned out......Oh How BEAUTIFUL....and Oh How FUN to give to that someone special. (and yes,.....you are seeing double - I premade two of these boxes for Debbie and Jan (who can't be at Club this month) and will show the Club Gals how you can change up the look of this box by simply changing up the way you layer all your scallop square pieces).

Thanks for stopping in today - I'll be back tomorrow with the two cards we created at our August Stamp Club - Hope you can come back and join me.  Keep Living Your Dream! 

Saturday, August 20, 2011

August Stamp Camp - Part Two

Happy Saturday my Blogger Friends - today is Stamp Club day - so I'll try to make this post quick.....
Today I'll be sharing the second part of Stamp Camp (this last Wednesday) with you so let's get right to it....
This first card we created was from a card I spotted on somebodies blog (sorry I can't remember who's) and knew that it would be the perfect Camp card to make.  The base of our card was from the BigZ Clear Scallop Square die.....and the candles were made from Pocketful of Posies DSP and we just trimmed each of them at different lengths to create some WOW to this card.
The candles were free-hand and inked with More Mustard ink .......
And a fun little "Happy Birthday" message was stamped on a Rich RazzleBerry stripe that was tied off with a tiny piece of 1/4" White Grosgrain ribbon. 
This next card was created by Chera Wiest at http://greetingsbychera.blogspot.com/. Chera created this fun little recipe and it was the perfect card to add to the cards my girls would be making at our August Stamp Camp.  This card was created with the two circle punches - the scallop circle punch and the Boho Blossom punch - super easy and one of those cards that you can create your own masterpiece by just changing up the color combination.
We used the "Just Believe" stamp set to stamp the background of our scallop circle punch and stamped the "friends" onto Whisper White and punched it out using the Small Oval punch.  The total wow factor on this card (and the piece that pulls this whole card together) is the Crumb Cake 1/2" Seam Binding Ribbon that is wrapped around the crumb cake base piece of our card.  I have to say that Stampin' UP! hit this one out of the park when they began offering Seam Binding Ribbon in the new Idea Book and Catalog.  I swear - there is NO OTHER Seam Binding that compares to that which SU offers....LOVE ALL THE COLORS!

Thanks for stopping in today - I'm off to teach Stamp Club today and will be ready to share those creations with you tomorrow.  Hope you can come back and join me.......Until Sunday....Keep Living Your Dream!

Friday, August 19, 2011

August Stamp Camp Cards - Part One

Happy Friday my Blogger Friends!  Today, I'll be shaing three of the cards that we made at Stamp Camp  this past Wednesday.  The ladies made a total of five cards and today I will be shaing three of those cards with you - Let's get stated:
The first card we made was from a card Connie Babbat shared on her blog http://inkspiredtreasures.com/
Connie created this card from a traditional card recipe and without a doubt - when I saw what she created - well, I just knew this would be an amazing card for my Camp ladies to make.
We used the "On the Grow" stamp set from the Summer Mini Catalog - along with some yummy yummy Daffodil Delight 3/8" Taffeta Ribbon to create this fabulous card.  Our Stampin Write markers added that little touch of color and shading to our stamped image - Totally fun little card (don't you think?)!
Next up is a card shared on my friend Mary Fish blog (http://stampinpretty.blogspot.com/).  When Mary posted this card - I quickly emailed her and asked if I could CASE her card for my upcoming Stamp Camp.  She was thrilled to be asked.  This card uses the awesome stamp set "Button Buddies" along with the Itty Bitty Shapes Punch Pack to create the flowers.
We stamped and embossed our Button Buddies Vase and then popped it up on our Whisper White framed panel.  We embossed the Daffodil Delight/Real Red and Pacific Point cardstock with clear embossing powder and then punched out a Itty Bitty Flower Shapes to crerate our flowers.  We then added one of each punched flower shape to the top of our stamped flower stems (adhered with a mini glue dot) and popped a tiny pearl in the center of each flower to give it that little something something that each of the flowers were needing.  Totally LOVE how this card turned out - and Thanks Mary for your rockin great card recipe.
The last card I'll be sharing today is a fun little sassy 3"x3" card that I created.  With the amazing Cupcake Builder punch this fun little gift card was created in a heartbeat.  We crimped the cupcake base with our trusty paper crimper - embossed some chocolate chip cardstock with the "Dot Dot Dot" stamp set in white embossing powder (that created the white dots all over the cake portion of our cupcake).
Here's a close-up of our cupcake which we stacked on top of the smallest BigZ scallop square die.  We added two little pieces of 1/4" Real Red Grosgrain ribbon to each side of our square and our DSP is from the Big Top Birthday collection.  Our "happy birthday" message was created using the Modern Label and Word Window punch.  Does this little card not look fabulous - and oh how it will pretty up any birthday gift.

Thanks for stopping in today - Hope you have some fun plans in store for today.  I have Stamp Club planned for tomorrow afternoon - so I'm off to put the finishing touches on that.  Keep Living Your Dream!

Thursday, August 18, 2011

Card From Kris

Happy Thursday my Blogger Friends - Today I was going to share with you the cards that my Stamp Camp girls made - but seriously......I'M EXHAUSTED!  I LOVE LOVE LOVE Stamp Camp (and Club) but work sooooo hard and put sooooo much time into making sure it all runs perfectly that I exhaust myself along the way.  SO - today I'm going share is a quick little card that my friend Kris Holmes showed me how to make at our July FU Summer Gathering.  Let's get started with the sharing..............
My friend and stamping buddy (and I DO MEAN buddy) Kris Holmes had me make this card for our summer FU group.  (Even though the other two gals are away for the summer  - Hi Debbie and Ann!) Kris and I decide to continue meeting during the summer and swap cards.  This is the card she had me make in July (I THINK IT WAS JULY??????).  

When I think of Nestabilities.....I think of Kris.  I seriously believe Kris wears the "Queen of Nestabilities" crown.  I love making cards with Kris - not only because she is SO TALENTED.....but also because she has all the SUPER COOL Nestabilities and she's always willing to break them out to let her friends give them a try.  And believe me......this card is a fine example of that.
Kris had me use one of the Nestabilities label dies along with some OctoberAfternoon DSP - and a fun vase punch to create this card.  She also showed me how to use ink directly to the diecut label (before the plate is removed) and that helped create this amazing shadow image around the inner portion of the label.  Is this just not the most AWESOME LOOK?   I have to tell you that this card will stay in my sample file..... and won't be given away.  It's just one of those cards that is just toooooo pretty to ever give away!

Thanks for joining me today - I'll be back tomorrow to share the five cards we made during Camp.  Keep Living Your Dream!

Wednesday, August 17, 2011

SW Stamper Swap Day Three

Happy Wednesday my Blogger Friends!  Today, when I woke up ..... and my feet hit the floor .... I'll be working in fast motion until I drop tonight.  It's August Stamp Camp today and I have nine ladies joining me.  I have some amazing and fun cards to share with them and hopefully I will be able to share those cards with you either Thursday or Friday.  BUT....for today......I have the last two cards that my fellow SW Stamper Demonstrator friends made in June.  Here we go.......
Frist up is a GREAT card made by Amanda Harbison. She created two adorable watermelon images using the new Blossom Bouquet Triple Layer Punch from Stampin' UP! ....... WOWZA!
With three different layers of Stampin' UP! cardstock - she created the ideal watermelon image and with the help of some dimensionals - she turned this Whisper White base card into a piece of FUN WOW with some ribbon - a SU wheel and the amazing Triple Layer Punch.  AWESOME card Amanda-You ROCK!
This next card wasn't signed and is seriously the reason why I should post my swaps immediately after I receive them........because........ I have no recall on who gave me this card (SORRY!).  I will tell you that it is a 3"x3" fun little card that has been run through the Perfect Poka Dots Embossing Folder and the Cupcake was created using the Cupcake Builder punch.
There is something OH SO LOVELY about a card that is embossed with the Perfect Poka Dots folder.  EACH and EVERY time I use this folder I swear there is NO OTHER Poka Dot folder that compares to the one Stampin' UP! offers. 

Well....I'm off to put the finishing touches on Stamp Camp.  The nine ladies will be here at 1:00 and I want to be sure that everything is set-up and ready for their arrival.  I'm seriously looking forward to all the FUN that these nine ladies bring to my Camp events. 

Thanks for stopping by today - I'll be back tomorrow......Hope you can join me!  Keep Living Your Dream.

Tuesday, August 16, 2011

SW Stamper Swap Day Two

It's Tuesday my Blogger Friends and THANK YOU for joining me today.  I have more SW Stamper Swap cards to share with you.....SO........Let's kick off this day with some super fun cards!
First up is a FUN little card made by my SW Stampers friend Karen Reid.  Karen created this amazing 4-1/4" x 4-1/4" square card and featured the most popular item out there right now....PinWheels!
Here's a close-up of not only the 1/8" taffeta ribbon that she used - but also the fun little pin-wheel she created using some DSP from the Brights Stack.  She also ran her Crumb Cake cardstock through the Big Shot and used the Perfect Poka Dots Folder to create a fun little sassy background for her ribbon and pin-wheel to sit on.  Your card TOTALLY ROCKS Karen!
And this BEAUTIFUL little number was made by Sue Brown.  Sue is yet another one of those talented demonstrators I am honored to share my second Wednesday night of the month with......She has so much talent and creates some of the most amazing cards for our monthy swaps.
Sue used the Flower Garden embossing folder TWICE on her Whisper White card base.....and then she ran a third Flower Garden embossed image onto a seperate piece of Whisper White cardstock and ended up cutting it out and popping it to the center of her card with dimensionals.  She also added ink from the new In-Color collection to the embossed part of her Flower Garden image and without a doubt.....that gave this card some serious WOW factor!  She also added a "friends" jewelry tag to the steam of one of her bunhces of flowers to seriously complete this card.

I am amazed each month that I attend our SW Stampers Demonstrators meeting at how much talent I am surrounded by and if I don't get anything else done between our meetings - I know that I want to participate in our swaps because the ladies always have the best swap ideas in town.  THANK YOU LADIES for sharing with me.

I'll be back tomorrow with a couple more Southwest Stamper swap cards - hope you can join me. Keep Living Your Dream!