Wednesday, December 06, 2017

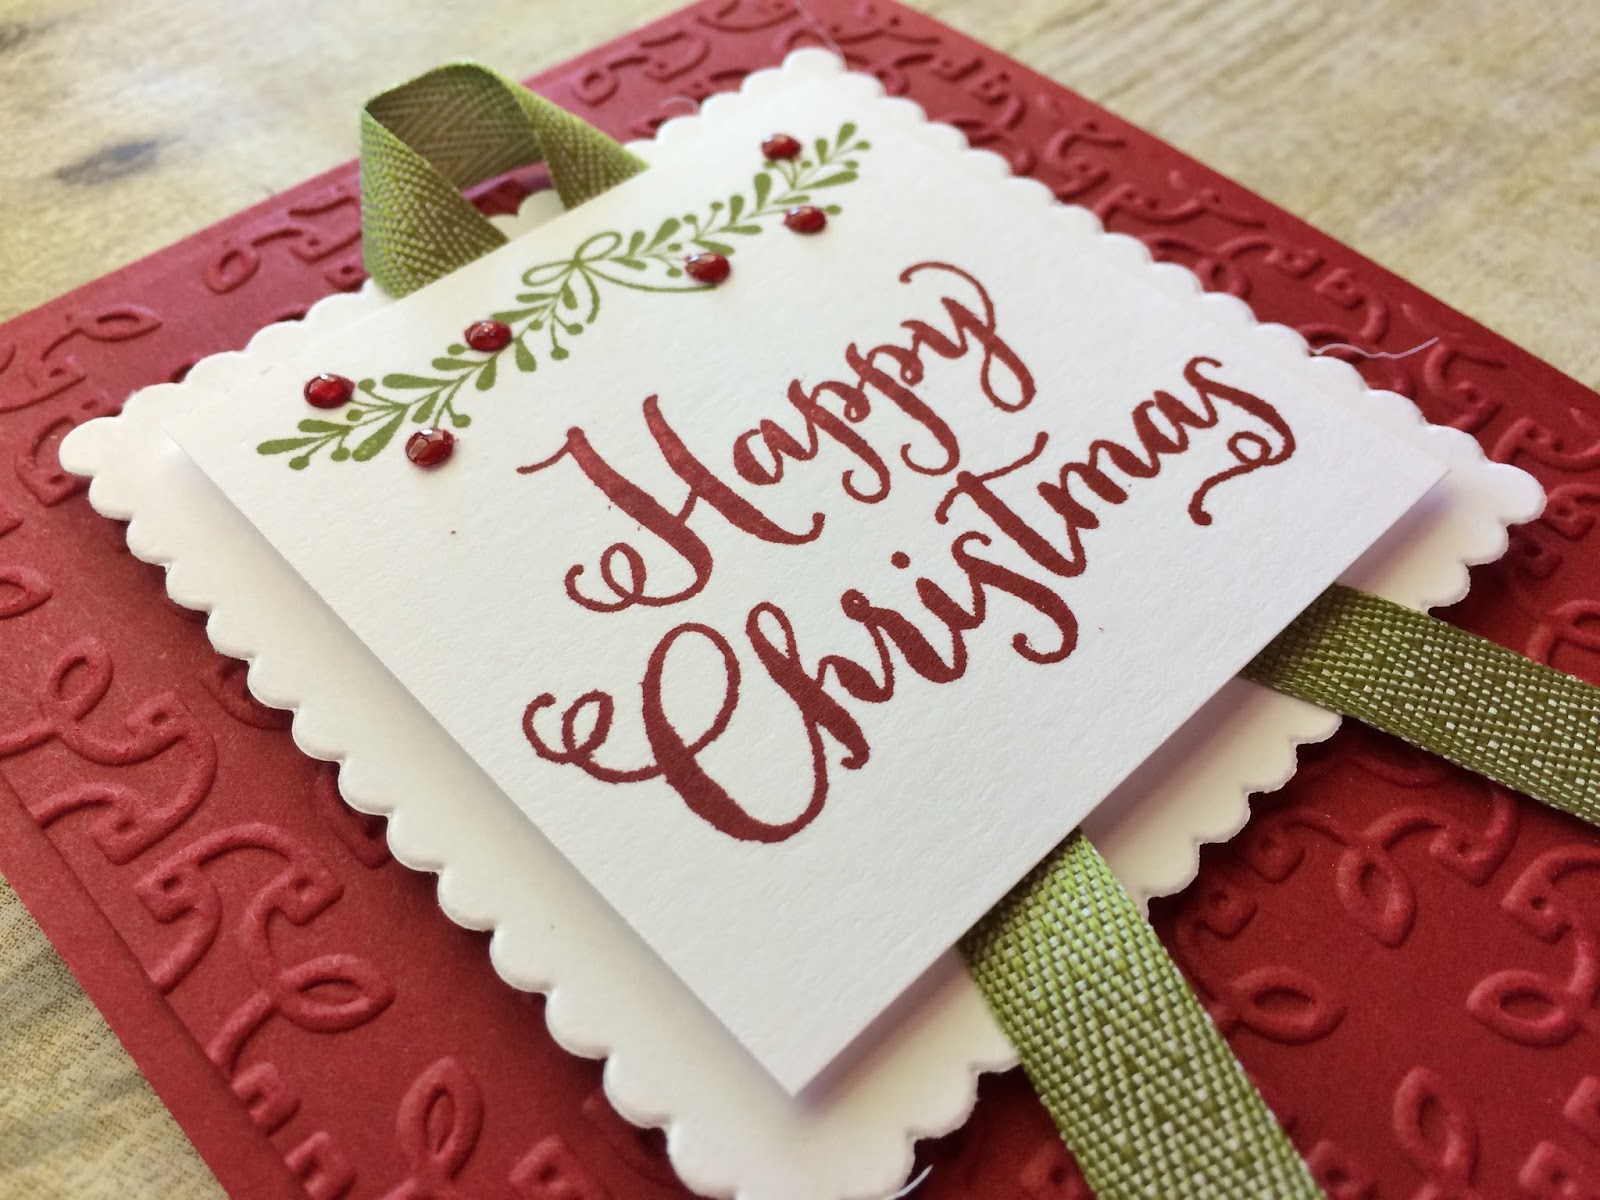
Day 13/32 Christmas Extravaganza Happy Christmas Card

Happy Wednesday My Blogger Friends!
Today is Day 13 of my 32 days of Christmas Extravaganza projects.  This card was created using product from the Stampin' UP! 2017-2018 Annual Catalog.  This is a card that is packed full of texture and holiday cheer.  Let me share that card with you now......
What a beautiful way to wish a Happy Christmas to someone special this holiday season.
It starts out by embossing a panel of Cherry Cobbler cardstock with the 'Garden Trellis Embossing Folder' ...... And then adhering that panel down to a Cherry Cobbler card base.
Next, I used the 'Oh, What Fun' stamp set to create this BEAUTIFUL sentiment square.  And the 'Layering Squares Framelits' allowed me to crop both the sentiment and scallop layer perfectly without any fuss.
Before I adhered my sentiment pieces together ....... I slipped a piece of 3/8" Old Olive Mini Chevron Ribbon between the two layers and created a pretty little loop with my ribbon.
I think this card just turned out perfectly and to me ........ just screams HAPPY CHRISTMAS!
 
Thanks for joining me today!  I'll be back tomorrow to share Day 14/32 Christmas Extravaganza with you ........ Hope you can make plans to stop back and join me for that share.  Keep Living Your Dream!
 

Tuesday, December 05, 2017

Stamparatus Reservation Today

Today is the day to order your Stamparatus Tool

Stamparatus-Collage

Check out the changes Stampin' UP! has made to the ordering reservation for the new STAMPARATUS tool

The first Stamparatus reservation window reached its maximum number of reservations in just 15 minutes, which provided Stampin' UP! with some very important information:
* You LOVE this new stamping tool!
* And we needed to make some important adjustments to the reservation process.
 
As was previously announced, the second reservation window will remain open from December 5–30; however, during this reservation period we will take as many orders as we receive (yay!) and not close the window until December 30. So whether the total number of reservations is 100 or 100,000, the window will stay open!
 
Here's a fun video to show you more about this amazing new tool.
 
Please note the following important changes:
 
* Beginning March 19, we will ship Stamparatuses in the order the reservations were received (first in, first out) and continue through the next few months and beyond as product arrives in our warehouse. Because shipment dates are based on manufacturing lead times, not all of the reservations made during the December 5–30 window will ship on March 19 (as was previously announced).
 
* In order to accommodate demand, limits have changed as follows: one reservation per customer and one per demonstrator.
 
* Because we are not limiting the maximum number of reservations for the second window, we will not offer a third window. This is the last chance for you to reserve a Stamparatus before it becomes available in the 2018-2019 annual catalog.
 
Please note what has not changed:
 
 * If you reserved more than one stamping tool during the first reservation period, that number will not change; you will still receive the same number you reserved.
 
*If you reserved one or more stamping tool(s) during the first reservation period, you may still order during the second window.
 
* The reservation window will open at 2:00 PM (MT) on December 5. 

* We can’t wait for you to get your hands on your very own Stamparatus and look forward to seeing the projects you’ll make with this incredible stamping tool.

You can go directly to my on-line store to order your Stamparatus tool:
https://www.stampinup.com/ecweb/default.aspx
Scroll down to 'The Stamparatus is here' and select 'Click Here'.
The system will walk you through the rest of the process.

If you have more questions,,,,,,,We have answers.  Check out the PDF's listed below to help you ordering your very own Stamparatus.

Day 12/32 Christmas Extravaganza Tag Holder

Happy Tuesday My Blogger Friends
Today is Day 12 of my 32 days of Christmas Extravaganza projects.  This project was created using product from the Stampin' UP! 2017 Holiday Catalog and the 2017-2018 Annual Catalog.  Let me share that project with you now.......
This project was designed to be a TAKE ALONG GIFT for any of those upcoming holiday dinner parties you might be going to.  This DARLING little tag holder comes together quickly ....... But delivers a big WOW FACTOR to whoever you are giving it to.
I started out by cutting one of the 'Acetate Card Boxes' in half and designed a Real Red and Basic Black belly band to wrap around it.  I used the 'Merry Little Labels' set to create my sentiment piece.  I stamped the sentiment onto a piece of Whisper White cardstock and then used my 'Stitched Shapes Oval Framelits' to die-cut that piece.  All that was left to do was die-cut a Real Red 'Layering Circles Scallop Framelits' piece and adhered all those pieces together.
The tag were all created with the 'Merry Little Labels' set and the 'Celebration Thinlits Dies'.
For each tag I used a combination of Whisper White, Real Red and Basic Black cardstock ....... And I used the 'Everyday Label Punch' to create each of the sentiments.
Each sentiment was stamped with Basic Black ink......
And I topped each tag off with some 'Basic Black Baker's Twine'.
These were the only two tags that I added some extra color ........ And that was done with my Stampin' Write Markers for the holly.
I'm thinking ahead this holiday season ......... And will be making up a few of these tag holders so I have them on hand for those last minute gift giving needs this holiday season.
 
Thanks for joining me today!  I'll be back tomorrow to share Day 13/32 Christmas Extravaganza with you .......... Hope you can make plans to stop back and join me for that share.  Keep Living Your Dream!

Monday, December 04, 2017

Day 11/32 Christmas Extravaganza Santa/Elf Cards

Happy Monday My Blogger Friends!
Today is Day 11 of my 32 days of Christmas Extravaganza projects.  These two cards were created using product from the Stampin' UP! 2017-2018 Annual Catalog.  And dare I say ....... these cards are packed full of holiday FUN and HAPPY.  Let me share those cards with you now......
What screams Christmas like..........
A Santa and Elf Card
This Santa card was created with Real Red cardstock on a Whisper White card base. 
I added a panel of Whisper White down the center of the Real Red panel and then added some Basic Black for the belt and topped it off with a Silver Glimmer square for the buckle.
The Elf could came together in a SNAP!  I used an Old Olive card base and added a panel of 'Be Merry Designer Series Paper' to the bottom portion.  The belt was created the same as the Santa belt ....... And that was a piece of Basic Black cardstock and a square of Silver Glimmer Paper for the buckle.
I used the scallop die in the "Popcorn Box Thinlits' to create the Whisper White collar piece ....... And three 1/2" Basic Black circles were punched out to create the buttons.
Two festive cards that will surely make someone on your Christmas card list SMILE BIG this holiday season.
 
Thanks for joining me today!  I'll be back tomorrow to share Day 12/32 Christmas Extravaganza with you ........ Hope you can make plans to stop back and join me for that share.  Keep Living Your Dream!

Sunday, December 03, 2017

Day 10/32 Christmas Extravaganza - DSP Card

Happy Sunday My Blogger Friends!
Today is Day 10 of my 32 days of Christmas Extravaganza projects.  This card was created using product from the Stampin' UP! 2017 Holiday Catalog and the 2017-2018 Annual Catalog.  This card is a SUPER QUICK & EASY GET 'ER DONE kind of holiday card.  Let me share that card with you now......
The focus on this card is the wonderful 'Be Merry' Designer Series Paper.
I created two panels of Designer Series Paper ........ And matted each with either Cherry Cobbler or Garden Green cardstock.
My sentiment was stamped from the 'Merry Little Labels' set with Cherry Cobbler ink.  I punched that sentiment out with the 'Starburst' punch and then matted it with a circle die-cut from the 'Layering Circles Framelits Dies' using Cherry Cobbler cardstock.
I think this will be a GO TO card for me this year!
 
Thanks for joining me today!  I'll be back tomorrow to share Day 11/32 Christmas Extravaganza with you ........ Hope you can make plans to stop back and join me for that share.  Keep Living Your Dream!

Saturday, December 02, 2017

Day 9/32 Christmas Extravaganza - Tree Card

Happy Saturday My Blogger Friends!
Today is Day 9 of my 32 days of Christmas Extravaganza projects.  This card was created using product from the Stampin' UP! 2017 Holiday Catalog and the 2017-2018 Annual Catalog.  Let me share that card with you now......
This card is a pretty little trio of Christmas Trees all lined up for that someone special on your Holiday card list.
I started this card out by stamping my "Merry Christmas" sentiment from the 'Star of Light' stamp set onto a Whisper White panel.  Then I matted that Whisper White panel to a Basic Black panel and got ready to decorate the front........
Next, I selected three different quilted pattern pieces from the 'Stitched Christmas Designer Series Paper Stack' to create my Christmas Trees.  I used the 'Quilt Builder Framelits Dies' to cut die-out my three trees and then grabbed some Garden Green cardstock and die-cut out the three bases for each of my trees.
I used two pattern pieces from the 'Quilted Christmas Designer Series Stack' to create my background color blocking ........ And matted those two blocks onto a panel of Basic Black before adhering it down onto my Whisper White card base.
All that was left to do was wrap some 'Black Vintage Crochet Trim' around my card and called this card DONE ........ And PERFECT!!!!!  
So there you have it friends ....... I have to admit that this card turned out pretty SPECIAL ...... But think this card would look AMAZING using  any of the pattern paper found in the 'Quilted Christmas Designer Series Paper Stack'.
 
Thanks for joining me today!  I'll be back tomorrow to share Day 10/32 Christmas Extravaganza with you ........ Hope you can make plans to stop back and join me for that share.  Keep Living Your Dream!

Friday, December 01, 2017

Day 8/32 Christmas Extravaganza - Stocking Card

Happy Friday My Blogger Friends!
Today is Day 8 of my 32 days of Christmas Extravaganza projects.  This card was created using product from the Stampin' UP! 2017 Holiday Catalog and the 2017-2018 Annual Catalog.  This card just has to be one of my FAVORITE cards I'm using when my plan is to give a gift card this holiday season.  Let me share that card with you now......
How FESTIVE & FUN is this card!
I started out by using the 'Holly Textured Impressions Embossing Folder' on the Old Olive panel  I matted that embossed Old Olive panel onto a panel of Real Red and then adhered both of those panels down to a Whisper White base card.
I used the 'Trim Your Stocking Thinlits Dies' to create my darling little stocking ....... and my accent cuff, heel and toe pieces used the 'Merry Little Christmas Designer Series Paper' to add some SERIOUS FUN to my stocking piece.
I used VersaMark and White Embossing Powder to create some WOW FACTOR for my sentiment piece.  And I used the 'Half Full' set to create that Merry Christmas sentiment.
After I had my stocking completed ...... I used some 'Foam Adhesive Strips' and positioned those strips around the outer edges of my stocking and adhered the stocking down to the embossed Old Olive panel.  This created some real dimension to my stocking ...... and also served as a way to create an opening for my gift card to slide into the top of the stocking.
All that was left to do was insert a gift card and attach a 'To/From' tag to the top of my stocking.
Just doesn't get any easier than that .......
And the WOW FACTOR is off the chart for whoever gets this card.
 
Thanks for joining me today!  I'll be back tomorrow to share Day 9/32 Christmas Extravaganza with you ........ Hope you can make plans to stop back and join me for that share.  Keep Living Your Dream!