Sunday, November 13, 2011

SBS November Theme Card

Happy Happy Sunday My Blogger Friends!
I was able to finish cutting, assembling and packaging my Stamp Camp
packets (all 24 of them) yesterday.........So today I'm able to do some serious
playing........But first.......I want to share my
SaddleBrooke Stampers Theme Card with you.......
 Our theme card for November was "Grandma's Kitchen"....so I borrowed a
stamp set from my BFF and decided to paper piece this entire stamp set with
a Echo Park Paper Pack that one of my SaddleBrooke girlfriends gave me.
 I used the Country Drive and Springtime 6x6 paper pad
for all the pieces of this fun stamp set.
 I think my favorite part of this card has to be the super fun Pot Holders that
look like they are hanging from the hooks on the little kitchen shelf.
 And what would grandma's kitchen be without a homemade pie.....and
a super fun sugar container?
 I used my Scallop Border punch to make the fun border
for the top of my card........
And I was super impressed with how amazing this card turned out.......and
many thanks to Jan for allowing me to borrow her
"Grandma's Kitchen" stamp set.

I'm off to go do some shopping with two of my SaddleBrooke Stamper
friends today - but I'll be back tomorrow to share my SaddleBrooke
Stampers Challenge Card with you.  Hope you can join me.
Keep Living Your Dream!

Saturday, November 12, 2011

Crafternooners & FU Swap for October

Happy Happy Saturday My Blogger Friends.
I'm taking a little break today from cutting up material for my Stamp Camp on Wednesday
and I'm heading up to Queen Creek (Mesa area) to partidipate in a class that Di Gibbs is offering. 

So QUICKLY today - I will share alittle something something that was made at this years 
Stampin' UP! convention.........Let's get started..........
 I shared this fun little Convention Make N Take with my Crafternooner and FU Group Gals in October.  It's a cello bag that is filled with new In-Color Tags.
This tag packet came together by using the adorable "Easy Events" (P.57) Stamp Set and also the "Itty Bitty Shapes Punch Pack" P.210) Flower to create the flower image of my tags.
I received this Make N' Take packet from my good friend Mary Fish (http://stampinpretty.com) - who offered it to me while I was at her studio one day creating.  Of course the Make N' Take came with these fabulous instructions that Stampin' UP! provides with every packet they hand out at convention or regionals.  Love that they provide written instructions and a color photo of your completed project.
The bag topper was a 2-3/8" Circle punch in Pool Party and folded in half.....and then a "Mini Clothespin" (P198) was added to the top for that little SOMETHING SOMETHING to complete our bag topper!
Of course you can't just leave the Mini Clothespin sitting up there all naked.....so we added one of the Itty Bitty Punch Pack Flowers to the center of the Clothespin and called this one finished.
And here are all the supplies that I had spread all over my studio work surface to complete this project.  It seemed to me that for just a few supplies - this project came together in a SNAP!

Many THANKS to my dear friend Mary Fish (http://stampinpretty.com) for providing me with this wonderful Make N' Take project from convention.  It was my luck that Mary hadnm't completed her project while at convention and she offered it to me.  I just couldn't believe that she was offering it to me and of course I said YES!  I came straight home and completed the project and just knew that it was going to be something that I would share with several of my SaddleBrooke friends.  Thank You Mary!

I'll be back tomorrow to share the two card that I made for my SaddleBrooke Stampers meeting this past Wednesday.  I have a Theme Card and Challenge Card to share with you...............Hope you can swing back tomorrow and join me for those two cards.  Keep Living Your Dream!

Friday, November 11, 2011

Halloween Cards

Happy Friday My Blogger Friends! 
Today I will be spending the entire day prepping for my upcoming Stamp Camp on Wednesday......SO......My post for today will be SHORT and QUICK.
First up is a card I received from my BFF Jan. 
Check out this amazing Halloween card that Jan made! 
She created this card with the help of some Tim Holtz Halloween paper and seriously .......
from a bag full of srapbooking and cardmaking supplies.
I think my single most favorite part of Jan's card is this amazing lace trim she added
 to the bottom of my card.......OH SO PRETTY!
And I love love love the spooky skeleton that Jan framed out on the front of my card.
I found a special little home on my upper cabinets that this FUN little card sits
and every time I walk into my studio I'm able to see this card and SMILE!
The other card I want to share with you today is this AMAZING creation that
my friend Berta made for our Crafternooners card challenge for October.  
Our color combination for this card challenge was Rust and Green ......
which Berta was able to NAIL!
We also were asked to use Nestabilities or an embossing folder on our card challenge...........
and Berta was able to use BOTH on her card challenge.
I have to tell you that there are certain cards that I receive in the mail......which TOTALLY SPEAK to me about who has sent them to me.  When I receive a card from Berta......I know it's from her by all the amazing color and techniques she uses on her cards.  And without fail.......This card totally spoke to me that it was from my good friend Berta .....even before I knew it was from her.
Many THANKS to both Berta and Jan for creating two amazing fall cards for me.....I seriously LOVE BOTH OF THEM!
I'm off to go begin the long process of cutting and assembling my Stamp Camp packets.......My goal is to have all 24 packets cut and assemblied by Sunday night....WISH ME LUCK!

I'll be back tomorrow to share more Kards by Kadie creations with you - Hope you can join me.
Keep Living Your Dream!

Thursday, November 10, 2011

Crafternooner November Cards

Happy Happy Thursday My Blogger Friends....and THANK YOU for joining me today. 
I'm off to play with my good friend Nancy and KP today - we are heading up to Phoenix to do some serious shopping for KP's new house.  That means.......a serious road trip to Ikea and the Container Store....and whatever stores come our way as we travel the big city of Phoenix! 
Today I have two cards to share with you - Both made at my November Crafternooners gathering last Friday.  First up is a beautiful card that Jan had us make. We embossed both the "Hello Doily" (P127) stamp set and the "Delicate Doilies" (P127) stamp set with White emobssing powder and also embossed the "Hand-Penned Holidays" (P15-Mini) stamp set.
Check out how BEAUTIFUL both of these sets stamped on Gold Glossy Cardstock....OH SOOOOO PRETTY!
And the "Merry Christmas" is BEYOND BEAUTIFUL!
I fell in love with this card so much.......I made it for my SouthWest Stampin' UP! Demonstrators swap this month.  They too loved this card - and I'm pretty sure there will be plenty of ladies copying this card from me.  MANY THANKS Jan for this amazing idea! 
And my next card is a totally FUN and card that packs a TON OF WOW FACTOR - and that would be the card that Opal had us make.  Opal actually did a LOT of the prep work for us.......She made the colorful cones in advance......so all we needed to do was glue them to a 1-3/4" Circle and arrange the lower five 1-1/4" circles to the bottom portion of our card.  Such a quick card - thanks to all the work that Opal did in advance for us!
Needless to say....Opal knows my favorite color is PINK and she picked out all these fun pink colors and several coordinating colors to go along with the most AMAZING pink button that took center stage of my arrangement.   I LOVE LOVE LOVE this button!
Here's a little closer look at this BIG PINK BUTTON......and the pink bakers twine that Opal had me use for the center of my button was the cherry on top of this project for me.
I just love how these little bugles got all lined up in a circle to form this pretty amazing medallion centerpiece.....oh so fun and oh so pretty.  Thank You Opal for a project that I will for sure be making more of.  LOVE IT!

Thanks for joining me - I'll be back tomorrow to share more Kards by Kadie Creations....Hope you can drop back in to see what I've got planned.  Have a fabulous day and Keep Living Your Dream!

Wednesday, November 09, 2011

CraftJunkieToo Thanksgiving Design Team Share

Happy Happy Wednesday My Blogger Friends and a
VERY SPECIAL WELCOME to all my visiting CraftJunkieToo Friends
who are visiting my blog. 

Today, Tracy over at CraftJunkieToo asked her Design Team members to participate in a special CraftJunkieToo Design Team Thanksgiving Project Post.  We were asked to create a Thanksgiving Project (designers choice) and I want to share the Thanksgiving Treats that I'm making for my Grandkids to share with their fellow classmates for Thanksgiving.  Here are those treats........
 I started out with these SERIOUSLY CUTE Turkey's............
 And added them to the top of a pencil.......To create a Fun Turkey Pencil Topper.
The Turkey bodies were made with 1-1/4" and 1" circle punches.  The fethers were made from a small oval punch.  I punched out one each of Red, Yellow, Tan, Green and Orange cardstock to form the feathers for my turkey.
 I assemblied my turkey's..........
 And more turkey's..........
 And attached pencils to those turkeys.........
 And MORE Turkey's on Pencils........
 And just when I thought I might be done making turkey pencils.........
 I realized that I had to put together a total of 175 Turkey Pencils for all of my grandschool grandkids!
 So kept punching........
 And kept sticking assemblied turkey's to the end of the pencils.......
 Until I FINALLY reached the magical number of 175............
 It was a lot of work....and with the help of my trusty 1" and 1-1/4" Circle Punch....and my small oval punch......I was able to pull these together for my grandkids to give out to their fellow classmates the week of Thanksgiving.
 I also added some black doddle lines to the edges of each of the ovals.....It seriously gave the Turkey feathers that little something something that I was looking to finish off my Turkey Pencils.
 Here's the punches I used for the Turkey Body.
And the Trio Punch was used to create the Turkey's feet.
I have to say.........All in All....This was a FUN project and I just know my Grandkids are going to love handing these treats out to their fellow classmates for Thanksgiving. 

Many Thanks to Tracy for this Design Team Challenge......It was FUN and I look forward to our next Design Team Challenge (scheduled for November 23rd).

Thanks for joining me today - I'll be back tomorrow with more Kards by Kadie creations ..........
Hope you can join me. 

Keep Living Your Dream!

Tuesday, November 08, 2011

Simply Score - Di Gibbs Style Day Two

Happy Tuesday My Blogger Friends....
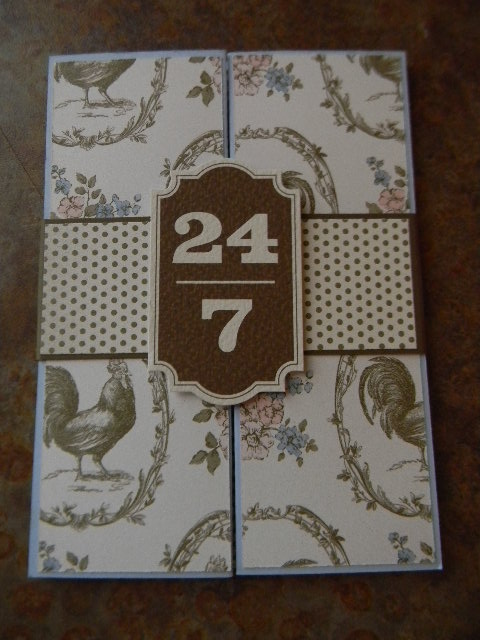
Today I will be sharing the gate-fold card and medallion piece that we made at Di Gibbs Simply Scoring Tool Class a couple weeks ago.  Let me just JUMP right in........
We started out with the "Beau Chateau" DSP (P184) and used the "Side Notes" (P190) die-cuts to embellish the belly band of our gate-fold card.....Oh this is starting out SO PRETTY!
Di Gibbs gives amazing direction and instructions in her classes and creating this
gate-fold card was a snap with the help of our Simply Score Tool.
Here's a view of the inside of our card - after we remove the belly band.
And one last additional view of our Gate-Fold card in all it's glory.
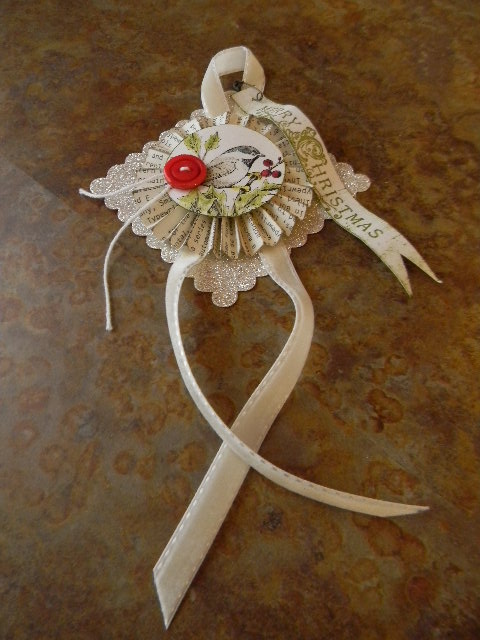
 The last thing I will be sharing with you is the wonderful paper medallion that Di had us make -
OH MY GOSH Friends.......this was SOOOOO Stinkin Easy To Make.......
We stamped a "Merry Christmas" sentiment on a 1/2" strip of Whisper White card stock
and made a thin banner for our medallion........FABULOUS little touch!
A special little WOW factor came when we added a Real Red button to the front of our Medallion.  Don't you just love the way Di had us tie the Bakers Twine on to the button??????? 
The base of our Medallion is a Scallop Square which was die-cut from the Big Shot Machine and all our layers were stacked onto the center of that square to build our medallion.
The medallion is made from a 1-1/4" x 12" piece of DSP that is scored every 1/4".  If you spend the time and ink all the edges of your scored out piece it will create lots of texture and dimension to your finished medallion.
I'm planning to make each of my Grandkids teachers one of these for Christmas. 
I plan to attach a pin to the back of each medallion and make a
Holiday Pin for the kids teachers to wear during the upcoming Holiday Season. 
I just know they are going to LOVE LOVE LOVE 'em. 

Many thanks to my SU demonstrator friend Di Gibbs for all the amazing projects she shared with me during her recent Simpy Score Tool class - If you are ever in the Mesa area and have some extra time on your hands......I strongly recommend you sign up for one of Di's classes that she teaches at her Queens Creek/Mesa stamp studio.

I have a special CraftJunkieToo Design Team Challenge to share with you tomorrow.  
Our fearless leader Tracy asked her Design Team Members (that would be ME!) to prepare a Thanksgiving Project and I prepared the PERFECT project for that challenege and will be sharing that with you tomrrow morning.  Hope you can join me for that project. 

Appreciate you stopping by today and hope to see you back here tomorrow
for my CraftJunkieToo design team share.  
Keep Living Your Dream!


I'll be back tomorrow to share the final project that we made at Di Gibbs Simply Score Tool class....It seriously is one of those projects that I think I'm going to make for each of my grandkids to give to their teachers for the holiday's....OH SO PRETTY!

Keep Living Your Dream!