Happy Tuesday My Blogger Friends!
My blog post for today is '3D/CASE IT TUESDAY'. That means today I have a fun little 3-D project that I found on the internet ....... And I created a CASE of that project to share with you today. This project was SUPER FUN to create, and I want to jump right in and share that project with you now.This 3D project was inspired by Cindy Brumbaugh ....... Who shared a video on how to create this box back on June 12, 2019. It might be a couple years old......But still a
GOODIE. Here is the link to her Utube video:
Stampin' Up Scalloped Notecards Holder - YouTubeI fell in
LOVE with this box design and made a few slight tweaks of my own to end up with this
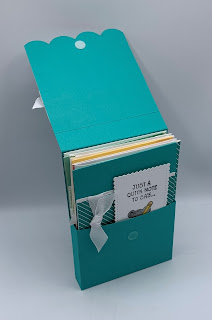
DARLING Note Card Gift Box.
For the base box I used Bermuda Bay card stock and measured out a 3-1/2" x 9-1/2" piece. It was scored (with the long side at the top of my Simply Score Board) at 3-3/4", 4-1/2", 8-1/4" and 9". Then on the short side I scored at 3/4" and this formed the bottom of my box. For the flap-over section, I used a piece of Bermuda Bay card stock that measures 3-3/4" x 10". I scored at piece at 5-1/4" and 6".
I was able to tuck five fairly chunky note cards inside and also coordinating envelopes for each.
Here is how the box opens......
These are the five cards I created. I used 'Mischievous Mice' stamp set along with some 'Sunshine & Rainbows Designer Series Paper' to decorate my cards.
Here's the Bermuda Bay version.....
And the inside.
The Mint Macaron version.....
And the inside.
Here's the So Saffron version......
And the inside.
The Granny Apple Green Version.....
And the inside.
And finally, the Flirty Flamingo version.....
And the inside.
I also decorated the front of my box using the 'Scalloped Contours Dies' for the scallop edge.
So there you have it friends......
Just TOO CUTE for words wouldn't you agree!
Thanks for joining me today! I'll be back tomorrow to share a Wine Down Wednesday card with you ........ Hope you can make plans to stop back and join me for that share. Keep Living Your Dream!


Cute packaging for all those little darlings inside!
ReplyDeleteThanks my friend. Couldn't be happier with the way this gift turned out.
DeleteJust TOO cute!!! Great projects.
ReplyDeleteThanks Wanda. SO GLAD you like my little project.
DeleteThese are adorable, Kadie!!!
ReplyDeleteWhy thank you Michelle. And many thanks for stopping by.
Delete