Sunday, September 30, 2018

World Card Making Day Promotion

10.01.18_TH_SHAREABLE_NA

Did you know that October 1st - October 7th is going to be a very special week at Stampin' UP! 
Stampin' UP! will be celebrating World Card Making Day with a week long promotion (that you won't want to miss)!
The card making products that Stampin' UP! has selected will be offered at a 10% discount.  You can click on the image below to open a full-size PDF document with the sale items and prices.  But hurry ........ this sale ends on October 7, 2018 at 11:50 PM (MT).

Signs of Santa Card

Happy Sunday My Blogger Friends!
Today is Spotlight Sunday ....... And I have a card I created using product from the 2018 Stampin' UP! Holiday Catalog.   This card uses several products from that catalog ....... And I'm thrilled with the way it turned out.  Let's jump right in with my card share for today..........
How FESTIVE & FUN is this cute little Santa card!
I started out by using the 'Swirls & Curls Embossing Folder' on my Poppy Parade panel.
Next, I added a panel of the OH SO FUN 'Santa's Workshop Designer Series Paper' across the center of my card.
Then I stamped the ADORABLE Santa from the 'Signs of Santa' set onto a panel of Whisper White card stock and matted that to a panel of Garden Green card stock.
And the final touch to this card was adding three little 'Red Rhinestones' in the corner of my stamped sentiment and was able to call this card done ........ In no time flat!
Can see myself making a few more of this card for several friends on my Christmas card list.
 
Thanks for joining me today!  I'll be back tomorrow to share an upgraded version of this very card with you ...... Hope you can make plans to stop back and join me for that share.  Keep Living Your Dream!

Saturday, September 29, 2018

Thank You Tag

Happy Saturday My Blogger Friends!
My blog post for today is Paper Pumpkin Saturday ........... And I would like to share with you the project I created using the August Paper Pumpkin kit.   Here's that project.......
Check out this alternate project I made.......
I created a tag with the base cards that were included in this kit. 
My sentiment panel was stamped with VersaMark ink and then sprinkled with 'Silver Embossing Powder' before heat setting.  One product I did add to this project were the two 'Blossoms Elements' on both sides of my stamped sentiment.
And the final addition that I added to this tag was some 'Silver Metallic Thread' behind the stamped sentiment.
Just couldn't be happier with the way this tag turned out!

Thanks for joining me today!  I'll be back tomorrow to share a Spot Light Sunday card with you ...... Hope you can make plans to stop back and join me for that share.  Keep Living Your Dream!

Friday, September 28, 2018

Friends Friday Pics

Happy Friday My Blogger Friends!
My blog post for today is Friends Friday.  On Friday's, I have the honor of spot-lighting some of the fabulous cards and projects that I received from Friends ....... Fellow Demonstrators ........ and Family.  Each of these creations are works of art........and it is with great pleasure that I share with you today some AMAZING projects that three very special friends made for me.
Check out this DELISH project that my Scissors and the City friends Donna & Kathy made for me.
This OH SO YUMMY Apple Pie creation was made in a mini version ...........They used the lid of a Mason Jar to cook this little Apple Pie for me.
And how about a FUN packaging of some Boston Baked Beans.
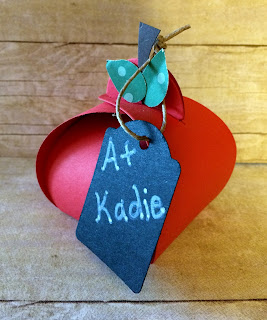
This ADORABLE little apple packaging had some yummy candy tucked inside.....
And who wouldn't LOVE receiving this Chix-Mix box.....
And Donna & Kathy's final gift was this CREATIVE stress relief package!
My final share for today is this SUPER YUMMY box of Carmel Corn that my good friend Gus made for me.  I have to say.......The Carmel Corn was OVER-THE-TOP YUMMY!!!!!
 
Thanks for joining me today!  I'll be back tomorrow to share a special Paper Pumpkin Saturday creation with you ........ Hope you can make plans to stop back and join me for that share.  Keep Living Your Dream!

Thursday, September 27, 2018

Snowman Cheer Tag

Happy Thursday My Blogger Friends!
My blog post for today is Tag Thursday.  Today, I will feature a tag I created and show you how easy it is to use minimal supplies to create a SUPER PRETTY TAG.  Now that you have the details for my Tag Thursday creation for this week ........ Let's jump right in with my tag share for today........
Check out this FESTIVE & FUN snowman tag!
I started this tag off by stamping the snowflake image from the 'Spirited Snowmen' set to my Whisper White tag.  I also added a sweet sentiment piece to the top of my tag.........And used the 'Layering Oval Framelits' to create that sentiment piece.
I gave my tag a couple drifts of snow ........ and sponged the edges with Balmy Blue ink.
My SUPER HAPPY snowman was stamped from the 'Spirited Snowmen' set and colored in with my Stampin' Blends.
I topped off my tag with some 'Striped Burlap Ribbon' and tied it off with a pretty bow with some 'Linen Thread'.
Just couldn't be happier with the way this tag turned out!

Thanks for joining me today!  I'll be back tomorrow to share some Friends Friday creations with you ........ Hope you can make plans to stop back and join me for that share.  Keep Living Your Dream!

Wednesday, September 26, 2018

JOY Season Greetings Card

Happy Wednesday My Blogger Friends!
My blog post for today is Wine-Down Wednesday.  My middle of the week card feature for today will hopefully offer you some inspiration and provide you with some motivation to keep you moving through your busy week.  Let's jump right in with my card share for today........
Check out this SUPER PRETTY holiday card that I created.
I started this card out by stamping my 'Feathers & Frost' image onto a panel of Whisper White card stock.  I used Garden Green ink and then quickly sprinkled 'Clear Embossing Powder' over the top and heat set it.  After the image was cooled......I stamped the "JOY" into the center with Chery Cobbler ink.
Next, I layered that Whisper White panel onto a panel of Cherry Cobbler and adhered that down onto my Garden Green panel.
I stamped my sentiment from that same set and used 'Clear Embossing Powder' on that too.
Before I adhered that panel down to my Whisper White card base ....... I wrapped some 'Garden Green Baker's Twine' around it and tied it into a pretty bow.
A simply darling little card that came together in no time flat!
 
Thanks for joining me today!  I'll be back tomorrow with a Tag Thursday creation to share with you ........ Hope you can make plans to stop back and join me for that share.  Keep Living Your Dream!

Tuesday, September 25, 2018

This Is For You Bag

Happy Tuesday My Blogger Friends
My blog post for today is 3-D Tuesday.  That means today I have a fun little 3-D project to share with you.  This project is SUPER FUN to create and the product is featured in both the 2018 Stampin' UP! Holiday Catalog and the 2018-2019 Annual Stampin' UP! Catalog.  Let's jump right in with my project share for today.......
I just couldn't be happier with the way this treat bag turned out.
I started out by using one of the 'Striped Treat Bags' and adding a pretty Cherry Cobbler Belly Band.  To the top of that belly band......I added some new 'Striped Burlap Trim'.
The Belly Band is just a decorative design element........And doesn't have to be removed to open this Treat Bag.
I created this beautiful Gold Embossed sentiment piece for the front of my bag......
And used the 'Take Out Treats' set along with some VersaMark ink and 'Gold Embossing Powder' to create this beautiful sentiment piece.
My sentiment is punched out with the 1-1/2" Circle Punch ....... And then I layered a 1-3/4" Cherry Cobble Circle along with a 2-1/4" Gold Circle.  Next, I adhered all those circles to a 'Colored Doilies' (using the white side).  The final layer was a Cherry Cobbler 'Layering Scallop Circle and then I was able to call this sentiment piece done.
The finishing touch to my sentiment piece was adding 2-Old Olive 'Sprig Punch' pieces to the backside of the Cherry Cobbler Layering Scallop piece.
The top Cherry Cobbler Scallop Circle piece has a small magnetic attached to it......
And the coordinating magnetic is attached behind the center of the Belly Band.
To the inside of my Treat Bag ....... I added several small embellishment packages and called this project done in no time flat.
This is one of those fun little projects that can be made for a last minute gift packaging need.......And will make whoever you give it to think..........You put LOTS OF TIME into creating it.

Thanks for joining me today!  I'll be back tomorrow to share a Wine Down Wednesday card with you ........ Hope you can make plans to stop back and join me for that share.  Keep Living Your Dream!

Monday, September 24, 2018

Poinsettia Trio Upgrade

Happy Monday My Blogger Friends!
Today is Mix It UP! Monday and I have an upgraded version of the card I shared with you yesterday.  I used the exact same product that was used to create yesterday's card ....... but added one additional product found in the 2018 Stampin' UP! Holiday Catalog to bring this card up to the next stamping level.
Here is my Spot Light Sunday card from yesterday on the TOP.....
And my Mix-It-UP! Monday card for today on the BOTTOM.....
 
Now this is what I call an upgraded card!!!!
By adding the new 'Merry Merlot Joyous Noel Glimmer Paper'
My upgraded card takes on a whole new level of SPARKLE & SHINE!!!!!
 
I started out by using the same "Merry Christmas" sentiment (from the 'Timeless Tidings set) to create my Black Embossed sentiment.
My poinsettia flowers were stamped with VersaMark ink and also sprinkled with 'Black Embossing Powder' to really help all three flowers POP OFF this card.
Each circle was matted with a 1-1/2 Black Circle and that too gave each poinsettia an extra layer of POP!
And I added the 'Braided Linen Trim' to the top section of my center panel.
 So tell me friends........
How FUN are both of these poinsettia cards!!!

Thanks for joining me today!  I'll be back tomorrow to share a 3-D Tuesday creation with you ...... Hope you can make plans to stop back and join me for that share.  Keep Living Your Dream!