Happy Monday My Blogger Friends and WELCOME BACK! As promised.....Today I have two more cards/projects from my October Stamp Camp (which was last Wednesday).
Here's a recap of all the projects we made last Wednesday - and today we will be focusing in on the Candy Corn Cello Bag Treat......and......The Pumpkin card....Let's JUMP right in.........
First up is a project that I know you have seen at MANY OTHER Blogs. This project was made possible with the help of those AMAZING NEW
"Cello Bags" (P11-Mini) that are being offered in the new Mini Catalog. How wonderful are these little bags? I just knew when I saw these little babies that I would be purchasing MANY of them and using them for my Grandkids school treats (which I did this year).
I got the idea for creating the adorable Candy Corn Tag from a fellow SU demo blog (sorry-I'm not recalling the blog-but will post it when I run across it again). All she did to create this Candy Corn Tag was use the
"Bright DSP Collection" (P.186) and with the help of the
"Petite Pennants Builder" (P.213) punch she punched out one pennant in Pumpkin Pie and one in Daffodil Delight and trimmed each of the punches down to fit perfectly over a base Whisper White pennant. We used the
"Tiny Tags" (P.136) stamp set and stamped out the "Boo" and punched it out using the
"Jewelry Tag Punch" (P.210). And we then hung our Jewelry Tag from our Cello Bag with the help of some
"Linen Thread" (P.194) and
1//8" Taffeta Ribbon (P.195) in Pumpkin Pie.
My good friend Kris showed me how to feed the candy corn into the cello bag.....Which was BRILLIANT! Because the opening is so small to our Cello Bags........If you take a 8-1/2"x1" piece of computer paper and fold it in half ....you will then be able to slip your computer paper into the cello bag and feed your candy into the bag with the help of this computer paper strip. When you have the amount of candy you want in your cello bag....simply start pulling your computer paper out....and your candy will remain in the bag ......The candy will be NICELY STACKED UP and your computer paper will just slide right out of the cello bag!
(MANY THANKS KRIS for this amazing tip on getting candy into the Cello Bags....without having to finger up all the candy!)
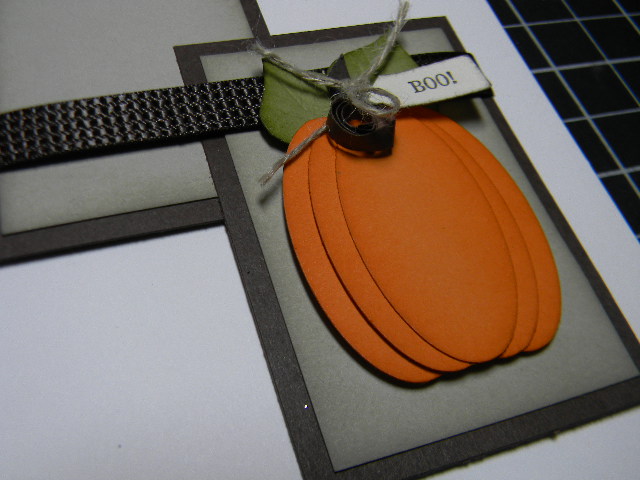
And the last card I will be sharing with you today is this fun little pumpkin card. We created our pumpkin with five
"Large Oval" (P.212) punches - that were inked and stacked along side of each other to create a fun little pumpkin creation. We stamped two
"Falling Leaves" (P.29) images and cut them out and added those to the top of our pumpkin. A thin strip of Early Espresso cardstock was added to create a stem.
And to add yet one more fabulous element to our card, we added the "Boo" from the stamp set "Tiny Tags" (P.136) and punched it out using the "Jewelry Tag" (P.210) punch. We also added the new 3/8" Quilted Satin Ribbon (P30-Mini) in Early Espresso around the frames of our card and called this one DONE! It's amazing what a WOW FACTOR a little ribbon can add to your card.
Thanks for joining me today - I'll be back tomorrow to share the last two cards from last weeks Stamp Camp.......... Hope you can come back and join me for those last two cards.
Keep Living Your Dream!


Wondering if Carol R has stopped by to check out these cards that we made at Stamp Camp. Do you have any questions on any of the cards we made Carol?
ReplyDelete