Wednesday, January 31, 2018

Panda Birthday Card

Happy Wednesday My Blogger Friends!
My blog post for today is Wine-Down Wednesday.  My middle of the week card feature for today will hopefully offer you some inspiration and provide you with some motivation to keep you moving through your busy week.  Let's jump right in with my card share for today........
How ADORABLE is this 'Party Pandas' FREE Sale-a-bration set!
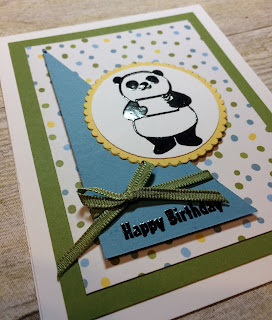
I started this card out by adding a panel of Old Olive cardstock to the top of my Whisper White card base.  Then I added a layer of 'Sweet Soiree Designer Series Paper' to that Old Olive layer and I was off and running with this card.
I used a Marina Mist cardstock panel that was cut into a triangle and then stamped my "Happy Birthday" sentiment at the bottom of that panel.  I used 'Clear Embossing Powder' to that sentiment and that gave my sentiment a FUN SPARKLY look.
For one additional touch for that sentiment panel ...... I wrapped some 'Old Olive 1/8" Sheer Ribbon' above the stamped sentiment and tied it up into a pretty bow.
My DARLING little Panda was stamped with the 'Party Pandas' set and I also used 'Clear Embossing Powder' to give my Panda a PRETTY SHINY look.
And to finish off my card ...... I matted my embossed Panda onto a Daffodil Delight scallop circle and popped that BUNDLE OF CUTENESS onto the center of my card.
I have plans to send this card off to my little grandson for his birthday this year ....... Just know he's going to SMILE BIG when he sees that cute little Panda Bear! 

Thanks for joining me today!  I'll be back tomorrow with a Tag Thursday creation to share with you ........ Hope you can make plans to stop back and join me for that share.  Keep Living Your Dream!

Tuesday, January 30, 2018

Crate of Thank You Cards

Happy Tuesday My Blogger Friends
My blog post for today is 3-D Tuesday.  That means today I have a fun little 3-D project to share with you.  This project is SUPER FUN to create and the product is featured in both the 2018 Stampin' UP! Occasions Catalog and 2017-2018 Annual Stampin' UP! Catalog.  Let's jump right in with my project share for today.......
How fun would it be to give this little crate of thank you cards to a special friend!
I began this project by using the 'Wood Crate Framelits' and the 'Wood Textures Designer Series Paper Stack' to create my base box.  Then I wrapped some of the new SUPER YUMMY 'Berry Burst 3/8" Metallic-Edge Ribbon' around the center of my box and I tied that ribbon up into a pretty bow.
Next, I created a sweet little sentiment tag for the front of my crate.   I used the 'Tabs for Everything' set and stamped my "For You" sentiment with Berry Burst ink ...... And then had some fun layering different circles to that sentiment.
All that was left to do to finish off my crate ........ was grabbing some of the OH SO FUN 'Sweet Soiree Ready Shreddie' and I added a handful of that 'shreddie' to the inside of my box.
For the three little 3"x3" notecards that I added to the inside of my crate, I used the 'Sweet Soiree Embellishment Kit' and selected three of the beautiful floral die-cuts for the front of each card.
For my first card ...... I used Powder Pink and Flirty Flamingo cardstock to create the perfect panel for the front of my Whisper White 3"x3" card.
I used the Washi Tape that comes with the 'Sweet Soiree Embellishment Kit' to add a little sparkle element to the bottom edge of each card.
This card used both Powder Pink and Berry Burst cardstock for the panel.......
And each card used the "Thank You" sentiment that is in the 'Petal Palette' set.  To add one more level of WOW FACTOR to each card ...... I used 'Silver Embossing Powder' for each stamped sentiment.
And this final card is a Calypso Coral and Berry Burst cardstock panel combination.
I'm just crazy about each of the die-cut flowers that came with the 'Sweet Soiree Embellishment Kit' ........ And must admit they look amazing on all three cards.
And all that was left to do was tuck the three little cards and coordinating envelopes into the center of the crate ....... And this gift was all ready to give to a special friend.
 
Thanks for joining me today!  I'll be back tomorrow to share a Wine Down Wednesday card with you ........ Hope you can make plans to stop back and join me for that share.  Keep Living Your Dream!

Monday, January 29, 2018

Heartfelt Thoughts Upgrade

Happy Monday My Blogger Friends!
Today is Mix It UP! Monday and I have an upgraded version of the card I shared with you yesterday.  I used the exact same product that was used to create yesterday's card ....... but added a couple additional products (found in both the 2017-2018 Annual Stampin' UP! Catalog and the 2018 Occasions Catalog) to bring this card up to the next stamping level.
Here is my Spot Light Sunday card from yesterday on the TOP.....
And my Mix-It-UP! Monday card for today on the BOTTOM..... 
Just when I thought I couldn't create an upgraded card for today ......... The coordinating Stampin' UP! product came shining through.
I added a panel of Silver Foil cardstock between the Berry Burst and Whisper White cardstock panels......
And I stamped the same sentiment with Berry Burst ink.....
And the GORGEOUS flower from the 'Heartfelt Blooms' set.
My upgrade was adding the OH SO YUMMY 'Berry Burst 3/8" Metallic-Edge Ribbon' to the left hand side of my Whisper White panel.  And for one additional upgrade ...... I added some 'Silver Mini Sequin Trim' and attached that directly to the Berry Burst Ribbon.
TWO BEAUTIFUL CARDS.......
THAT HANDS DOWN ....... MAKE THE 'HEARTFELT BLOOMS' SALE-A-BRATION SET A MUST HAVE SALE-A-BRATION SET!
 
Thanks for joining me today!  I'll be back tomorrow to share a 3-D Tuesday creation with you ...... Hope you can make plans to stop back and join me for that share.  Keep Living Your Dream! 

Sunday, January 28, 2018

Heartfelt Thoughts

Happy Sunday My Blogger Friends!
Today is Spotlight Sunday ....... And I have a card I created using product from the 2018 Stampin' UP! Sale-a-Bration and Occasions Catalogs.  This card uses products from both of those catalogs ........... And I'm thrilled with the way it turned out.  Let's jump right in with my card share for today..........
I must admit ........ When I first saw the 'Heartfelt Blooms' Sale-a-Bration set........I passed it right up.  But then I began seeing other demonstrators sharing what they had created with this set and I knew - BIG MISTAKE PASSING THIS FREE SET UP!
I started this card out by layering a panel of Berry Burst cardstock onto a Whisper White base card.  Then I layered a Whisper White panel on top of that Berry Burst cardstock and stamped my sentiment.  OH MY GOSH ........ HOW GORGEOUS!!!!!
And if that wasn't enough pretty for one card......
Check out the beautiful flower image on this set!
A final touch was adding three Berry Burst 'Tutti-frutti Adhesive-Backed Sequins'.
I'm just crazy about the way this card turned out....
What do you think?

Thanks for joining me today!  I'll be back tomorrow to share an upgraded version of this very card with you ...... Hope you can make plans to stop back and join me for that share.  Keep Living Your Dream!

Saturday, January 27, 2018

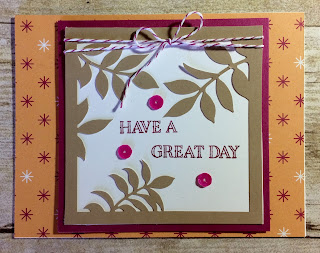
Have A Great Day

Happy Saturday My Blogger Friends!
My blog post for today is Paper Pumpkin Saturday ........... And I would like to share with you the project I created using the December Paper Pumpkin kit.   Here's that project.......
This alternate card was made using a Whisper White base card and then covering the front with a panel of the 'Picture Perfect Party Designer Series Paper'.
Next, I matted the Crumb Cake laser die pieces that was included in this kit onto a Whisper White square.  Then I matted that panel onto some Berry Burst cardstock.
I stamped my "Have A Great Day" into the center of that Whisper panel.....
And then used the Baker's Twine that was included in this kit and wrapped that around the top portion of my sentiment panel.  I tied up a pretty bow with this Baker's Twine before adhering this panel onto my card base with Stampin' Dimensionals.
And the last thing I added to this card were three Berry Burst Sequins.
So tell me friends.......
What do you think????
LOVE how this card turned out!!!!
 
Thanks for joining me today!  I'll be back tomorrow to share a Spot Light Sunday card with you ...... Hope you can make plans to stop back and join me for that share.  Keep Living Your Dream!

Friday, January 26, 2018

Friends Friday Picks

Happy Friday My Blogger Friends!
My blog post for today is Friends Friday.  On Friday's, I have the honor of spot-lighting some of the fabulous cards that I received from Friends ....... Fellow Demonstrators ........ and Family.  Each of these card creations are works of art........and it is with great pleasure that I share these four cards with you today...........
My first card share today is from a fellow InkBig peep ........ Jennifer.  She sent me this card over the Christmas holidays and I just LOVE what she created.
My next card is from my friend and Kadie's Ladies downline team member Linda.  I ask you ....... how GORGEOUS is this card!!!!
This next card is from my BESTIE friend Debbie.  I'm simply in LOVE LOVE LOVE with what she created for me.
And my final card share for today is from my good friend Gus.  We took a road trip up to Scottsdale after my Saddle-UP! event and just had a girls weekend away.  We did the Pool Time......Massage Time.......and the Cocktail Time.  What a FUN weekend and a SUPER FUN card to remember it all by.
 
Thanks for joining me today!  I'll be back tomorrow to share a special Paper Pumpkin Saturday creation with you ........ Hope you can make plans to stop back and join me for that share.  Keep Living Your Dream!
Thursday, January 25, 2018

I Just Love You Tag

Happy Thursday My Blogger Friends!
My blog post for today is Tag Thursday.  Today, I will feature a tag I created and show you how easy it is to use minimal supplies to create a SUPER PRETTY I LOVE YOU TAG.  Now that you have the details for this weeks Tag Thursday creation ........ Let's jump right in with my tag share for today!
I created this tag for my husband .........
As it's something that I say to him ALL THE TIME!
I started out by using my 'Layering Circle Framelits' on a Rich Razzleberry cardstock panel and also on a piece of the new 'Painted with Love Specialty Designer Series Paper.  I layered those circles so I could add a gold heart (from the 'Lots to Love Box Framelits Dies') in the center of the two die-cut circles.
Here's a close-up of how those layers just came together with all the work being done by my Big Shot and the 'Layering Circle Framelits'.
I stamped my "I Just Love You" sentiment with the 'Petal Palette' set.  I stamped that sentiment with Rich Razzleberry ink and my 'Layering Oval Framelits' were used to die-cut that sentiment out.
I topped my Whisper White tag off with some 'Rich Razzleberry 1/4" Stitched-Edge Ribbon' and finished it off with a pretty 'Whisper White Baker's Twine' bow.
Just a precious little tag......
That I just know he is going to love receiving!!!
 
Thanks for joining me today!  I'll be back tomorrow to share some Friends Friday creations with you ........ Hope you can make plans to stop back and join me for that share.  Keep Living Your Dream!

Wednesday, January 24, 2018

Panda Birthday Card

Happy Wednesday My Blogger Friends!
My blog post for today is Wine-Down Wednesday.  My middle of the week card feature for today will hopefully offer you some inspiration and provide you with some motivation to keep you moving through your busy week.  Let's jump right in with my card share for today........
Who wouldn't LOVE receiving this FUN birthday card!
I started this card out with a Whisper White base card.
Next, I covered the front of my Whisper White card with a 4-1/4" x 5-1/2" panel of the 'Picture Perfect Designer Series Paper'........
And I cut a slit into the bottom center of that Designer Series Paper and folded both cut pieces up to create a fun little fan section at the bottom of my card.  And because this Designer Series Paper is double sided.......I was able to get a coordinating pattern exposed at the bottom of my card.
My FREE Sale-a-Bration 'Party Pandas' set was used to stamp this OH SO ADORABLE Panda ....... And then my 'Layering Circle Framelits' were used to create a Playful & Fun layering piece for the stamped Panda to sit upon.
I used my 'Stampin' Write Markers' to color in the Panda party hat........
And all that was left to do was stamp my "Happy Birthday" message from the 'Perennial Birthday' set at the bottom of my card.
The possibilities are ENDLESS with this Designer Series Paper Stack and some coordinating cardstock.

Thanks for joining me today!  I'll be back tomorrow with a Tag Thursday creation to share with you ........ Hope you can make plans to stop back and join me for that share.  Keep Living Your Dream!