Happy Monday My Blogger Friends and THANKS for joining me today. My time with my son is drawing near a close - and today ....... we are going to hang out at my pool and just CHILL. We have been RUNNING non-stop since he arrived last Thursday and he requeted we hang out at the pool and catch some "rays" and "good times". We plan to head up to the Ranch and have lunch at their club house - but the rest of the day is going to be spent CHILLING OUT.
My share today is from a class I took down at Real Deals this past February with Kimberly. She was teaching a Valentin'es Day package class and was showing us 5-different ways we can get creative with packaging up for the holidays our little gifts. Here are all five gifts that we made that evening.
First up was a fun little trinket box that we decorated the top with a Nestabilities type tag die and by wrapping some bakers twine around the top of the box before we adhered our tag down ...... well ..... it makes for a super fun and pretty easy decorative topper.
We added a piece of clear window sheet to the inside of our box ...... and that helped our candy hearts from falling out once we were all finished with constructing our box.
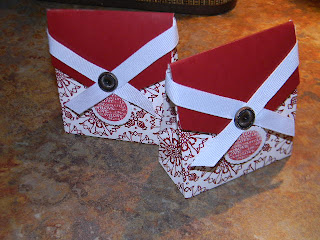
Next up were these sweet little boxes that we added a small piece of ribbon around the top of the boxes to secure them closed.
And by adding a small oval embellishment and the vintage brad ...... it gave our treat box holder a very shabby chic kind of look.
This was probably the EASIEST of all the gift bags we created ...... but also was the one that we could pick the border edge trim we wanted to use ...... and the ribbon we wanted to go along with securing our bags closed. LOVELY LOVELY Look!
I think this white bag was by far my favorite ..... but what totally makes it so PRETTY is the border edge punch I used and the PRETTY PRETTY Ribbon that was wrapped around the bag to secure it shut.
And this fun little Kraft colored box was a BIG BIG Hit. We used a woodgrain die that we inked up and stamped on the front of our box. We next added a piece of vellum over the punched out hole and added a piece of decorative pattern paper to the top of our box and after punching two holes in the flap - we were able to run some bakers twine through the holes and created a super fun closure for our box.
Kimberly gave each of us a digital download of this ADORABLE CRITTER and we each created a tag out of our download and then colored in our critter to add a real WOW FACTOR for our tag.
LOVE LOVE LOVE how all of these gift packagings turned out. Know that they were designed for Valentine's Day - but each can be reproduced for any holiday that I might need a quick little gift package. THANK YOU Kimberly for teaching me how to make these packages - They will each come in handy for a special friend up here in SaddleBrooke.
Thanks for joining me today - I'll be back tomorrow to share a couple Kards to Kadie creation with you ....... Hope you can plan to stop back and join me for that share. Keep Living Your Dream!


I love it when I have to verify I'm not a robot after posting a comment, LOL! Those packaging ideas are so cute. I've seen a couple of them before, but never tried them.
ReplyDeletehave fun chillin' love all these projects, especially the birdhouse. hugs, m
ReplyDeleteThis comment has been removed by a blog administrator.
ReplyDelete