Welcome to the Remarkable InkBig
Blog Hop for December 2017
This month our theme is Sneak Peek: 2018 Occasions & Sale-a-Bration Catalogs! You may just be starting the blog hop here at my blog – Kadie Labadie at KardsByKadie or may have come from the person previous to me in the list. If you get off track at any time, the full lineup below will help you move along from blog to blog so you see all the projects.

Here is the sneak peek project that I created.
It's a little purse size note holder.
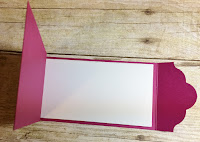
I started out with a 11" x 2-3/4" piece of Berry Burst cardstock. My scoring measurements are 4-1/4", 4-3/4" and 9-1/2". After I had my piece of cardstock scored........I used the largest die from the 'Lots of Labels Framelits Dies' to cut out the small scored section on my Berry Burst cardstock.
Here is how I inserted my Berry Burst cardstock into the 'Lots of Labels Framelits Dies'. All I wanted to do was die-cut the very edge of the small scored section. Once I had my framelits die insert.....All I had to do was run that die through my Big Shot - Just till the scalloped edge of the die cut my Berry Burst cardstock. Then I rolled the die backwards out of my Big Shot Machine.
Next I trim about 1/16" off the long edge of my cardstock piece. This was done to help the insert pages fit into my holder. I also cut a piece of the new 'Picture Perfect Party 6"x6" Designer Series Paper' that measures 4" x 2-1/2" and that piece was adhered to this trimmed off section.
I used my Stampin' Trimmer to cut up 12-pieces of copy paper that measured 2-1/2" x 4-1/2".
I neatly stacked all 12 pieces of the copy paper into the center section of my holder and then used my desk stapler to adhere that paper into my holder.
The next thing I did was create a closure for my holder. I used Lemon Lime Twist cardstock and the 3/4" circle punch to form the base ...... And then I grabbed some Berry Burst cardstock and the smallest flower from the 'Flourish Thinlits Dies' and created this darling little flower to top off my Lemon Lime Twist circle. I used a Stampin' Dimensional to adhere that piece to my holder.
To secure my holder closed .... I stacked two Velcro small dots together and attached them to the flap portion of my holder ........
Then all I needed to do was close that flap over ..... PRESS DOWN FIRMLY and the Velcro pieces would be attached to my holder.
To pretty up the stapled section of my holder, I wrapped some of the new 'Night of Navy Corduroy Ribbon' around that section and tied it off into a pretty knot.
For my sentiment panel ........ I punched a Berry Burst 2" Circle Punch and stacked a Night of Navy 'Tailored Tag Punch' piece onto that. The new 1-3/8" Scallop Circle Punch was punched with Lemon Lime Twist cardstock and I topped that off with a 1-1/4" Circle Punch piece in Berry Burst. My sentiment was from the new 'A Good Day' set and I punched that out with a 1" Circle Punch.
I jotted a quick note on the inside paper......
And topped my flower closure off with a Night of Navy 'Enamel Shape'.
A pretty quick and easy project that is perfect to hand out as a quick little gift ....... or maybe even customize them and use them for a quick stocking stuffer for Christmas.Thanks for taking part in our blog hop, there are so many amazing ideas and inspiration you don’t want to miss. Remember that currently, you are at my blog – Kadie Labadie at KardsByKadie, so check the blog hop line up list below to see who is next on the list.


Ok this is cool - right up my alley - wow but simple. So in love. Thank you.
ReplyDeleteThanks for your sweet comment Janet. Hope you have FUN making some of these.
ReplyDeleteWhat a great, little note holder, Kadie! And, thanks so much for the wonderful instructions!
ReplyDeleteYou are SO WELCOME Su. Hope you have FUN making these!
ReplyDeleteThis is so adorable! Thanks so much for sharing with us.
ReplyDeleteI am going to give this a go. Great project.
ReplyDeleteThank you Courtney and Katrina for your sweet comment......Please share pic if you make one!
ReplyDeleteDarling details and I love the tip with the die! The curves add so much character!
ReplyDeleteThank You Mary for stopping by and leaving me your sweet comment. Glad you liked all my tips on using the die for this project.
ReplyDelete