Tuesday, June 30, 2015

3-D Tuesday - 4th of July Gift Bags

Happy Tuesday My Blogger Friends!
My blog post for today is 3-D Tuesday.  That means today I have a fun little 3-D project to share with you.  Talk about a SUPER QUICK and SUPER EASY project to create ........  Let's jump right in with my project share for today.
All three of these boxes were created using the new Stampin' UP! "Gift Bag Punch Board".  Don't the fronts of each of these bags look FABULOUS!
And the backside of these gift bags are just as ADORABLE as the front.

Each bag was created with some Stampin' UP! cardstock and the handy dandy Gift Bag Punch Board. 
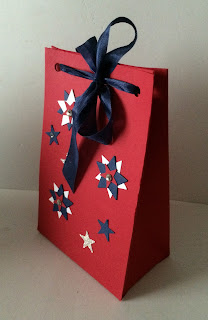
Here's the "large" bag ........ that was made with Real Red cardstock.
The "medium" bag was made with Night of Navy cardstock. 
  And the "small" bag was made with some Whisper White cardstock.
Each of the measurements are printed directly on the front of the "Gift Bag Punch Board" and just couldn't be any easier to make.  Hope you can take some time this week to create a few of these bags for your 4th of July table.
 
Thanks for joining me today!  I'll be back tomorrow to share a fun Wine-Down Wednesday card with you ........ Hope you can make plans to stop back and join me for that share.  Keep Living Your Dream! 

Monday, June 29, 2015

Mix It UP! Monday - KISS Technique

Happy Monday My Blogger Friends!
Today is Mix It UP! Monday and I have a great new product card to share with you.  I shared with you yesterday my version of a card I CASE'd from my Stampin' Success magazine.  What I want to share with you today is the 'Mixed-UP!' version of that very same card.  Today's card version uses the exact same product I used to create yesterday's card ....... with some additional product and a fun stamping technique.  Let's jump right in with my card share for today.......
 Here are the two cards I created.  The card on the left is the card I shared with you yesterday.
Today's 'Mixed-UP!' version of that same card uses a fun "KISS" technique that I didn't use on my original card.  Let me share with you how I did the "KISS" technique.

To create the "KISS" technique all you need is a solid/bold image (for mine I used the heart from the "Perfect Pennants").  You ink up your bold stamp (for mine I used So Saffron ink) and then 'kissing' it to an un-inked pattern stamp (for mine I used the "I Think You're Great" stamp set).  All that is left to do is stamp your image onto your cardstock (for mine I used Whisper White cardstock).  When you "kiss" these stamps together.......The pattern from the second stamp removes some of the ink from the heart stamp and the results are a fun texture with different shades of the same ink. 
You can see in the picture above all the texture I was able to capture on my So Saffron heart by using this "KISS" technique.
My Cucumber Crush tag was created the exact same way on my 'Mix-It UP! Monday' card as it was on my original card.
But for my 'Mixed-Up' version......I used Whisper White Embossing Powder to give my tag an even BIGGER POP! 
And one final touch was to gather my Cucumber Crush 1" Lace Trim with some Whisper White Baker's Twine and create a pretty little bow for the top of my tag. 
So there you have it friends ........ A fun little card that goes from simple and basic ........ To a version that is 'Mixed-UP!' and packs a whole lot of WOW FACTOR!
 
Thanks for joining me today!  I'll be back tomorrow to share a fun 3-D Tuesday project with you ....... Hope you can make plans to stop back and  join me for that share.  Keep Living Your Dream! 

Sunday, June 28, 2015

Spot Light Sunday

Happy Sunday My Blogger Friends!
Today is Spotlight Sunday ....... And I have some wonderful new product to share with you.  The product is from the new 2015-2016 Stampin' UP! Annual Catalog ........ and today, I'm going to feature a fun way to incorporate this new product line into a pretty amazing card.  Let's jump right in with my card share for today. 
This card was inspired by a card that was featured in the July/August Stampin' Success magazine.  This is a Stampin' UP! demonstrators only magazine and it's always JAMMED PACKED FULL of some pretty amazing cards and projects. 
I used the heart from the Perfect Pennants stamp set and some So Saffron ink to decorate the front of my Whisper White base card.  I did some stamping off of the So Saffron ink to give my hearts two different shades of So Saffon ink.
I added a small So Saffron cardstock panel to the bottom of my base card and then added a layer of Cucumber Crush cardstock to that So Saffron piece.
My Cucumber Crush tag was stamped with 'Perfect Pennants' stamp set ........ and I used Whisper White ink to stamp my sentiment. 
I topped off my tag with a small piece of Cucumber Crush 1" Lace Trim. 
 I have to say ........ this card turned out exactly as I had pictured it in my head. 
 
Thanks for joining me today!  I'll be back tomorrow to share with you a 'Mixed It UP! Monday' version of this card .......... Hope you can make plans to stop back and join me for that share.  Keep Living Your Dram!

Saturday, June 27, 2015

Paper Pumpkin Saturday

Happy Saturday My Blogger Friends!
My blog post for today is Paper Pumpkin Saturday ........... And do I have two fun cards to share with you!  These two special cards were made with the May Paper Pumpkin kit.  I used some additional product to complete these two cards ........ But honestly ....... they were minimal Stampin' UP! supplies and I'm sure you have something close to these in your stash.  Let's jump right in with my card share for today.
My first card share is this triple circle card that has the sentiment embossed directly onto each of the colorful circles.
All I did was use my 1-3/4" circle punch and three Stampin' UP! colors (Daffodil Delight, Calypso Coral and Island Indigo) to create each of my sentiment messages........
And then cut three stripes of the festive cardstock (that was included in this Paper Pumpkin kit) and added that to the left of each stamped circle.  For a final touch I added some Whisper White Baker's Twine to the end of each festive cardstock piece.......and tied the bakers twine in a pretty bow.
For my next card.......I was able to create three birthday candles with the same festive cardstock I used on my first card.
I just hand drew three flames onto some Daffodil Delight cardstock and fussy cut out each of the flames.  I then used some Pumpkin Pie ink to brighten' up the edges.  I also used Calypso Coral embossing powder on my 'happy birthday' sentiment and then punched it out with one of my Stampin' UP! circle punches.

Thanks for joining me today!  I'll be back tomorrow to share with you another Spotlight Sunday card creation ........ Hope you can make plans to stop back and join me for that share.  Keep Living Your Dream!

Friday, June 26, 2015

Friends Friday 6/26 Chris and Jude

Happy Friday My Blogger Friends!
My blog post for today is Friends Friday.  Today I have the honor of spot-lighting a couple cards that I received from two very dear friends.  Both of these card creations are works of art........and it is with great pleasure that I share them here with you.  Let's jump right in with my card share for today.
First up is this GORGEOUS and simply FABULOUS card that Chris made for me.
I'm so in love with the color combination for this card........And will be trying this layout with some of my new Stampin' UP! DSP.
And my second card share for today is this DARLING card that I received from my sweet friend Jude.
I'm just crazy for the way Jude took this stamp set and used the Flower Medallion punch to create this SUPER AWESOME 'Thanks So Much' sentiment.
 
Thanks for joining me today!  I'll be back tomorrow to share a fun Paper Pumpkin Saturday Creation with you ........ Hope you can make plans to stop back and join me for that share.  Keep Living Your Dream!

Thursday, June 25, 2015

Tag Thursday - Birthday Cake Tag

Happy Thursday My Blogger Friends!
Today I have my 'Tag Thursday' post to share with you.  On Tuesday.........I had shared with you a darling little box I created with the new "Baker's Box Thinlit Dies".  Today I would like to share the tag that I created to coordinate with that box.  Let's take a closer look at the tag I created.
Here's the Baker's Box with the tag.......
And a close-up of the darling little tag that I created.
I used the new "Build a Birthday" stamp set to stamp my sentiment and cake stand.....
And then I used the new "Cherry on Top" Washi Tape to create the layers for my birthday cake.
I added some Bermuda Bay 1-1/4" Striped Grosgrain Ribbon to the top of my tag and tied it all off with some Whisper White Baker's Twine.
Just LOVE how the cake was created to go off the side of my tag ........ Totally fun and totally trendy.
And......without a doubt......Looks GREAT when added to the Bermuda Bay Baker's Box that I created.
 
Thanks for joining me today!  I'll be back tomorrow to share some Friends Friday cards with you ........ Hope you can make plans to stop back and join me for that share.  Keep Living Your Dream!

Wednesday, June 24, 2015

Wine Down Wednesday

Happy Wednesday My Blogger Friends!
My blog post for today is Wine-Down Wednesday.  My middle of the week card feature for today will offer you some inspiration and hopefully provide you with some motivation to keep you moving through your busy week.  Let's jump right in with my card share for today........
How's this for a SNAPPY / HAPPY card!
This card starts out with the 'Oh My Goodies' stamp set ........ That has been stamped with Blackberry ink.  I then grabbed my 'Deco Labels Collection Framelits' and created a darling frame for my stamped sentiment.
I used the "Happy Heart" embossing folder to create some great texture for my Blackberry Bliss cardstock panel.
The top panel for my card used the "Large Polka Dots" embossing folder to create a striking impression on my Whisper White cardstock panel.
 
So there you have it friends ...... a special card that packs a lot of PUNCH for just a little work.

Thanks for joining me today!  I'll be back tomorrow to share with you a great Tag Thursday creation ........ Hope you can make plans to stop back and join me for that share.  Keep Living Your Dream!

Tuesday, June 23, 2015

3-D Tuesday Baker's Box

Happy Tuesday My Blogger Friends!
My blog post for today is 3-D Tuesday.  That means today I have a fun little 3-D project to share with you.  This project is SUPER QUICK and SUPER EASY to create ........ And one that I made with some new Stampin' UP! product.  Let's jump right in with my project share for today.
How's this for an over the top gift packaging idea!
This little box comes together in a JIFFY with the help of some Bermuda Bay cardstock and the new Baker's Box Thinlits Die. 
The top flap of this Baker's Box is closed up with the help of a Stampin' UP! Clothespin.  I added some Bermuda Bay Sequin Trim to the clothespin.......To give it a little WOW FACTOR.
I added some sequin stars from the Brights Sequin Assortment pack ........ And some Bermuda Bay 1-1/4" Striped Grosgrain Ribbon was added around the center of my Baker's Box and topped off with some new Bermuda Bay Thick Baker's Twine. 
I also created a fun little birthday tag for my Baker's Box ........ And I will share that tag with you on Tag Thursday this week.
 
Thanks for joining me today.  I'll be back tomorrow to share with you a Wine Down Wednesday card project ........ Hope you can make plans to stop back and join me for that share.  Keep Living Your Dream!

Monday, June 22, 2015

Mix It UP! Monday

Happy Monday My Blogger Friends!
Today is Mix It UP! Monday and I have a 'stepped up' version of the card I shared with you yesterday.  I simply created a second version of that same card.......Using the exact same product but adding to it a couple additional Stampin' UP! products.  Let's jump right in with my card share for today.......
Here's the card I created  yesterday.  GREAT card that is PERFECT for mass-producing.  But let me show you a 'Stepped-Up' version of that same card.......
Here's my 'Mix-It-UP! Monday' card.
I stamped my sentiment with the same ink color (Hello Honey) ........But for this card I used the 1-3/4" circle punch to punch-out my sentiment and then matted it to a 2" Delightful Dijon circle and added a 2-3/8" Hello Honey Scallop Circle to the base. 
A small piece of the new Hello Honey 5/8" Striped Cotton Ribbon was added to the bottom of my card .......... And then I wrapped a tiny piece of Delightful Dijon 1" Dotted Lace Trim and Venetian Crochet Trim around my Striped Cotton Ribbon ........ and tied it up in a knot.
And one final touch to this card ........ was adding a sprinkling of 'Gold Sequins'.
So there you have it friends ........ Two versions of a pretty card.......That comes together pretty darn QUICK!  Would love to hear which one you prefer ....... Please leave me a comment on which one your like best.
 
Thanks for joining me today!  I'll be back tomorrow to share a fun 3-D Tuesday gift with you ........ Hope you can make plans to stop back and join me for that share.  Keep Living Your Dream!