Tuesday, April 30, 2013

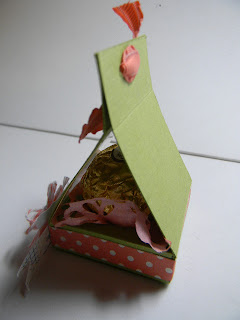
Ferrero Rocher Candy Box

Happy Tuesday My Blogger Friends! 
Today I will be sharing the measurements for the Ferrero Rocher candy box that I made for the Scissors and the City retreat this past weekend.......Let's jump right in!

This box was created by Christi Beck from Stampin Texas (www.StampinTx.com).  She has an amazing video on how to put this project together......and I encourage you to head over to her blog and check it out.  I created my Ferrero Rocher Candy Holder using Lucky Limeade cardstock and Calypso Coral for a splash of color.
You start by cutting one piece of Lucky Limeade cardstock (for the wrap-around holder) at 1-3/4"x7-3/4". On the long side score at 3/4", 2-1/2", 3", 4-3/4", 5-1/4" and 7". 
 
Now you will cut your center section where you candy will fit into........Cut a piece of Lucky Limeade at 5" x 2-3/4.  You will score on the long side at 1/2", 2-1/4", 2-3/4" and 4-1/2".  And on the short side you will score at 1/2" and 2-1/4".
For the front cut out section of your long piece.......I used the Curly Label Punch to punch out my opening.........and then I added a piece of Clear Window Sheet that measures 3/4"x3/4".  You will attach your window sheet with mini glue dots in each corner.
I added a piece of Tea for Two DSP (1/4"x12") around the bottom section of my candy holder and created a flag at the very end.
I added the largest doily from the SU Delicate Doilies Sizzlits die to the inside of my treat holder.  I sprayed the doily with 70% rubbing alcohol and Calypso Coral reinkers mixture and allowed it to dry before shaping it with the Ferrero Rocher Candy and dropping it into the center box section.
I also added a Calypso Coral Bakers Twine bow above my mini curly label "Yum" punched image and I added a small piece of Calypso Coral Ruffled Ribbon to the top of my holder to keep the box closed.
This project comes together very quickly and the Scissors and the City ladies loved this project.  I also had my Stamp Club gals make this project at our April 20th Stamp Club.......they LOVED this 3-D project.
 
Thanks for joining me today.....I'll be back tomorrow to share the 3x3 note pad holder that I made the gals at the Scissors and the City event last weekend.  Hope you can make plans to join me for that share.  Keep Living Your Dream! 

Monday, April 29, 2013

Scissors and the City Retreat

Happy Monday My Blogger Friends!
This past weekend I took some time off my busy schedule and joined my scrapbooking friends from Phoenix for the Spring Scissors and the City event.  This is an event that Stephanie, Sandy and Dale put on twice a year in Tucson.  Let me tell you friends.......IT'S A BLAST!  It's a 53-hour event (Friday 10am to Sunday 3pm) that is dedicated to the most HARD CORE SCRAPBOOKERS.   Each of us have one thing in mid .......... Scrap our hearts out ........ Stay up WAY TO LATE ...... Laugh ...... and ENJOY each others company.
 
To kick off our Scissors and the City event.....I made gifts for each of my peeps (Donna, Kathy, Terry, Jennifer and Melody) and what to share those gifts with you today..........
I made each of the gals a Ferrero Rocher Candy Holder.......A 3x3 note pad holder......and a bottle water hanger.

Let me start out with the Ferrero Rocher candy holder.  This was a project that my April Stamp Club gals created.  I will be sharing the dimensions for this project in a blog post this next week.....SO STAY TUNED!
I created the holder to hold a single Ferreo Rocher candy and this project just couldn't be any easier if I tired.
Next up is the 3x3 note pad holder that I created.  I will share with you later in the week the measurements for this darling little box.
I added a thumb cut-out so the ladies wouldn't have troubles trying to refill their holders when the paper was all used up.
And here's my bottle water cover.  These bottle water covers are gifts that I have been making for some time now......and they are ALWAYS a huge hit.

So there you have it.......My Scissors and the City retreat gifts.  I'll be back tomorrow to share the dimensions on how to make the Ferrero Rocher Candy Box with you........Hope you can make plans to stop back and join me for that share.  Keep Living Your Dream!

Sunday, April 28, 2013

InkBig Challenge Card #7

Happy Sunday My Blogger Friends!
Today I have the 7th and final InkBig Card Challenge to share with you.  This card was sent to my good friend and fellow SaddleBrooke Stamper Board Member (President) Debbie. 

 The purpose of this card was to just make Debbie SMILE!
And to let her know that I'm thinking of her!
A small piece of 1/8" taffeta ribbon was added to the front of my card......And I used the Needlepoint Border Embossing Folders to create a hand-stitched look across the center of my card.
I punched out a 2-1/2" circle on the right hand side of my card.  I then stamped a Pumpkin Pie Betsy Blossom image right onto that punched out 2-1/2" circle and adhered that circle into the center of my card.
Here's a close-up of the Betsy Blossom image that I stamped onto my 2-1/2" punched out circle.
 
When the card is closed.....the 2-1/2" circle fits perfectly into the punched out frame and makes for a DARLIN LITTLE CARD!
 
Thanks for joining me today!  I'll be back to share the gifts I made for my six Phoenix GalPals who joined me at this past weekends Scissors and the City Retreat that I went to.  Hope you can come back and join me for that share.  Keep Living Your Dream!

Saturday, April 27, 2013

InkBigChallenge Card #6

Happy Saturday My Blogger Friends!
Today I have card #6 in my InkBig Card Challenge.  It was one of the cards that Hailey and I made last week for our Skype Sunday event.  Knowing that my granddaughter Brooke loves Hello Kitty............I knew this would be the perfect card to send to my Doll Baby (Brooke).  Check out this Hello Kitty Card......


This card was one that my fellow SaddleBrooke Stamper Karin shared at our April stampers meeting.  She was kind enough to forward to me all the measurements and punch sizes.......and that is all I needed to create this card with Hailey at our last weekends Skype Sunday Event.
The Hello Kitty Pink bow is made from TWO Stampin' UP! heart punches and glued them together at the points and a 1" circle punch was added to the middle of the bow.  My two hearts and circle punch was run through my Big Shot using the Perfect Dots Embossing Folder.
I added two black 3/4" circles for Hello Kitty's eyes and the nose was created from the small oval punch.  I cut thin stripes of black cardstock and adhered three on each side of my Hello Kitty face for her little Whiskers.
I just know my Doll Baby is going to LOVE LOVE LOVE this little card and the little something something that I tucked inside.
 
Thanks for joining me today.....I'll be back tomorrow to share the SEVENTH and FINAL InkBig Card Challenge card with you.  Hope you can come back and join me for that share.  Keep Living Your Dream!

Friday, April 26, 2013

InkBig Challenge Card #5

Happy Friday My Blogger Friends!
Today I have card #5 in my InkBig Card Challenge.  This card was MADE and SENT to my good friend Kris.  I have to tell you ....... Kris is my LifeSaver of all times ....... She comes over to help me package up my big Camp and Club orders and this month was difference.  I asked Kris if she could help me with all the orders and she jumped in to help me and in the process HELPED save me about 4-hours worth of work if I had done it myself.  Here's the card I sent to Kris......

I wanted to send Kris a card that just SCREAMED......."You're the Best" and this card turned out to be the PERFECT card for the message I wanted Kris to hear.
I used my striped embossing folder at the very end of my Crumb Cake cardstock and only did a small section of my card with this embossing pattern.  I also added a Chocolate Chip scallop edge right over my striped embossed section and added a small piece of Crumb Cake Taffeta ribbon above the scallop edge piece.
This sentiment was from the "Friendly Phrases" stamp set and was exactly what I wanted to say to Kris.
I mounted my sentiment onto a Chocolate Chip Decorative Label punch and placed it right onto my Cherry Cobbler DSP panel.
This was a card that I did with Hailey on one of our first Skype Sunday events......and I just love that it turned out PERFECTLY for my sweet friend Kris
 
THANK YOU Kris for all the help you give me with packaging up my camp and club orders .......... You will never know how much I appreciate all your help!
 
Thanks for joining me today.....I'll be back tomorrow to share the sixth card I made for my InkBig Card Challenge.  Hope you can join me for that share.  Keep Living Your Dream!
Thursday, April 25, 2013

InkBig Challenge Card #4

Happy Thursday My Blogger Friends!
Today is Day Four in my InkBig MAKE and SEND a card challenge.  Here is the card that I made for my BIGGEST BLOG FAN and FRIEND Patti.......

I used the left over supplies from last Wednesday's Stamp Camp to create this card for Patti...... 
 I wanted to send her a "Congratulations" card for her recent promotion to Stampin' UP! Supervisor!
I ended up writing her a sweet little note on the inside left panel and then tucked a Starbucks gift card into the inside right pocket. 
 I figured she could stop at Starbucks on the way into work some morning.....or treat herself to something yummy and cold as an afternoon treat!
SUPER PROUD of you Patti!  CONGRATS and WAY TO GO on your promotion to SU Supervisor.
 
Thanks for joining me today.....I'll be back tomorrow to share a sweet little card that I made and mailed to my dear friend Kris. Hope to see you back here tomorrow for that share.  Keep Living Your Dream!

Wednesday, April 24, 2013

InkBig Challenge Card #3

Happy Wednesday My Blogger Friends!
I continue today with the challenge that my Upline Lisa Pretto put out to our InkBig group last week.  She has challenged us to not only MAKE CARDS this week......but SEND THOSE CARDS OUT to someone special.  So......I'm up for Lisa's challenge and have a card that I made for my fellow Stampin' UP! demonstrator friend Mary Fish.  .
This is one of the cards that Hailey and I made this past weekend for our Skype Sunday.  It's a "Think Spring" card and is just PERFECT for my good friend Mary!
I created three banner flags using the Polka Dot Parade DSP..........And added some retired 1/4" Pumpkin Pie Grosgrain Ribbon across the top.
My images were stamped from the Spring Sampler set (Spring Catalog)........and I mounted each stamped image onto some coordinating cardstock that was punched out using the new 1-1/4" scallop circle.
Just love how this card turned out.........and couldn't resist sending a special message inside my card letting Mary know how much her friendship means to me.
 
Thanks for joining me today!  I'll be back tomorrow to share a special little congratulations card I sent to my new Stampin' UP! demonstrator friend Patti.  Hope you can make plans to stop back and join me for that share.  Keep Living Your Dream!

Tuesday, April 23, 2013

InkBig Challenge Card #2

Happy Tuesday My Blogger Friends!
I continue today with the challenge that my Upline Lisa Pretto put out to our InkBig group last week.  She has challenged us to not only MAKE CARDS this week......but SEND THOSE CARDS OUT to someone special.  So......I'm up for Lisa's challenge and will be share with you today the Thank-You card I made for a dear customer who placed an on-line order through my Stampin' UP! website.  

This card was made for Lonnie.....who placed a SU order through my website and I wanted to make sure she knew how much I appreciate her business.
My card base is from Pacific Point cardstock and I added a Daffodil Delight Scallop Trim Border piece to the bottom of my sentiment panel.
My sentiment was stamped with Pacific Point ink onto a Whisper White banner flag using the Curly Cute stamp set.  I added a small piece of 1/4" Daffodil Delight Stitched Grosgrain Ribbon and two Pacific Point flowers from the Itty Bitty Shapes Punch Pack to my sentiment panel.
LOVE LOVE LOVE how this card turned out........it's a HAPPY card that will make Lonnie SMILE BIG!
 
Thanks for joining me today!  I'll be back tomorrow to share a special little Spring card that I will be sending to one of my fellow Stampin' UP! demonstrator friends........Hope you can swing back and join me for that share.  Keep Living Your Dream!

Monday, April 22, 2013

InkBig Challenge #1

Happy Monday My Blogger Friends!
I have a special challenge that I am participating in this week.  It's one that my Upline Lisa Pretto put out there to the members of the InkBig group.  She has challenged us to not only MAKE CARDS, but to SEND OUR CARDS OUT!   So......I'm up for Lisa's challenge and will be sharing 7-cards that I will be making this week - AND SENDING those cards OUT to seven very dear friends!
 
First up is a card for my dear friend KP.........
I am sending this card to my friend KP who recently had an accident while walking her dog.  She went down......and her 165 pound dog ended up on top of her and she ended up spending SEVERAL DAYS in the hospital and suffered a BROKEN HIP before it was all over. My hopes are that KP is mending and on the road to recovery very soon!
This card uses a window box stamp set from my stash ...... along with some Copic Markers to bring the whole window box scene to life!
I mounded my stamped window box image onto a piece of Elegant Eggplant cardstock..........And added some White Signo Gel Pen stitching around the edges of my Elegant Eggplant cardstock.
I made my banner flags from some Wisteria Wonder cardstock and the Regals Designers Series Paper Stack.  I also added a small piece of 3/8" Wisteria Wonder Ruffled Ribbon to the end of my Wisteria Wonder banner flag.
I embossed a "get well soon" sentiment on a piece of Elegant Eggplant and punched it out with the small oval punch.
My sentiment on the inside reads.......
 
Comfy Jammie....
Cozy Bed....
Warm Soft Pillow for your head.
Worry not the world will wait......
Take your time.........Recuperate!
 
Wishing you a speedy recover KP
 
So there you have it friends......my first InkBig Challenge card for this week.  Hope you can join me tomorrow when I share the pretty Thank You card that I made for one of my SU customers that placed an order through my on-line store last week.  Keep Living Your Dream!

Sunday, April 21, 2013

April Stamp Camp Card #4

Happy Birthday Jenni!
Today is not only Skype Sunday with my granddaughter Hailey.....But it's also my youngest daughter Jenni's birthday.  Happy Birthday Jenni!
 
I have the fourth and final card from last Wednesday's Stamp Camp to share with you today......Let's JUMP right in for that share......

This is one of those cards that comes together SUPER FAST.....and SCREAM FUN!  The technique is a punched out and flipped up style card.  Let me share with you how this card looks as you open it up.....
You begin by adhering DSP to the top panel and inside bottom panel........
You then punch out the upper panel with a 2-1/2" Circle punch.
This creates the opening that your 2-1/2" Not Quite Navy Circle along with two additional circle layers ( 2-3/8" Marina Mist Circle and 1-3/4" Happy Birthday stamped cake image) gets layered on to.
We stamped "Make a Wish" from the "Sweet Essentials" stamp set and created a banner and added that to our top flap.
The card is a perfect Birthday card.....but also would be darling as a Thinking of You or Get Well Card. 
And here's a final recap of all four card projects that we made at my April Stamp Camp. 
 
I'm off to join Hailey for another Skype Sunday today.  We are making Hello Kitty (THANKS Karin) and a fun little banner card using the Spring Sampler in the new Spring Catalog.  I'll be sharing those cards with you tomorrow.....Hope you can make plans to come back and join me for that share.  Keep Living Your Dream!