Thursday, June 30, 2011

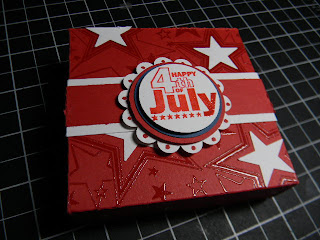
Mini Pizza Box - 4th of July Style

Hi my Blogger Friends! I have to say that I am overwhelmed with all the comments and emails I received from my post yesterday about my 4th of July Mini Pizza Box post......WOW! It was overwhelming that you'all want to know how to make this little cutie.......SO....Today I decided to post those directions for you'all. For those of you that wanted to know the DSP I used.....well....I ended up making that paper myself........I used my SU star jumbo wheel and my VersaMark - along with clear embossing powder...... First up.....a recap of what my dimensions are for today. This little pizza box measures 3"x3" and hold six little 3"x3" notecards w/envelopes that perfectly tuck inside this pizza box!
Here's the belly band I created to wrap around my pizza box. Starting with your Whisper White pc: 11-1/2"x 1-1/2" Next is your Real Red pc: 11-1/2" x 1-1/4"
Layer these two pcs of cardstock on top of each other and then once your pizza box is completed - you will wrap your belly band around the pizza box and form your fold and then secure the ends together to form your belly band (which will slide on and off of your pizza box).You can add a scallop layered element to the center of your belly band (depending on what your using your pizza box for).
Here's what the pizza box looks like when opened. The dimensions of my pizza box measures: 5-1/4" x 9-1/2" (mine is with real red cardstock) Score on the 9-1/2" side at 1", 4-1/4", 5-1/4" and 8-1/2" Score on the 5-1/4" side at 1" on both ends. You will on the 9-1/2" side CUT up to the score line at the 1" score, 4-1/4" score, 5-1/4" score and the 8-1/2" score. You will do this to both sides of the 9-1/2" side. What this step will be doing is creating the tabs for you to form your box. Add sticky strip to each 1" section of these snips that you just made and assemble your pizza box.
When you have completed all these steps......You should end up with a pizza box that looks like this. Please contact me if you have any questions or if any of these steps aren't clear. I'll be back tomorrow to share with you the cards and project samples that I made for my Open House. I'll be sharing those with you starting tomorrow and continue sharing over the weekend. Happy New Catalog Release and my hopes are that you don't end up with too many paper cuts from rapidly flipping through the pages of the new 2011-2012 Stampin UP! Idea Book and Catalog. Keep Living Your Dream!

Wednesday, June 29, 2011

4th of July Project - CJToo

Happy 4th of July my Blogger Friends.......Uhm wait a minute....It's June 29th - Did someone forget to send Kadie the Memo? NO....We are just celebrating the 4th of July early with Tracy over at CraftJunkieToo. I am on Tracy's design team and she asked her team of designers to send her something Patriotic for our July challenge. Here is what I forwarded to Tracy! I made a fun little 3x3 red box for Tracy's challenge. Check it out...... I created a darlin little "Happy 4th of July" belly band to keep my embossed pizza box closed and the fun little 3x3 notecards tucked away inside this charming little box. Once you remove the belly band - the box opens up like a mini pizza box and tucked inside are six little 3"x3" notecards. Here's what my 4th of July pizza box looked like with all the notecards unloaded. And here's a close-up look of my darling darling little note cards. Love how these notecards turned out - and all the FUN and CHEERFUL color that goes along with my project. Here's a close up of three of the notecards. Just love how this projects packed a whole LOT of 4th of July celebration into one little pizza box. Here's another view of my pizza box opened up and showing off the 3x3 notecards. I thought it would be fun to add a little something something to inside cover of my mini pizza box.......SO..... I created this sweet little red, white and blue scallop circle and used SU dimensional to attach it to the inside of my pizza box. I love how all six notecards just stack up so nicely inside the pizza box and even though they are plan and simple - these little cutie cards are for sure going to make someone smile big time. And I leave you today with one final look at my mini pizza box and hope you've been inspired to get out there and create something fun and fast for this upcoming 4th of July holiday. A special thanks to my friend Mary Fish (http://stampingpretty.blogspot.com/) for her original post on this charming mini pizza box. Thanks for stopping in today and hope you can return tomorrow for more Cards by Kadie creations. Keep Living Your Dream!

Tuesday, June 28, 2011

Pink Tote

Hi My Blogger Friends and HAPPY Tuesday. Only THREE more days to go before the New Stampin UP 2011-2012 Catalog & Idea Book is released. On July 1st, I'm having an Open House at my house from 11:00am to 1:00pm.....If your in the area and would like to pick up your new catalog and check out some amazing new product - PLEASE....Stop in! Today, I want to share a cute little PINK Tote I made last week;. I learned how to make this tote from one of my Stampin Up Demonstrator friends Karen. She showed us at our June SW Stampers meeting how to make this cute little tote. WELL.......I decided that I would make one of these cuties while I was on hold with the cable company trying to resolve an issue. I was put on hold for about the 10th time -I thought....what the heck....I'm going to start making this tote and see how far I can get with making it in the time I'm on the phone. True to form....I almost got it completely finished while I was holding! I then thought - what the heck....now I need to make a few 3x3 cards to go along with my Pretty Pink Tote - and here's what I ended up creating...... I took this picture of my tote and notecards after I had untied the tote - and then I realized I didn't have a good picture of my tote all tied up. I do have a picture at the end of this post to show you.......so....stay tuned............. This tote holds six little notecards that measure 3"x3". The notecards went together super fast and were super simple to create. Here's several of the notecards all spread out to show you that I made two different versions of notecards for my tote. Here's another view of the notecards - and a side view of my tote. This is a pic of my tote with the top cover removed. And here's the tote going together with some pretty pretty grossgrain ribbon! Just love how the 5/8" Grossgrain ribbon ties.......SO PRETTY and the bows makes this tote super CUTE! Here's a fun little stamp from Paper Smooches and is from the Sentiment Sampler Stamp Set. and......as promised.....one last view of the completed tote with the 6-notecards tucked inside. THANK YOU Karen for showing us how to create this fun little tote. I'll proabably make one for my Open House and use new DSP from the new catalog. I'll be back tomorrow to share my Fourth of July project for Tracy's design team members over at CraftJunkieToo. We were asked to create a 4th of July project and I just LOVE LOVE LOVE what I ended up creating. Hope you can stop back and check it out. Keep Living Your Dream!

Monday, June 27, 2011

Di Gibbs 10/10/20 Stamp Camp Cards Part Three

Happy Monday Friends.......And does this card not say it all for a Monday......... Today I'l be sharing the last of the cards I made at Di Gibbs (http://dianagibbs.typepad.com/) 10/10/20 class two weekends ago. This first card up is for sure going to my grandson who loves everything to do with Johhny and Pirates! We used the Subtles Patterns DSP Stack for our base paper and the stamp set is "Beware Pirates". I have to say that I would have never thought to buy this set - but I'm thinking I just might have to purchase this set (for my grandson!). Next up is a fun little card using the stamp set "Totally Tool" and the Neutrals Patterns DSP Stack. What a fun card and the real wow is the zig-zag element running down the center of this card..... Di had us use the "Tasteful Trim" Bigz XL Die for this fabulous little zig-zag border....The great thing about this die is you have up to FOUR trims to pick from - each of them creating a little different border look to your card. I am seriously placing an order for this little addition to my Big Shot die collection. And last.....but certainly not least....is "Sock Monkey". I don't own Sock Monkey but have to say - he's a keeper! We used the Subtles Patterns DSP Stack for this card and created an embossed layered look with the stacks of cardstock we used.....and added a strip of frayed 1-1/4" striped grosgrain ribbon for our accent piece across the center........Take a closer look at this ribbon..... Not sure which is cutier....Sock Monkey or the Grosgrain Ribbon! By fraying the edges of our ribbon it created that little something something that was needed for this card.......(because lordy knows you don't want to take away from Sock Monkey). Thanks for joining me for the last three days and allowing me to share the fabulous cards we created at Di Gibbs (http://dianagibbs.typepad/com/) 10/10/20 class. If you are in the Phoenix area and can arrange your travels around one of Di's fun classes.....I promise you...You won't be disappointed. MANY THANKS to Di for offering this FUN 10/10/20 class - I can't wait to return for more of the classes that Di offers. I'll be back tomorrow to share some of the cards I've been working on for my upcoming Open House......It's only three days away - and then we will have the big reveal of the new 2011-2012 Stampin' Up! Idea Book & Catalog - I guarantee you.....you will be blown away with all the new things Stampin' UP! has to offer. Until tomorrow......Keep Living Your Dream!

Sunday, June 26, 2011

Di Gibbs 10/10/20 Stamp Camp Cards Part Two

Happy Sunday my Blogger Friends and thanks for joining me today. I have another bunch of cards to share with you today.....the second batch of cards I made at Di Gibbs (http://dianagibbs.typepad.com/) 10/10/20 class last weekend. Let's get started..... First up Di took the set "The Open Sea" stamp set in the Summer Mini catalog and had us stamp that and frame it using Night of Navy CS. We used the anchor stamp to create our background paper and added thr Nautical Expedition DSP to the bottom half of our card. But before we adhered our paper down to the card - we used the new Baker's Twine in Cherry Cobbler and White to add a little bow to front of our card. Totally fun and perfect for this card. Next up is the first card I made at Di's 10/10/20 class. Simply a classic card and a masculine card that could be used for anything. We used the "Best Dad Ever" set from the Summer Mini catalog and stamped them in Tempting Turquoise on a small piece of Whisper White. We then added one Daffodil Delight tie to create a little WOW to the line-up of our ties.....super fun! We also ran our whisper white base cardstock through the Big Shot using the Perfect Polka Dots Embossing Folder. Next up is a FUNNY little birthday card (seriously made me laugh-good and hard). We used the neutrals patterns DSP stack for our card base....and with the help of the Scallop Edge Border punch and some 5/8" Black Satin Ribbon - we created the perfect little accent piece to the center of our card. These pieces totally brought this card together......... Our stamp set was "From the Crypt" and the real life of this party is adding a little bit of White Gel Pen to the teeth and skull.....Cute...Cute....Cute (I think). Our last card for today is a fast little number using the "Have a Seat" stamp set and our trusty Stamp-a-ma-jig. We lined up three of the chairs and added a "i miss you" stamp and we were done with our focal image. We used the Woodgrain background stamp to cover our Crumb Cake cardstock and that provided us with a little WOW to this traditional and simple card layout. There isn't a lot going on with this card....but guess when you are trying to say "i miss you" ....... you want your message to really stand out! Probably going to send this little card to my grandkids - just to let them know I'm thinking of them. I'm off to enjoy this fabulous Sunday here in Sunny Arizona - More pool time and playing in my studio is what's on my agenda for today. Hope you have a great day and can return tomorrow for my last 10/10/20 card post. Until tomorrow......Keep Living Your Dream!

Saturday, June 25, 2011

Di Gibbs 10/10/20 Stamp Camp Cards Part One

HAPPY Saturday my friends! It's the start of the weekend.....and hope you have some wonderful things planned. I'm counting down the days until my Open House on July 1st - It's officially only 6-Days to go until the new SU Idea Book & Catalog is realeased. Today.....(and the next three days)...........I want to share with you a few of the cards I made last weekend up at Di Gibbs 10/10/20 class. I have been following Di Gibbs blog (http://dianagibbs.typepad.com/) since I lived in Wisconsin and found out when I moved out to Arizona ...... exactly how close she lives to me! Di offers a TON of classes/workshops and clubs to her customers that when I saw she had a 10/10/20 class ..... I just knew I wanted to drive up to her place and join in on the fun. And without a doubt......FUN is what Di offers in her classes. Let me share with you today three of the cards that we made last Saturday...... First up is this little cutie dog card using the "Friends Fur-ever" stamp set. It seriously reminded me of Di's darlin little dog Toby (who I got to meet last Saturday......and is just about the cutiest little dog you'll ever want to see). We stamped our dog and saying all over a piece of whisper white cardstock and then added that onto an A2 sized whisper white card base.
We frayed a small piece of striped grosgrain ribbon and added a vintage trinkets pin to the bow that had three punched out tags from the Jewelry Tag punch before calling this one DONE! SUPER CUTE and when I showed this card to Jack it made him smile and laugh out loud to the saying of this card!
Next up we made this timeless recipe card. This one is probably going to go to my oldest grandson (who loves anything Pirates and anything Johnny!). The DSP is from the Summer Mini (Nautical Expedition) which I would have never thought to use-because well....I'm not into the whole nautical thing - but turns out Di used this DSP for several of our cards and it's LOVELY!
The stamp set is "Beware Pirates" and I love this set. We used it for a couple other cards at Di's 10/10/20 class - and I just know it gave me a whole new look to buying this set.
And last is probably my favorite card for today.....Who doesn't own and love Pun Fun stamp set? This little set is seriously one of my "Go To" stamp sets! Di had us use a traditional criss-cross recipe for our design layout and then we stamped this little rocketship onto a piece of water color paper and let us hae some fun coloring in this little number.
Just love everything about this card! And I for sure will be using this recipe in more of my upcoming Kards by Kadie Creations!
So that's it for today - I'm off to go enjoy some fun in my pool and studio......Seriously only have plans to PLAY today (and probably tomorrow). Hope you have a fabulous Saturday and can return tomorrow to see my second post of the cards I made at Di Gibbs (http://dianagibbs.typepad.com/) 10/10/20 class last weekend. I promise you - you won't be disappointed. Keep Living Your Dream!

Friday, June 24, 2011

Cards from BFF and SaddleBrooke Friend

It's Friday my Blogger Friends and once again.....My plate is totally FULL for this upcoming weekend. Today three friends and I are heading up to Hobby Lobby and will probably end up doing lunch together.....I'm seriously looking forward to our road trip and just know that we will laugh - and share - and find some real buys while up to Hobby Lobby. I'm just hoping that I can get all the things that are on my plate - done this weekend. BUT....for today.....I have two cards to share with you and figure we should just jump right in....... First up is (another.....) card from my BFF - this time she made me this fabulous card that not only is beautiful to look at....but the inside message made me SMILE! She used her scoreboard to add three lines across her Coord-a-nation card stock and because this cardstock has a white core to it......the three lines appear white when done from the inside of the card.....FABULOUS IDEA NO? She added a sweet Thank You message to the front of her card and added four sparkly blings to the centers of the flowers. Check them out ........ Jan seriously has this ability to make every card she creates a Work-of-Art! Her message on the inside of her card is what stole my heart.....Her stamp said....."you're a real gem! Hope your day shines". Now how fitting is that for the inside of this card? Jan doesn't stop at just buying a stamp - she works hard to coordinate all the pieces together and once again she master her talent with this card. Thanks Jan for your amazing card. Next up is a sweet little card I received from the SaddleBrooke Hospitality Group when I was sick at the beginning of the year. As the chair for that committee, Opal sent me this card which was made by Judy Conklin. Talk about making you feel better when your feeling down...this card totally works it number on me! What I love about this card is that it's not your every day "Get Well" card - and I love that the SaddleBrooke Stampers were thinking of me when I was not feeling my best back in February. I am truly blessed to have so many talented and thoughtful friends here in SaddleBrooke....I realize that every day - but even more when I sit back and look at the many cards I receive from my friends here in Arizona. Thank you all for caring about me and sharing all your beautiful cards with me too. I treasure each of them as a piece of art and have them proudly displayed in my upper cabinet of my Studio. Hope you can join me tomorrow when I'll begin to share the 10/10/20 stamp camp cards I made at Di Gibbs studio last weekend. Keep Living Your Dream!

Thursday, June 23, 2011

FU June Challenge Cards

Hi my Blogger Friends and HAPPY THURSDAY - we are almost at the end of the week and before we escape into the weekend - I want to share the cards my three FU gal pals shared this month for our June Challenge. Our challenge was to create a card or project using Lime Green and Purple.....Here's what we created.... First up is the card my good friend Kris made. I have to tell you......My mouth dropped open when she handed me my card ...... Holy Buckets ...... did she meet the challenge! She did the most amazing job of paper piecing......check-out a close-up of her card........ She bought this Hero Arts stamp with our June challenge card in mind. She seriously paper pieced the entire flowers to this entire card. She showed me the stamp she used and I just couldn't believe she had the determination to do that much work to our cards! Way to go Kris - Your card rocked....BIG TIME! Next up is Ann's card - talk about hitting this one out of the park....wow! Total Lime Green and Purple and her image is super paper pieced! Love the recipe for this card and love how Amn coordinated the colors of her insect with our challenge theme colors. FABULOUS Job Ann! Here's her catapiller cutie.....all paper pieced with some totally WOW Lime Green DSP! FUN! And her snail is even paper pieced and coordinates with her other DSP......So cute and I love the little cutie critters that she used. And last (BUT NOT LEAST).....is my sweet friend Debbie (MISS YOU DEBBIE GIRL BIG TIME!). Debbie thought outside the box and did some fun paper piecing with her purse. Have to say that I am in LOVE LOVE LOVE with this recipe and might even have to CASE this recipe for my upcoming Stamp Camp. Here's a close-up of Debbie's paper piecing.......Nobody said anything about having to use paper in the piecing portion of our challenge.....LOVE LOVE LOVE how you used bling in place of paper for your piecing Debbie. Totally outside the box and I'm loving it! Thanks for joining me today and hope you can return tomorrow for a kick off for the upcoming weekend. I'm taking a road trip tomorrow morning with three Stampin Friends to head up to Hobby Lobby up in the Mesa area......Looking forward to some bonding and shopping time with my good friends from SaddleBrooke. I'll post a quick post in the morning and then be taking off - I have lots to share with you so hope you can join me. Keep Living Your Dream!