Friday, October 31, 2014

Happy Halloween!

Happy Friday My Blogger Friends!
It's Halloween my friends......and I'm out bright and early this morning delivering my Halloween Mailbox gifts to my SaddleBrooke friends.  I have several Halloween cards to share with you today .......but before I share those pictures .......... I would like to share a couple pictures of Twoie with you.  I received these last night from my daughter back in Wisconsin...............
Twoie is going Trick or Treating as a friendly green dinosaur! 
He didn't mind dressing up.......but he didn't like the hat portion of this dino.
And without a doubt ....... I saved the BEST picture for last.
Tell me my friends......Who wouldn't want to just eat this little guy up!

So now let's jump right in with a bunch of Halloween cards and projects for today.
This little 3x3 card was made with the retired Peek-a-Boo BigZ die.
Not only is there a stamped skull on the front of this card......but it also has an "eeek" message on the inside.
This card comes together with the help of some DSP and FUN Stampin' UP! ribbon.
One of my favorite retired products has to be those Glimmer Brads!
An all time favorite retired product is the Spider Web embossing folder.
And how easy is it to make this darling little owl just sparkle under the shine of a silver glimmer moon!
Who's says......Three heads are better than one?
But we will all agree that the frayed ribbon that is popping out from behind each of these skulls is OH SO FESTIVE!
And what would Halloween be without Candy Corn!
This cello bag is topped off with the perfect little candy tag.

Thanks for joining me today..........And I hope you have a delightful Halloween!  I'll be back tomorrow to begin sharing with you some fall decorations.......Hope you can make plans to stop back and join me for that share.  Keep Living Your Dream!

Thursday, October 30, 2014

Halloween Past Part Thirty

Happy Thursday My Blogger Friends!
Today I have another Halloween card to share with you......It's a Witches Rosette card.  Check out this adorable Halloween card.......
Could this witch be an cuter?
Her dress is made from a rosette that was attached to the front of this card.
I inked the edges of my rosette and then added a purple poke-a-dot circle to the center for a little Halloween Fun Factor!
I stamped the witches legs and hat........and then colored these stamped pieces with my Pumpkin Pie and Wisteria Wonder Markers.
Such a fun card to make......and one that just screams......
Happy Halloween!

Thanks for joining me today!  I'll be back tomorrow to share more Halloween creations with you ........ Hope you can make plans to stop back and join me for that share.  Keep Living Your Dream!

Wednesday, October 29, 2014

Halloween Past Part Twenty-Nine

Happy Wednesday My Blogger Friends!
Today I have another Halloween card to share with you.  It's a tri-fold card that has a square punched out of the top flap.....to reveal a "spooky" little sentiment behind it.  Let's jump right in with my card share for today........
Here's the spooky Halloween card.......
And as you can see I have punched out a square on the top panel which reveals a "Spooky" sentiment on the center panel.  And then the center panel has been punched also........
To reveal a "Boo" sentiment on the inside center panel.  

Thanks for joining me today!  I'll be back tomorrow to share more Halloween creations with you ........ Hope you can make plans to stop back and join me for that share.  Keep Living Your Dream!

Tuesday, October 28, 2014

CYCI42 Halloween Challenge

Happy Tuesday My Blogger Friends!
Today I have a fun little Halloween post to share with you.  It's something that I submitted to my fellow Stampin' UP! demonstrators over at "Can You Case It Weekly Challenge Blog".  (http://canyoucaseit.com)

Their CYCI42 challenge for this week is anything Halloween.
CYCI #42
How PERFECT is this challenge for me...............as this is DAY 28 of my all things Halloween blog post month.  Here's what I submitted to my friends over at Can You Case It........
This fun little card comes together in a SUPER QUICK JIFFY!
It starts out with the witches shoes from the new "Tee-Hee-Hee" set.  I stamped the shoes with Black Statz-On ink and then punched them out with a 1-3/8" circle punch.  Next I created two additional layers for my stamped shoes.......a 1-3/4" Pumpkin Pie circle and a 2" Basic Black circle.  For the perfect combination of WOW FACTOR for each of my circles, I sponged all the edges with my Black Statz-on ink.
The "all about the shoes" sentiment was stamped with Black Statz-On ink and then I used my BigShot and the Word Bubbles framelits to die-cut out the perfect little shape for my sentiment.
While my Big Shot was out......I used the "Large Polka Dot" textured impression embossing folder for a little extra texture on my Pumpkin Pie panel.  I reversed the texture of my polka dots to add just one more level of FUN to this card.
So there you have it my friends.  A seriously SPOOKY FUN card for this "Can You Case It #42 Halloween Challenge".  For more information and to participate in this fun challenge......Head on over to their site at http://canyoucaseit.com/?p=936

Thanks for joining me today!  I'll be back tomorrow to share more Halloween projects with you ........ Hope you can make plans to stop back and join me for that share.  Keep Living Your Dream!

Monday, October 27, 2014

Halloween Past Part Twenty-Seven

Happy Monday My Blogger Friends!
Today I have a fun little 3" x 3" Halloween card to share with you. 
How fun is this little skull and cross-bone Halloween card.....
And here are the punches I used to create this little cutie.
A cute little Happy Howl-o-ween sentiment is stamped on the inside for a little bit of fun!
So there you have it my friends.  A fun little Halloween Skull and Cross-bone card.

Thanks for joining me today!  I'll be back tomorrow to share more Halloween creations with you ........ Hope you can make plans to stop back and join me for that share.  Keep Living Your Dream!

Sunday, October 26, 2014

Halloween Past Part Twenty-Six

Happy Sunday My Blogger Friends!
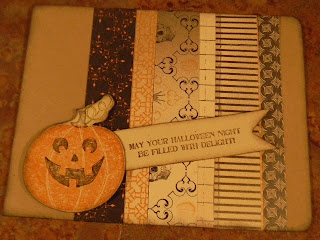
Today I have a quick and fun Halloween card to share with you.  It's one that uses up lots of your Halloween paper........and comes together in no time flat.
All you need to do for this card is pick out several Halloween papers and cut them into stripes of 4-1/4" x 1".......4-1/4" x 3/4"......and 4-1/4" x 1/2".
You will adhere your stripes of Halloween paper onto your Crumb Cake base card and just line them up right next to each other until you have them going across the from of your card.
Stamp a cute little Halloween sentiment and create a banner flag to one end of your sentiment........add some dimensional adhesive to the back and set aside.
Your next step will be to stamp a cute little Halloween Pumpkin and add some dimensional adhesive to the back of your pumpkin.  Add your Halloween sentiment to your pumpkin and then add both of these pieces over your stripes of Halloween paper.  That is it my friends......A quick and fun little Halloween card is done in a flash.

Thanks for joining me today!  I'll be back tomorrow to share more Halloween creations with you ........ Hope you can make plans to stop back and join me for that share.  Keep Living Your Dream!

Saturday, October 25, 2014

Halloween Past Part Twenty-Five

Happy Saturday My Blogger Friends!
Okay my stamping friends......This is the last picture of my Twoie.  Check out my little SLOBBER MACHINE.............

Twoie was at the babysitters this past week.....and seems the temperatures in Wisconsin are a wee-bit on the chilly side.  He was really enjoying the cold glass on his nose ......... and before long.....he got licking the glass and making one giant slobber mess. (YIKES....kudo's to that babysitter for taking all the Twoie slobber all over her window.  I'm pretty sure that there must be some dogs running around this sitters household!)
Today I have a fun fall card to share with you.
This one is more of a fall combination kind of card.  One that uses some die-cut pieces....some stamping......and some beautiful Crumb Cake seambinding.
I just love how the Lattice die and stamped leafs look so pretty stacked together.......And the little bit of ribbon adds that little WOW FACTOR to complete this card.
I'm loving how this card turned out......and comes together in no time flat!

Thanks for joining me today!  I'll be back tomorrow to share more Halloween creations with you ........ Hope you can make plans to stop back and join me for that share.  Keep Living Your Dream!

Friday, October 24, 2014

Halloween Past Part Twenty-Four

Happy Friday My Blogger Friends!
I have one final day of sharing Twoie pictures with you.  Check my little Dude'r out.......
He seriously looks like he got caught doing something in his room......
And this is the face that says it all.......

Today I have a fun little Halloween card......One that I learned to make from a fellow Stampin' UP! demo Sue (and Donna).  Let me jump right in with today's share.......
This fun little Halloween card uses a retired peek-a-boo BigZ die.
The two "O's" are die cut with the peek-a-boo die with black cardstock.....
And then some White cardstock is added behind the cut-out and you create two stinkin' cute eyeballs!
Darling little Halloween card.....
and one that comes together in a SNAP!

Thanks for joining me today!  I'll be back tomorrow to share more Halloween creations with you ........ Hope you can make plans to stop back and join me for that share.  Keep Living Your Dream!

Thursday, October 23, 2014

Halloween Past Pat Twenty Three

Happy Thursday My Blogger Friends!
Before we jump right in with my next Halloween share.....here's another picture of my Twoie........
How adorable is this little dude'r!  I'm seriously in love with all his curls!

Today I have a fun little Halloween card to share with you.  This card of cuteness comes together with the help of a retired Stampin' UP! Halloween stamp and my dotted scallop trim punch.
Here's my fun little creation.
I created the three little witches skirts with some colored cardstock and my scallop dotted lace punch.
I grabbed some black ribbon and added three clip elements I had in my stash......and ran the entire piece of ribbon across the center of my card.  This created the darling little belt for my three witches.
I also colored in the leggings for each witch to match her dress and added a tiny Rhinestone to the top of her shoe laces.
A pretty quick and easy card to make for Halloween.

Thanks for joining me today!  I'll be back tomorrow to share more Halloween creations with you ........ Hope you can make plans to stop back and join me for that share.  Keep Living Your Dream!