Wednesday, November 30, 2011

Kadie's Crafternooner Card

Happy Wednesday My Blogger Friends and today I will be sharing the card that I created last Friday when my Crafternooner group met.  I got this idea from a fellow Stampin' UP! demonstrator Dawn Griffin and basically CASE'd her card creation and shared it with my group.
The card wreath is made from the Stampin' UP! Boho Blossom punch.
All you do is punch out 8-Always Artichock and 8-Old Olive and cut each one in half and use those half pieces to create your wreath......
 Here's a close-up of the beautiful wreath that we created for our focal point of our card.
 The punched Boho Blossom flowers that were cut in half were attached to a punched out scallop circle punch.....and you just stack your flowers one on top of the next until you completely go around your scallop circle frame .  You then attach five dimensionals to the back of your wreath and can attach the completed wreath to the front of your card.
 Here's what the completed wreath looks like and below it are the Boho Blossom punched out pieces.
 I have this completed wreath just waiting to take it's place on a completed card........
 Here's a close-up of the wreath....and you really can see in this photo the Boho Blossom flower pieces cut in half.
 I stamped my "Holiday Greetings" sentiment directly on to a piece Crumb Cake DSP.....that came from the Neutrel DSP Collection packet.
I'm thinking that I will be making a few of this card design for my Holiday cards this year......
Once all the flowers are punched out.....This card comes together in a snap.

I'll be back tomorrow to share a fun little Thanksgiving Treat that I received from
my good friend Sandra......Hope you can join me for that.
Keep Living Your Dream!


Tuesday, November 29, 2011

Jan's Crafternooner Card

Happy Tuesday My Blogger Friends! 
I want to wish my good friend Mary Fish a VERY HAPPY HAPPY BIRTHDAY
 May you have a EXTRA SPECIAL BIRTHDAY Mary!
Today I will be sharing the card that my BFF Jan had us make at our Crafternooners gathering this past Friday........Check out this amazing card!
My photos do not show all of the glossy and shiny color that this card has in person.  TRUST ME....this card really has some of the most amazing shine and color.  The yellow and orange colors are so bright.....and when stamped on Glossy cardstock......It totally packs a real WOW!
We did some two step stamping and the second portion of our stamping required us to "Rock n Roll" our ink to create this amazing and vibrant yellow and orange flower.
I just love how crisp and clear this card turned out........And the "thanks" sentiment is such an amazing font that I think I might have to pick up this stamp set the next time I'm up at Scrapbook Etc in Mesa.
I also LOVE how you could switch out the "thanks" stamp and basically use any sentiment and still create an amazing card.
Many Thanks Jan for creating this fun card.....I know your studio is in the process of being constructed and for you to even come up with a project for our Crafternoons on Friday amazes me......How you were able to find anything with all the construction that is going on in your studio right now leaves me wondering how you did it.  WELL DONE FRIEND!

I'll be back tomorrow to share with you the card I created for last Friday's Crafternooners gathering.  I made a fun Christmas Card......So I hope that you can swing back by and join me for that card share.
Keep Living Your Dream!

Monday, November 28, 2011

Project By Opal

Happy Monday My Blogger Friends. 
Hope you had a fabulously yummy Thanksgiving and ENJOYED the long weekend.  But now it's back to work and may the MERRY begin.
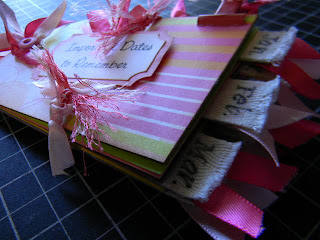
Today I'm going to share an awesome little project that my dear friend Opal had us make this past Friday when my Crafternooner galpals met.  We made this adorable "Important Dates to Remember" tag book.  SUPER EASY and SUPER FUN!  Let me begin the share with you......
We started out with two 5"x3" pieces of chipboard and we covered them with some DSP that Opal had out for us......Of course Opal had my colors all picked out and ready for me.....PINK (as she knows me all too well).
We also received 12-little twill tape tags that Opal had stamped the months on.....and those got attached to the 12-colored cardstock tags that were between our front and back chipboard pieces.
 The colored pages that make up our booklet were blank and I came home and printed up this little datebook insert......I just printed out 12 of them and used that to cover the inside of each of the months in my booklet.
 I can use this to record important birthdays and anniversary's for each month.......
And the back cover matches the front cover.....and without fail....I couldn't resist adding LOTS of PINK ribbon to my booklet.......
Here's what the booklet looks like with all the page inserts all spread out.......OH SO YUMMY!
And the twill month tabs look amazing with the months already stamped on them (MANY THANKS OPAL for all the work you put into stamping each of the tabs and applying the sticky strip to each).
I LOVE LOVE LOVE how this project turned out - And I think I will keep it on my studio desk - so I will always have it handy to help me remember all those important dates that come up for next year.

A special thank you to Opal for providing me with the opportunity to put this project together.....It was FUN and I might just have to create one for each of my daughters......who seriously would LOVE this projects as much as I do.

I'll be back tomorrow to share the project my BFF had us make at our Crafternooners gathering on Friday - Her card is a 10-Minute WOW Card.  Hope you can join me.
Keep Living Your Dream!

Sunday, November 27, 2011

Poinsetta Club Card

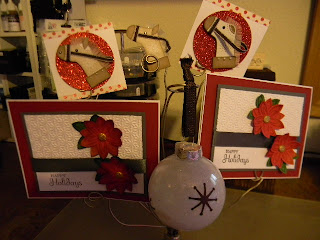
Happy Sunday My Blogger Friends and today I will be sharing the final Stamp Club project with you But first let's revisit all the projects that we made at Club in November.....
We made the adorable Ornament.......The Super Fun 3"x3" Hobby Horse and finally
the Elegant Poinsetta Card.....Let me share with you how we made the Poinsetta card.
 I can't remember who's blog I saw this poinsetta card - but I basically CASE'd their idea almost to the letter.  I used a different embossing folder - but everything else was their idea. 
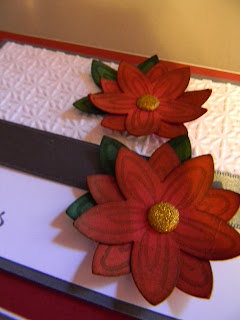
 We used Real Red cardstock to make our Poinsetta's.  They were stamped using the Flower Fest Stamp Set (P124) and punched them out using the 5-Petal Flower Punch (P.210).  We stamped and punched out two for each flower.  And used Garden Green cardstock to create the leafs which are peeking out behind the Real Red.
We added Glimmer Brads to the center of our Poinsetta to give the flower that little wow which poinsetta flower have.  For this first sample.....I did not distress any of my edges.......
 For this second sample I used Cherry Cobbler Ink to distress all the edges of my Real Red cardstock for the poinsetta.....and that gave the flower a completely different look.  It was up to the club gals to decide which they wanted to do.
 As you can see here......The distress poinsetta has a much darker look.
So that wraps up my November Stamp Club....the gals had a fabulous time....and our time together is nearing it's end.  Next month is our final month and I will begin a new Stamp Camp
in January to the first six ladies that sign up.

I'll be back tomorrow to share more Kards by Kadie creations....Hope you can join me.
Keep Living Your Dream!

Saturday, November 26, 2011

Hobby Horse Card

Happy Saturday My Blogger Friends.  Hope you are having a fabulous day
and have plenty of time to relax - play and maybe even get a little nap in today.

I plan to share with you today the 3"x3" card we made at Stamp Club last weekend....
but first a quick recap of all three projects we made last Saturday at Club......
 We made an ornament.....an A2 Poinsetta Card and the Hobby Horse 3"x3" card.
Here's the adorable 3"x3" Hobby Horse Card we made.......Believe it or not.....It's made using the Stocking Builder Punch (P34-Mini).  All we did was turn the stocking upside down and added some frayed 1-1/4" Grosgrain ribbon........
The actual card we made was using the Stitched Stockings Stamp Set (P.34-Mini) that we stamped on Crumb Cake cardsock.  We used 1/8" Early Espresso Taffeta Ribbon (P195) for our horse handles.......and with the help of some frayed 1-1/4" Soft Suede Striped Grosgrain Ribbon this darling little hobby horse came together in a snap!
I also showed the Club gals what a white embossed Hobby Horse looked like.....
but we all decided that the stamped white horse looked the best. 
We used a Silver Mini Brad (P199) and used our black sharpie marker to color
the silver in to create a seriously bold eyeball for our Hobby Horse.
 And here you can see how we frayed the edge of our 1-1/4" Striped Grosgrain Ribbon
to create the mane for our hobby horse.
We mounted our Hobby Horse onto a 2-1/2" Circle (P.212) that was punched out of Red
Glimmer Paper (P181) and called this little cutie DONE DONE DONE!

Love how ADORABLE this little Hobby Horse turned out....and plan to seriously use
 him for MANY decorating purposes throughout the upcoming Holiday Season.

I'll be back tomorrow to share the A2 card we made at Club last Saturday - Hope you can join me.
Keep Living Your Dream!
Friday, November 25, 2011

BLACK FRIDAY

It's Black Friday My Blogger Friends and it's typically a day that MANY of us go crazy
and get up at the BUTT CRACK OF DAWN  (Hi Cheryl and Jenni) TO KICK OFF
the HOLIDAY SEASON........ 
But (or is that BUTT) for this girl...........IT WON'T BE HAPPENING........
I'm staying snug in my studio and plan to do my own KICKING OFF
and hope to get SEVERAL of my Holiday Projects checked off my list. (Wish me LUCK!)

What I want to share with you today is one of the projects that my Club Gals made last Saturday - But first I want to give you a sneak peek of all three of the projects we made.........Check this out...........
These are the three projects that my Club Gals made last Saturday. 
We had a fabulous time playing with the Big Shot and GLITTER that day......OH MY!
Here is the first project we made......It's an ornament that is filled with GLITTER!
 We lined the inside of our ornament with a "Magic Bubble Liquid Glue" offered by Kelly's Crafts (www.kellyscrafts.com).  We squirted about one teaspoon of Liquid Glue into our ball and tilted and slowly rolled the glue to evenly coat the inside of our ball.  We than drained the excess glue and while the ball was still wet - we poured Dazzling Diamonds into our ball and shook the ball to completely cover the inside of our ball with glitter.......
We then cut Chocolate Chip Vinyl snowflakes out with our Big Shot
and adhered four snowflakes to the outside of our ornament. 
A small piece of 3/8" Early Espresso Quilted Satin Ribbon was added to the top
of our ornament.  We now can hang our ornament from our Christmas Tree.
OH SO PRETTY! And LOVE LOVE LOVE how these turned out.

Thanks for joining me today!
Hope you can join me tomorrow for the 3"x3" card we made.
Keep Living Your Dream!

Thursday, November 24, 2011

Happy Thanksgiving

Happy Thanksgiving My Blogger Friends!


Hope you have some fabulously fun and restful things planned for today. 
Jack and I are heading up to our clubhouse with four other couples
to have our Thanksgiving Day Feast
****YIPPIEEEE NO COOKING for this CHICKY LA-LA
 Check out this ADORABLE little turkey I made......
I was up at the crack of dawn yesterday morning making my Thanksgiving Blessing Box delivery to my SaddleBrooke and Ranch friends........These are the fun little blessing boxes that I deliveried.
I realized on Sunday night that I hadn't prepared the things I would need to make my
Thanksgiving Blessing Boxes (nor was it anywhere on my radar screen)

So true to form......I ran around Sunday night like a chicken with my head cut off.....
I seriosuly think Jack believes I do these things to entertain him......

I was able to pull together all the things I thought I would need to put my
blessing boxes together and dragged them up to the Ranch on Monday
afternoon to begin working on them. 
I planned to put a treat bag inside each bag and knew that step would have to wait until Tuesday for me to do........But what I did get done at the Ranch was all the treat holders and the Thanksgiving Blessing Box Poem for the front of the box.
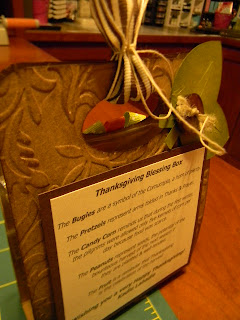
What I hadn't planned for......was this adorable ribbon turkey I had seen on someones blog and thought it would look so cute on the back of my embossed blessing box.
I ran a 4-1/4"x 11" piece of caramel cardstock through my Victoria style embossing folder.  
To create the handle I used the large oval punch to punch out an oval at the top
of my box and then ran a piece of 1-1/4" grosgrain ribbon through the handle. 

I cut the leafs out with my Cricut DoodleCharm cartridge and attached a chocolate button to
the top of the sponged leafs for a little something something to the front of my blessing box. 
 Here's all the blessing boxes lined up and waiting to be deliveried on Wednesday morning........
 Just love the look of anything in quanitity......
 Here's one of the blessing boxes showing the back....and front of the box.......
 And a sneak peek at the blessing mix that was tucked into the box.......
I mixed up candy corn....pretzels....bugles......peanuts and one candy orange slice
and adhered the mix to the inside of my blessing box.
Here is the Thanksgiving Day Blessing Poem that I took directly from Angie Kennedy Judda at Chick n Scratch.  She has been making blessing boxes for as long as I can remember and she has a pdf file just ready to be downloaded.  (MANY THANKS Angie for offering us this file)
I just love how even though these boxes were pulled together VERY QUICKLY......
they turned out better than if I had spend weeks preparing and fiddling with them.
I'm wishing you and your entire family a
very happy and blessed Thanksgiving
.....and as my BFF says.....
GOBBLE TILL YOU WOBBLE!

I'll be back tomorrow to share my November Club cards/projects with you. 
Hope you can come back and join me for that share! 
Keep Living Your Dream!