Happy Sunday My Blogger Friends!
Today I have the fourth and final October Stamp Camp Card to share with you.
.JPG)
Here's a re-cap of all four cards we created.
Not only was this card the most educational card we create at camp this moth.........but also had lots of tips and tricks that were shared on how to use the new Thinlits Card Dies.
It used the new Thinlits Card Dies......
We used the Circle Card Thinlits Die.
We used the Winter Frost Specialty Designer Series Paper Stack.......Which meant the ladies got to decide which side they wanted to use to decorate their card.
To get a perfect circle fit for our card we used some Pool Party cardstock that was positioned over the circle portion of the die and allowed us to cut out a perfect Pool Party Circle for the front and back of our card.
Here's a close-up view of what the Pool Party circles looked like after they were attached to the Whisper White base card.
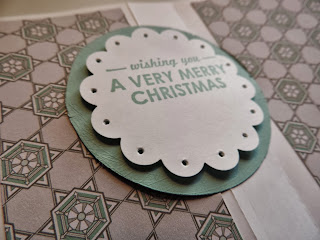
We used the new stamp set "Wishing You" to create the sentiment that went inside our card....
And the front of our card used the "Festive Flurry" stamp set and "Festive Flurry" Framelits dies to create our snowflake.
We began by stamping our "Festive Flurry" stamp with Silver Encore ink and then sprinkled Silver Embossing Powder over our snowflake image then heat set it with our embossing gun. Our final step was to die-cut out our snowflake with the Festive Flurry Framelit dies.
The most difficult part of this card is to cut your cardstock down to fit almost perfectly into your Thinlits card dies. You want to add your two DSP panels onto your base card before cutting the Thinlit die out (but just be sure to only add adhesive to the top part of your DSP so your DSP doesn't stick to your circles when they are cut out).
By attaching your DSP to your base card before you run it through your Big Shot......you will be sure to have a base card border around the edges of your DSP and the circle from your Thinlits will be cut out perfectly.
I started out with my Whisper White Base Card at 5-7/8" x 5-1/2". My DSP panels were cut 2"x5-1/4" (left side) and 2-7/8"x5-1/4" (right side).
Here's what my Thinlit Die looks like as it's going to be put through my Big Shot. I have my Whisper White base card .......... my two DSP panels (which are adhered only at the top) and my Thinlits Die with the cutting blade facing down onto the Whisper White panel.
Here's what it looks like after it is run through the Big Shot and my Thinlits Die is removed. Because you haven't put adhesive across your entire DSP panels......and only at the top......Your small pieces that are on the circle will be easily removed and then all you need to do is add adhesive to the back of your DSP panels and secure those down onto your Whisper White card base.
This is what it's going to look like when you add your Pool Party circle and stamped sentiment.
So there you have it friends.........The most popular Stampin' UP! product on the market right now. Super Cute card and Super Fun project!
Thanks for joining me today! I'll be back tomorrow to share the gifts I made for my girlfriends who joined me this past Saturday and drove up to Phoenix to attend Lorri Heillig Holiday Extravaganza. Hope you can make plans to stop back and join me for that share. Keep Living Your Dream!


I hadn't heard of using the Silver Encore Ink instead of Versamark. Do you think there is any advantage of one over another?
ReplyDeleteDonna
great directions on the thinlit flip. i like your way better!
ReplyDelete