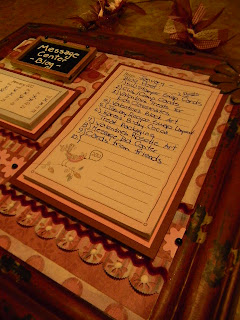
Happy Happy Happy Saturday My Blogger Friends. Today is Stamp Club and I have six of my favorite Stamper Friends coming over to create some amazing medallion style projects for this months Club. I will be sharing those projects with you early next week ..... but today ...... I have my sweet Message Board Center to share with you ..... so ....... Let's JUMP right in ..........Last Saturday I attended my first class down at Real Deals and was surprised with what they are offering in the lines of classes. The instructor Kimberly is a charming a delightful gal ...... who honestly can match me toe-to-toe with all the supplies she has available for her classes. We created this CHARMING and OH SO CUTE Message Board Center with the help of an OLD (and I do mean OLD) metal picture that honestly everyone's grandparents had down in their basements.
Kimberly handed us a cute little chalkboard frame and said if we wanted to use it on our creation - to "Go At It". I covered the edges of mine in some of the DSP I selected for my project and then when I got home ...... I used my chalk markers to dedicate my Message Center to my Blog.
I figured it would be useful in helping me prepare and plan for my blog posting and since I had the "Note" tablet and the calendar already for placement on my message center......the rest was just a matter of decorating and adhering some DSP to my frame.
Kimerly gave each of us a calendar to use for our message board and I trimmed mine down and matted it with some coordinating cardstock and will be using that to check off the days when I finish posting on my blog.
The real magic of this Message Board Center was the shabby/distressed look that was all around the outer edges of my frame. All I did was use a sanding block to smooth down the edges and then I was ready to grab my embellishments and coordinating DSP and begin the creative process of creating a real piece of art for my studio.
We were able to create a magnetic with some metal pieces that were available to us. I just added a pink flower to the center of my metal flower and by adding a small piece of magnetic to the back ...... I had an instant embellishment for my Message Board Center.
As you can see - the Message Board Center itself is not very thick (or heavy) so it's perfect to have hanging next to my laptop so I can just glance over to see what projects I should be posting. To me it's all about staying organized and this is just one more way of Staying Organized and Keeping It Pretty (at the same time).
Simply LOVE LOVE LOVE how this project turned out and LOVE even more how pretty this looks in my studio.
I'll be back tomorrow to begin sharing the cards we made at Stamp Camp this month - Hope you can join me for that share. Keep Living Your Dream!


both pretty and brilliant way to keep track of your blog posts! hugs, m
ReplyDelete