Tuesday, November 30, 2010

Kitchen Resurfacing

Today I'm going to share a completely NONE STAMPING related post - It mainly is so my family and friends back in Wisconsin can see how much our kitchen has changed since their last visit..........SO.....Let's get started...... This is s shot of my kitchen when you walk in from the hallway at the front door. Our old cabinets use to be a nasty blonde oak finish.....along with all the cabinets in our home......and they were really out-dated and though blonde in color-they always looked dirty.
Here's a view of the kitchen from the sliding glass door which leads out to the Ramada. We typically will eat our meals either at the Ramada of at this counter bar area. We do have a formal dining room.....but.....honestly......we have only eaten one or two meals there.
Here's a close-up of the corner portion of my kitchen. The counter top stove is to the right and the dishwasher and sink are to the left.
Here's the counter top stove area........I love how Miguel finished all the cabinets.....he did an amazing job of resurfacing the wood and now all the wood finish in our home is this amazing mission style finish.
And here's one last shot of my amazing (new/old) kitchen. I love spending time in my kitchen.....It's bright and large enough that both Jack and I can work together - without running into each other while we are preparing our portion of dinner.
Can't wait for my kids to come back out next year to visit......they will be amazed at how different things look when they get here.
Hope you can stop back tomorrow as I'm preparing to leave for my trip back to Wisconsin on Thursday........As much as I try to plan for my departure date.......something always comes up that requires me to RUN LIKE A CHICKEN WITH MY HEAD CUT OFF at the last minute........Hope I can get everything I want done before Thursday morning.......WISH ME LUCK!
Keep Living Your Dream!

Monday, November 29, 2010

Ribbon Storage

Happy Monday to you.....Hope you had a fabulous weekend - It always seems to go TOO FAST! Today I want to share with you a part of my studio that I am SO PROUD of.......My ribbon storage system. Let's get started....... This first picture is of my upper cabinets as you look towards the window in my studio. What you will be wanting to watch is the inside ends of those two cabinets which surround my window (which in this picture has the shades pulled down)..........
When you go to pull those two cabinets out.....they will slide outwards and reveal the inside workings of those cabinets. I designed the cabinets so they would pull out and I could store all my ribbon in those cabinets (on dowels).
Here's a close up look at the left hand side cabinet. You can see right above my inkpad caddy-there is a handle on the outside panel of the cabinet.....you simply pull that handle and..........
VIOLA........my ribbon drawer pulls out to reveal all my ribbon.......(OR SO I WOULD HAVE HOPED THIS WOULD BE ENOUGH ROOM FOR ME TO STORE ALL MY RIBON........)
I say "HOPED" it would be enough room to store all my ribbon........I have with ribbon what some people have with paper (oooppssss-bad example (right Jan!)......maybe it's with tools (OH....another bad example)........okay.....how about stamps (UHMMMMM- that's probably not a good example either.......I'll have to share with you sometime what I had made to store my stamps.........).............WELL.....let's just say that I THOUGHT-these two ribbon cabinets would be PLENTY of space for me to store my ribbon. It totally doesn't help that I took the left hand side ribbon cabinet and store all my Stampin UP ribbon in there and the right hand side cabinet is all my other type of ribbon........NEEDLESS TO SAY - "My name is Kadie and I am a ribbon addict".
I'm off to go find some ribbon to work with an upcoming card project.........Wish me luck.
Until tomorrow.......Keep Living Your Dream!

Sunday, November 28, 2010

Camping Book for Brooke

Today I will be sharing photo's of the scrapbook I made in September for my granddaughter Brooke. She too had a Brownie camp out with her mom and I wanted her to have a scrapbook to document the entire event. Here's the front cover of Brooke's scrapbook.
Two of the inside pages of her scrapbook.
I also made Brooke's scrapbook with LOTS of tags......
And ribbons......
And interactive pieces.
I can't wait to see how Brooke finished up her Great Outdoor Scrapbook when I go back in December.
Hope you can stop back tomorrow when I'll be sharing more Kards by Kadie creations. Keep Living Your Dream!

Saturday, November 27, 2010

Camping Book for Hailey

As I'm busy putting up my Christmas decorations........I wanted to share a few pics of the campi8ng book I made in September for my granddaughter Hailey. In September, Hailey was going on her first over night camping event with her mom and I made this "Great Outdoors" scrapbook for her to document the event. This is what the front cover looked like.
Here's pictures of the inside pages of that scrapbook.
Each of the pages had places for Hailey to post pictures and also there were journaling tags and LOTS of interactive features throughout this book.
The entire book was based on a chocolate brown and green cardstock theme....and I threw in LOTS of ribbons....cordings and dimensionals for texture.
Here's a picture of one of the pages that has a pull out tag feature to it. Hailey without a doubt was thrilled ove the end results. I'm looking forward to having Hailey show me how she completed the book when I return to Wisconsin in December.
Tomorrow I will be sharing the great outdoor scrapbook I made in September for Brooke. Until tomorrow....Keep Living Your Dream!

Friday, November 26, 2010

BLACK Friday

Guess what I'm not going to do today (OR THIS WEEKEND)? There will be NO SHOPPING for this chickie-la-la this year........ No struggling to find a parking spot...... No fighting over the last shopping cart.......... No lines No Specials......Or Deals......Or other tempting offers to get me into the stores. I'm planning to spend the entire day (and probably the weekend) in the comfort of my own home........putting up my Holiday decorations. I promise to take pictures and share my creations with you as soon as I'm finished. KEEP LIVING YOUR DREAM!

Thursday, November 25, 2010

Happy Thanksgiving

Today is Thanksgiving and I have PLENTY to be thankful for. I wanted to post pictures of each of the special people in my life that I am thankful for - but - besides from having technical difficulties with downloading the pics - I also realized that this post would be TOO LONG and that I was going to narrow it down to just ONE PICTURE and just fill in the rest from there. SO.......Let's get started:

Jack.......The one person who COMPLETES ME! I am without a doubt thankful that Jack came into my life and honestly.................I am a BASKETFUL OF CRAZY OVER THIS MAN !

My parents......although deceased, they provided me with a solid foundation and buckets of love.

My Children.........Michael, Cheryl and Jenni..........and also.......their spouses.............

My Grandkids.......(All TEN of them).......Zach, Madelyn, Jared, Hailey, Brooke, Steven, Bodie, Levi, Dalilah and Zev.

My BFF!

My Friends and Co-Workers from Madison.

The MANY MANY new friends I've made in SaddleBrooke.

The talented and creative ladies in my Stamping Group.

The fabulous Golfing friends who I golf with on Monday mornings.

My Medical Professional Team.

And.......last but not least......my two fabulous new neighbors in SaddleBrooke.

I give THANKS to all these special people in my life!

May you take time out of your busy schedule today to give THANKS to all the special people in your life that complete you. Happy Thanksgiving to you.....and......Keep Living Your Dream!

Wednesday, November 24, 2010

Happy Thanksgiving Eve

Happy Thanksgiving Eve to all! Today I was out BRIGHT and EARLY delivering my Thanksgiving treat baskets to 19 of my SaddleBrooke friends. WOW....If you could have seen me sneaking around in the dark trying to get my task done......well.....Let's just say, I'm glad the SaddleBrooke Patrol wasn't anywhere in sight. They might have taken me in for questioning-FOR SURE! Let's start my baskets out with this A*D*O*R*A*B*L*E (and I do mean ADORABLE!) Turkey Pencil. These are the very same Turkey Pencils I made 170 of for my 7-grandkids classmates AND......I also taught my fellow SaddleBrooke Stampers to make at a recent Saturday Fun Shop.
Here's the Pumpkin Basket I made using my Big Shot Large Scallop Die and from my Cricut for the Leaves (A Garden of Words). As you can tell from this picture.........I haven't stuffed my treat bags with goodies yet.........I was working on getting everything together so I could start an assembly line to get all 19-baskets filled.
Here are all the goodies I pulled together to get my treat bags filled with a Thanksgiving Blessing Mix. My plan was to gather all the goodies and then start dumping things in the little plastic bag which was going inside the pumpkin basket.
And here's an overhead shot of all 19-pumpkin baskets just waiting to be stuffed.
And finally.........a close-up of the Thanksgiving blessing basket that I deliveried at 5am to my friends up here in SaddleBrooke. The one thing I forgot........was to take a picture of the completed blessing baskets. Hopefully, I will grab my camera later today and snap a picture of the one remaining basket I made for my studio.
Many blessings to you and your families as celebrate Thanksgiving 2010. I hope you are able to spend the day HANGIN and CHILLIN with those close to you. See you tomorrow when I'll share with you those people in my life that I'm Thankful for. Until tomorrow.......Keep Living Your Dream!

Sunday, November 21, 2010

New Catalog Survival Kit

As a Stampin Up! demonstrator, I am always looking for FUN and CREATIVE ways to offer the new catalog to my customers when it's released in July. This year........I offered my customers a "New Catalog Survival Kit" when they purchased a new catalog from me. I call it......My New Catalog Survival Kit.
Here's a picture of the front and back of the gift that I make.
This is a close-up of the poem I have printed up for my customers.
And here are all the goodies that go inside the clear bag
And here is one final look at the New Catalog Survival Kit that goes out to my customers who order a new catalog.
Thanks for stopping by and hope you can swing back tomorrow for more Kards by Kadie creations. Until tomorrow........Keep Living Your Dream!

Saturday, November 20, 2010

4th of July Box

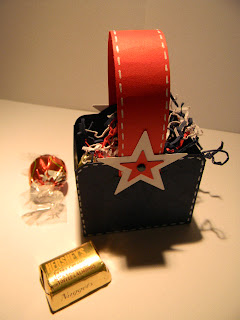
HAPPY Saturday to you. Are you ready to have a relaxing and fun weekend? Whatever your plans are......I'm hoping that you can spend time with your family and still have time to squeeze crafting time in sometime today. Here's the box I created for Jack and several of my SaddleBrooke Stamping friends. I used the Big Shot Tag die from SU to create the box. I glued two tags together to form the box and I made a handle which I attached with a brad.
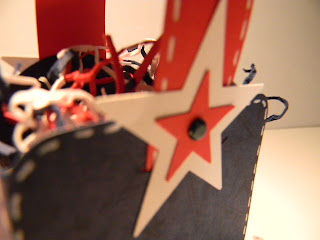
I added two different sized stars to the side of each handle.........and.....I added some thin stripes of red/white and blue paper to form colored crinkle filling.
Here's a closer look at the crinkle paper I added to inside of the box..... along with two pieces of chocolate just waiting to find it's new home in a 4th of July Box.
And one final picture of the star which I attached to the end of the handle. Thanks for stopping by.......enjoy the rest of your Saturday and stop back tomorrow when I'll be sharing some more Kards by Kadie creations. Keep Living Your Dream!

Friday, November 19, 2010

4th of July Kit Kat Bar

Here are the Kit Kat Bar holders I taught my fellow SaddleBrooke Stamper friends back in July. The holders are super easy and FUN FUN FUN to make. You take a piece of white paper and wrap it around your Kit Kat bar......Add three stripes of red cardstock........Add a 1" square punch (in blue) to the upper left hand corner. Add a white star with glitter on it and call it a day. SUPER EASY and SUPE CUTE!
A close-up shot of the glittered star........
And a view of the completed kit kat holder with extra kit kat bars to eat.
Please stop back tomorrow and I'll be sharing the 4th of July box I created for Jack......Until tomorrow....Keep Living Your Dream.

Thursday, November 18, 2010

4th of July Mailbox

While I was cleaning out the corner cabinet in my studio.....I came across these darlin little hersey nugget mailboxes and couldn't remember if I had shared them with you. This adorable mailbox came from SU demo Tammy White at http://stampwithtami.com/
You stack two hersey nuggets on top of each other and wrap decorative paper around the nuggets. You add a flag to the side and you have the cutest 4th of July mailbox.
Here's a close up of the back side of the mailboxes.........
And.....a close-up of the flags. I punched out two stars and added those to the center of the flag....and then to GLAM things up a bit........I added stickles and glitter to the punched out stars.
Tomorrow I'll be sharing another 4th of July creations........Keep Living Your Dream!