Happy Tuesday My Blogger Friends...... Today I have the two projects that my Crafternooner Buddies (Opal and Jan) made last Friday during our Crafternooners gathering - Let me share those two projects with you right now.............
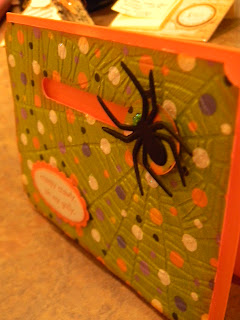
First up is this FABULOUSLY FUN Spinner card that Opal taught me how to make. I have seen these types of cards from "WAY BACK" but have never made one until this past Friday. HOW FUN and EASY is this card to actually make! It came together in a SNAP and let me tell you - mine seriously did some twirling and spinning!Opal had us use the Spider Web embossing folder on our DSP and before we adhered the DSP to the front of our card we built our spider component to our DSP.....which meant we used the Word Window punch (twice) to create a long word window punch slot to the top portion of our DSP.
We then secured our spinner onto two pennies that have been sandwiched between the open slot with a small piece of dimension between the two pennies. We added our circle with our spider to the top of the penny and now our spider was able to freely spin (and twirl) from one end of our word window punch channel to the other end.
Opal had used her computer and printed out this adorable "creepy crawly, oh my golly" sentiment (in orange no less) and we used the small oval punch and layered it with the scallop oval punch (in orange) to create this amazingly cute sentiment to the front of our card.
THANK YOU Opal for teaching me how to make a spinner card - Totally COOL and Seriously EASY! I still can't believe how smooth my spider spins across the front of my card. AND THANK YOU Opal for letting me borrow your spider die so I can create a few of these cards for my grandkids!
Amd that brings me to Jan's card/project.......I only wish you could see this little creation in person - It would SERIOUSLY ....... BLOW YOU AWAY! The over-all size of this project fits into an A2 envelope and is one of those projects that looks complicated - but once you break it down and make one for yourself.......You realize how EASY PEASY it is to make.........
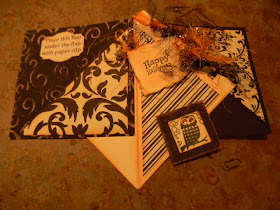
Jan overlapped three 4"x4" squares of cardstock (which were each scored and folded in half) and added triangle DSP to one of the triangles and did a TON of distressing of the edges to create a T-P type card. The real magic comes from how you decorate your T-P creation! We chatted at our Crafternooners gathering and thought this would make a fabulous FunShop for our SaddleBrooke lady friends - so Jan is going to demo this project with a follow-up Funshop sometime in October.
For those of you that can't wait (or aren't going to be at the Fun Shop) here is what the project looks like when opened up. You can see that the left and the right side 4"x4" squares (black cardstock) are connected with the center 4"x4" square (Very Vanilla cardstock). All you need to do to the Very Vanilla center piece is turn it 90 degrees and adhere that panel to the two black panels next to it.
And here is what the other side of the above picture looks like. The paper Jan used is Black on one side and Orange on the other. (So instead of your panels being 4"x4" Black and Very Vanilla - your panels are 4"x4" Pumpkin Pie and Very Vanilla)
Here's a close-up of the FUN little saying we added to the center panel of our card. We ended up waiting until our card was completely built and we secure the tiny paperclip to the back panel before we attached our "Happy Haloween" image to our card - and this ensured that the placement of our sentiment was lined up.
And here's one last look at this AWESOME creation. THANK YOU Jan for teaching us how to make this fun project......And can't wait for you to demo this project at our upcoming SaddleBrooke Stampers meeting. I know the ladies will completely enjoy this project. (I just might have to make this a project for my upcoming Stamp Camp)
Thanks for joining me today and remember you can subscribe to my blog by heading up to the upper right hand corner of my blog and selecting "Sign Up To Follow My Blog by Email" button. All you need to do is enter your email address and press the "Select" button. You will then begin receiving my daily post of "Kards by Kadie" directly to your In Box.
Tomorrow my fellow Design Team Members of CraftJunkieToo (http://CraftJunkieToo.blogspot.com) will come together to do a FUN Autumn "Anything BUT a Card" Blog Hop for you. Can't wait to share with you my AWESOME project. I hope you can join me and my fellow SUPER TALENTED Design Team members for this CREATIVE and FUN Blog Hop.
Keep Living Your Dream!!!!!!


No comments:
Post a Comment