Monday, February 21, 2022

Thoughtful Upgrade

Happy Monday My Blogger Friends! 
Today is Mix-It-UP! Monday, and I have an upgraded version of the card I shared with you yesterday.  I used the exact same product that was used to create yesterday's card ..... But changed up a few things on my card to bring this card up to the next stamping level.
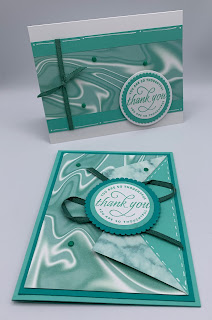
Here's my Spotlight Sunday card from yesterday on the TOP.....
And my Mix-It-UP! Monday upgraded card for today on the BOTTOM.....
The first change I made for my upgraded card was change the orientation from a Landscape style card to a Portrait style card.  I also changed it from a White base card to a Coastal Cabana base card.
I added several layers of cardstock to this upgraded version......Along with changing the fold for my 'Simply Marbleous Designer Series Paper'.
I started with a 3-3/4" x 5" piece of Designer Series Paper ...... And measured down 2-1/2" from the top of my DSP and went in 1-1/2".  I used my Paper Trimmer and cut my DSP from the 1-1/2" mark ..... up to the top corner.  I did the exact same thing to the bottom section of my DSP.  All I needed to do was fold back the DSP to expose the opposite side.
I used the same sentiment and layering technique as I did from yesterday's card....
And colored my 'Cotton Ribbon' with the same Bermuda Bay Stampin' Blends before adhering it behind my sentiment piece.
And there you have it friends......
Do you have a favorite???

Thanks for joining me today!  I'll be back tomorrow to share a 3-D Tuesday creation with you ...... Hope you can make plans to stop back and join me for that share.  Keep Living Your Dream!

Sunday, February 20, 2022

Thoughtful Thanks

Happy Sunday My Blogger Friends
Today is Spotlight Sunday ....... And I have a card I created using product from the 2022 Stampin' UP! Mini Catalog.  This card uses several products from that new catalog ........ And I'm thrilled with the way it turned out.  Let's jump right in with my card share for today..........
I started my card off with a White base.
Next, I joined a 2-1/4" x 5-1/2" panel of 'Simply Marbleous Designer Series Paper' to a 3-1/4" x 5-1/2" Coastal Cabana mat.
Before I adhered that panel down onto my base card ...... I colored some 'Cotton Ribbon' with a Bermuda Bay Stampin' Blends and wrapped that ribbon around the left-hand side of that DSP and card stock panel.
Then I got busy and stamped my sentiment.  I used the 'Flowering Tulips' set for my sentiment.....
And layered that onto several 'Layering Circles' die-cut pieces.
The finishing touch was adding a few 'Playing With Pattern Dots' that were colored with my Bermuda Bay Stampin' Blends.  And this card was done to PERFECTION!

Thanks for joining me today!  I'll be back tomorrow to share an upgraded version of this very card with you ...... Hope you can make plans to stop back and join me for that share.  Keep Living Your Dream!

Saturday, February 19, 2022

For You

Happy Saturday My Blogger Friends!
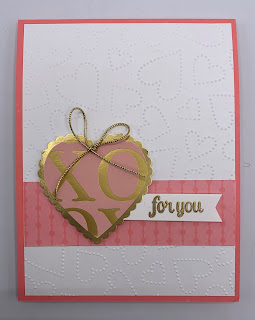
My blog post for today is Paper Pumpkin Saturday ........... And I would like to share with you the project I created using the January "Kisses & Hugs" Paper Pumpkin kit.   Here's that project.......
Check out this OH SO PRETTY alternate card I made using the January Paper Pumpkin kit.
I started with a Flirty Flamingo base card ...... And added a White panel that was embossed using the 'Dotty Hearts Embossing Folder'.
To the top of that embossed panel ..... I added a panel of the 'Flirty Flamingo Brights Designer Series Paper' across the front and then got busy adding some punched and stamped pieces.
The heart punch was created with 'Gold Foil Paper' and I used one of the heart pieces in this kit to punch out a heart.  Those pieces were adhered together and then Stampin' Dimensionals added to back to pop those pieces up off my card.
My sentiment is from the stamp set that came with this kit ..... And I created DARLING banner flag and used 'Gold Embossing Powder to add a fun little WOW FACTOR to that sentiment.
The finishing touch was creating a pretty bow with some of the 'Gold Trim' that came with this kit ...... And called this card DONE and FINISHED!

Thanks for joining me today!  I'll be back tomorrow to share a Spotlight Sunday creation with you ........ Hope you can make plans to stop back and join me for that share.  Keep Living Your Dream!

Friday, February 18, 2022

Friends Friday PICS

 Happy Friday My Blogger Friends!
My blog post for today is Friends Friday.  On Friday's, I have the honor of spotlighting some of the fabulous cards and projects that I received from Friends ....... Fellow Demonstrators ........ and Family.  Each of these creations are works of art........and it is with great pleasure that I share with you today some AMAZING projects that five very special friends made for me.
First up for today......this BEAUTIFUL card that Susan Akins made.
Next, I have this STUNNING card made by Betty Pearce.
This LOVELY card was made by Lynne Wescott.
Check out the GORGEOUS Z-fold card that Jan Knapp created.
And my final share for today is this OH SO CUTE card made by Randy Brosnahan.

Thanks for joining me today!  I'll be back tomorrow to share a special Paper Pumpkin Saturday creation with you ........ Hope you can make plans to stop back and join me for that share.  Keep Living Your Dream!

Thursday, February 17, 2022

You Are A Blessing

Happy Thursday My Blogger Friends!
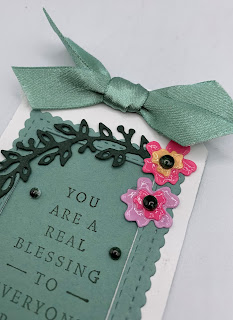
My blog post for today is Tag Thursday.  Today, I will feature a tag I created and show you how easy it is to use minimal supplies to create a SUPER PRETTY TAG.  Now that you have the details for my Tag Thursday creation for this week ........ Let's jump right in with my tag share for today........
How GORGEOUS is this tag.
I mean REALLY ...... It is PERFECT!!!
I started off with a 2-1/2" x 4-1/4" White base tag.
Next, I cropped out a Soft Succulent 'Stitched So Sweetly Die' for the frame......
To the center of that frame ...... I stamped my sentiment from the 'Blessings of Home' set and used Evening Evergreen ink to stamp that.
After I attached that stamped sentiment to my base tag ...... I got busy and cropped out several flowers and swags using the 'Flowers of Home Dies'.
And I finished off my tag with a pretty 'Soft Succulent Satin Shimmer Ribbon' bow and called this tag DONE (to perfection).
So there you have it my friends......
Do you LOVE it as much as I do???

Thanks for joining me today!  I'll be back tomorrow to share some Friends Friday creations with you ........ Hope you can make plans to stop back and join me for that share.  Keep Living Your Dream!

Wednesday, February 16, 2022

Just A Note

Happy Wednesday My Blogger Friends!
My blog post for today is Wine-Down Wednesday.  My middle of the week card feature for today will hopefully offer you some inspiration and provide you with some motivation to keep you moving through your busy week.  Let's jump right in with my card share for today........
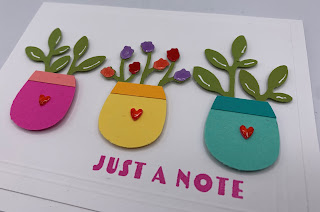
Check out this SERIOUSLY happy card.  I started with a White base card.
And to the top of that ...... I added another White panel that measures 5" x 3-3/4".  Before I adhered that panel down to my base card ....... I scored it 1/4" and 1/2" on all four sides.  This allowed me to create an embossed border look on this panel.
Then I got busy and grabbed some cardstock and the 'Cactus Builder Punch' and cropped out three little pots.  I used the 'Bough Punch' to cropped out filler to pop into each pot ....... And used some Stampin' Dimensionals to add those to the front of my card.
My sentiment was stamped directly below my three pots.  I used the 'Cactus Cuties' set and Magenta Madness ink.
I then added one single tiny heart to the center of each pot ....... And those little hearts came from the 'Shaker Shapes Embellishments' that were colored in with my red Stampin' Blends.
And that's all it took my friends to create this FUN card.
What do you think????

Thanks for joining me today!  I'll be back tomorrow with a Tag Thursday creation to share with you ........ Hope you can make plans to stop back and join me for that share.  Keep Living Your Dream! 

Tuesday, February 15, 2022

Mailbox Gift

Happy Tuesday My Blogger Friends!
My blog post for today is '3D/CASE IT TUESDAY'.  That means today I have a fun little 3-D project that I found on the internet ....... And I created a CASE of that project to share with you today.  This project was SUPER FUN to create and I want to jump right in and share that project with you now.
This little cutie was inspired by the very talented Angie Pyjas at 'Stamping With Amore'.  She posted this little creation on January 9th ........ And I knew it would be PERFECT to pass out to my neighbors and some friends.  Here is a link to Angie's UTube Video:  Valentines Day Truck Treat Box - YouTube
These little trucks use the 'Best Delivery' set along with the 'Sweet Talk Designer Series Paper'.
And both sides are decorated.
The box for the truck is a 6-1/2" x 3-1/2" piece of White card stock.  That is scored (with 6-1/2" side at the top of your Score Board) at 1/2", 1-1/4", 3-1/2" and 4-1/4".  Then you turn your card stock with the 3-1/2" side at the top and score at 1/2", 1-1/4" and 2-3/4".  Angie will show you the cutting of the box on her EXCELLENT video.
Here's just 4 of the 25 trucks I made for my neighbors and friends ....... And I know they are going to be THRILLED when they open this little cutie up.

Thanks for joining me today!  I'll be back tomorrow to share a Wine Down Wednesday card with you ........ Hope you can make plans to stop back and join me for that share.  Keep Living Your Dream!