Thursday, August 22, 2019

Blue Posy Friend Tag

Happy Thursday My Blogger Friends!
My blog post for today is Tag Thursday.  Today, I will feature a tag I created and show you how easy it is to use minimal supplies to create a SUPER PRETTY TAG.  Now that you have the details for my Tag Thursday creation for this week ........ Let's jump right in with my tag share for today........
 
I must admit......This was a pretty fun tag to create for a sweet friend.
 
I started out with a Night of Navy tag base and added some Designer Series Paper down the center of my tag. 
 
Next, I used my 'Night of Navy Stampin' Blends' along with a piece of 'Silver 3/8" Metallic-Edge Ribbon' and colored that ribbon to coordinate perfectly with my tag.
 
My Posy Flower is several layers of punches (2", 1-3/4", 1-1/2", 1-1/4" and 1") that each have been punched out and then spritzed with water and crinkled up to dry. 
 
After each circle was completely dried......I stacked them all together and added a 'Silver Faceted Gem' in the center.
 
I added a pretty little sentiment banner flag (from the 'Band Together' set) and sprinkled a few 'Happiness Blooms Enamel Dots' around my tag.
 
The finishing touch was adding more of the colored 'Metallic-Edge Ribbon' to the top of my tag and I used 'Silver Metallic Thread to tie it up into a pretty bow.
 
 Totally crazy about the way this tag turned out.

Thanks for joining me today!  I'll be back tomorrow to share some Friends Friday creations with you ........ Hope you can make plans to stop back and join me for that share.  Keep Living Your Dream!

Wednesday, August 21, 2019

Embossed Sympathy WOW!!!

Happy Wednesday My Blogger Friends!
My blog post for today is Wine-Down Wednesday.  My middle of the week card feature for today will hopefully offer you some inspiration and provide you with some motivation to keep you moving through your busy week.  Let's jump right in with my card share for today........
 
One of the cards that my good friend Gus Berry wanted to work on a couple weeks ago (while we were making sympathy cards) was a card she had seen on Pinterest.  This pretty card was SO MUCH FUN TO CREATE (Is that even possible to enjoy making sympathy cards?????).
 
We started out by running a panel of the Blueberry Bushel 'Noble Peacock Foil Sheet' through our die-cut machine using the 'Tufted 3D Folder'.  Talk about an INSTANT WOW FACTOR!!!!!
 
Next, we used a Whisper White panel and ran that through our die-cut machine using the 'Delicate Lace Die'
 
We added a large 'Stitched Shapes Oval' and stamped our 'Flourishing Phrases' sentiment to the center of that oval.
 
The finishing touch was adding some pretty blue ribbon from my stash ..... And this card quickly became one of my favorite cards that Gus and I made.

Thanks for joining me today!  I'll be back tomorrow with a Tag Thursday creation to share with you ........ Hope you can make plans to stop back and join me for that share.  Keep Living Your Dream!

Tuesday, August 20, 2019

Chip Board Post-It-Note Holder

Happy Tuesday My Blogger Friends!
My blog post for today is 'CASE IT TUESDAY'.  That means today I have a fun little 3-D project that I found on the internet ....... And I created a CASE of that project to share with you today.  This project was SUPER FUN to create and want to jump right in and share that project with you now.
 
My share for today is a CASE on myself.  Back when I lived in Wisconsin and would get together with my girlfriends and do weekend scrapbook retreats......I would often make these little chip board post-it-note holders for each of my friends.  Figured it was time to refresh this project and use some new Stampin' UP! product.
 
You start out with one 4"x4" chip board piece (I used foam board for mine today) and cut out 2-pieces of Designer Series Paper (I used Follow Your Art) to cover both the front and back of your chip board piece.
 
Adhering the Designer Series Paper is a snap.  You can use Mono Glue or Snail to adhere the Designer Series Paper to the chip board.  After I had my Designer Series Paper attached to my chip board piece, I used my sanding block to smooth out any edges that were hanging over.
 
Add your Post-It-Note to the top of the Designer Series Paper and you are almost finished with this project.
    
The last step is to add a tiny piece of Designer Series Paper to cover the bull clip....
 
And then a  pretty 'Bermuda Bay Mini Striped Ribbon' bow was added to the center of the bull clip.
 
And that's just how SUPER FAST you can crank these little cuties out.

Thanks for joining me today!  I'll be back tomorrow to share a Wine Down Wednesday card with you ........ Hope you can make plans to stop back and join me for that share.  Keep Living Your Dream!

Monday, August 19, 2019

Cow Crazy Upgrade

Happy Monday My Blogger Friends!
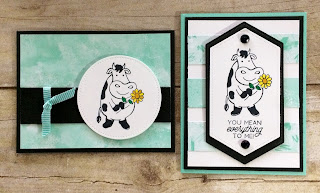
Today is Mix It UP! Monday and I have an upgraded version of the card I shared with you yesterday.  I used the exact same product that was used to create yesterday's card ....... but added a couple additional products found in the 2019-2020 Stampin' UP! Annual Catalog to bring this card up to the next stamping level.
 Here's my Spot Light Sunday card from yesterday on the LEFT.....
And my Mix-It-UP! Monday upgraded card for today on the RIGHT.....
 
The first thing I did for my upgraded card was change the orientation from Landscape to Portrait.
 
I used a Coastal Cabana base card and layered it with Basic Black and Whisper White card stock panels.  To the top of the Whisper White card stock panel......I added three panels of the 'Follow Your Art Designer Series Paper'.
 
My DARLING cow was stamped from the 'Over The Moon' set onto a Whisper White 'Stitched Nested Label' piece.
 
I used my 'Stampin' Write Markers' to color in my cow ......
 
And finished that label piece off with two large '2019-2021 In Color Faceted Dots' that were colored with my 'Basic Black Stampin' Blends'.
So there you have it friends.......
Two CUTE AS CAN BE cow cards.

Thanks for joining me today!  I'll be back tomorrow to share a 3-D Tuesday creation with you ...... Hope you can make plans to stop back and join me for that share.  Keep Living Your Dream!

Sunday, August 18, 2019

Cow Crazy

Happy Sunday My Blogger Friends
Today is Spotlight Sunday ....... And I have a card I created using product from the 2019-2020 Stampin' UP! Annual Catalog.  This card uses several products from that new catalog ........ And I'm thrilled with the way it turned out.  Let's jump right in with my card share for today..........
 
Who doesn't LOVE a FUN cow card????
 
This card starts out with a piece of the 'Follow Your Art Designer Series Paper' that is positioned onto a Basic Black base card.
 
Next, I cut a Basic Black card stock panel that measures 1-1/4"x5-1/4".  I wrapped some 'Bermuda Bay 1/4" Mini Striped Ribbon' around that panel and  then adhered it down to my Designer Series Paper.
 And check out this ADORABLE little cow.......
 
She was colored in with my 'Stampin' Write Markers' and then added to the front of my card.
And that's all it took my friends to create this sweet little cow card.

Thanks for joining me today!  I'll be back tomorrow to share an upgraded version of this very card with you ...... Hope you can make plans to stop back and join me for that share.  Keep Living Your Dream!

Saturday, August 17, 2019

Happy Birthday

Happy Saturday My Blogger Friends!
My blog post for today is Paper Pumpkin Saturday ........... And I would like to share with you the project I created using the July Paper Pumpkin kit.   Here's that project.......
 
Thinking outside the box with the July 'On My Mind' Paper Pumpkin kit helped me design this HAPPY and MODERN looking birthday card.
 
I started with a Pretty Peacock card base.  To that......I cut down some of the Designer Series card stock that was included in this kit and added some Terracotta Tile card stock to create four 1-1/4"x 3" panels for the front of my card.  (I used some scotch tape on the back of each panel to secure all 4-panels together)
 
Before I adhered those four panels down to my card ...... I trimmed down one lacy edge of some 'Pretty Peacock 1/2" Scalloped Linen Ribbon' and wrapped that around the center of that four panel piece and adhered it to the back.
 
My sentiment was stamped with Pretty Peacock ink onto a Whisper White 'Tailor Tag Punch' piece.
 
And that's all it took to create this fun birthday card.

Thanks for joining me today!  I'll be back tomorrow to share a Spot Light Sunday card with you ...... Hope you can make plans to stop back and join me for that share.  Keep Living Your Dream!

Friday, August 16, 2019

Friends Friday PICS

Happy Friday My Blogger Friends!
My blog post for today is Friends Friday.  On Friday's, I have the honor of spot-lighting some of the fabulous cards and projects that I received from Friends ....... Fellow Demonstrators ........ and Family.  Each of these creations are works of art........and it is with great pleasure that I share with you today some AMAZING projects that four very special friends made for me.
 
First up for today is this BEAUTIFUL box of tags my sweet Scissors Retreat friend Sandy made for me.
 
Here are the tags she tucked inside.
 
Next.....I have this SUPER YUMMY treat that Jan Gore and Linda Robertson made for me.  As if the cow card wasn't enough........Check out the MEGA BAG of jelly belly's they gave me.
 
And my final card share for today is this ADORABLE card that my good friend Gus Berry made for me.
 
Thanks for joining me today!  I'll be back tomorrow to share a special Paper Pumpkin Saturday creation with you ........ Hope you can make plans to stop back and join me for that share.  Keep Living Your Dream!