Tuesday, January 22, 2013

Stamp Club A2 Card

Happy Tuesday My Blogger Friends!
Today I will be sharing the A2 card that we made at our January Stamp Club.....Check out this card we made.....

We created this card using the new Secret Garden stamp set and Framelits die set.  Our base card is Lucky Limeade and we used on the front of our card the new Sunshine and Sprinkles DSP.
We stamped our images out in Calypso Coral and Pool Party and used the Secret Garden Framelits Dies to diecut out the largest Secret Garden flower.
We then stamped our Calypso Coral flower one more time and the Pool Party flower two more times and each of thoese stamped images we fussy-cut out and used dimensionals to stack those cut out images onto the flower that we diecut using the Framelits Die.
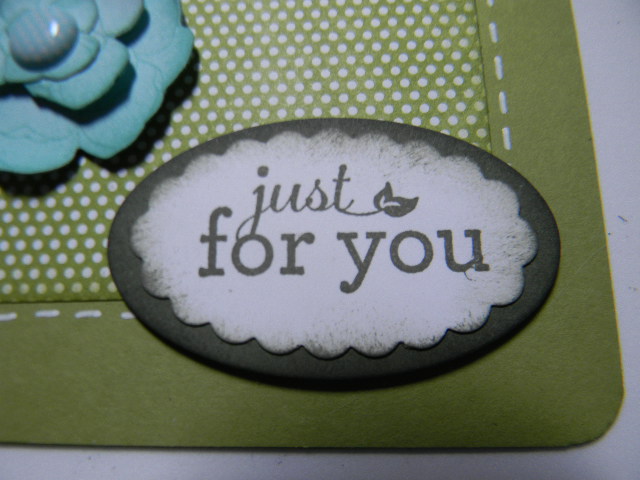
We used ALways Artichoke to stamp the "Just for You" sentiment ..... which is from the Pop-Up Posies Designer Kit.  We punched it out with the scallop oval punch and then used the new Framelits Oval Collection Dies to add a Always Artichoke oval border around our sentiment.
We added a 3/8" Designer Printed Brad to each of the center of the Calypso Coral and Pool Party Flowers.  Our Leaf was diecut using Always Artichoke cardstock and the Secret Garden Framelits Dies.
 
Thanks for joining me today......I'll be back tomorrow to share the 3x3 card we made at our January Stamp Club (last Saturday).  Hope you can make plans to stop back and join me for that share.  Keep Living Your Dream!

Monday, January 21, 2013

January Stamp Camp Card Four

Happy Monday My Blogger Friends!
Hope you'all had a fabulously fun weekend.......but it's time to regroup and head into another FUN PACKED WEEK.  Today.....I have my last January Stamp Camp Card to share with you.....and I honestly think I saved the best for last.  Check out this amazing Valentine's Day card we made......

We used the Hearts A Flutter Framelits dies along with the Hearts Framelits die to create our heart focal point for this card.
Our banner was created with the help of More Amore DSP and Pool Party cardstock.
We also used three embossing folders on this card.  The first was the Delicate Design embossing folder in Crumb Cake that was positioned right in the center of our card......
We also used the Elegant Lines Embossing Folder and the Honeycomb Embossing Folder for both of our diecut out hearts.  We also added a flattened Silver Soda Pop Top (we used the Big Shot to flatten the pop top.....) and we added a 1" Pool Party circle and a Raspeberry Ripple 7/8" Scallop Circle to the center of our flattened Pop Top.  We added a thick layer of Crystal Effects over our 7/8" scallop circle and that really glossed up the center of our Soda Pop Top Embellishement piece.
Here's a close-up view of what the Delicate Design Embossing Folder looks like....OH SO PRETTY when embossed in Crumb Cake......
 
And one last new product item was the new White Tea Lace Paper Doilies.  These are SERIOUSLY a favorite item of mine in the Spring Catalog!
And here's one last close-up of the flatten Soda Pop Top and Embossed Hearts. 
 
Thanks for joining me today.....I'll be back tomorrow to share more Kards by Kadie creations with you.  I've been busy creating cards with new product from the Spring Catalog and hope you can stop back tomorrow to see the cards I've created.  Keep Living Your Dream!

Sunday, January 20, 2013

January Stamp Camp Card Three

Happy Sunday My Blogger Friends!
 Today I have the third card we made at last Wednesday's Stamp Camp.  It's another Valentine's card....and this card uses LOTS of new product from the Spring Catalog.  Let's jump rght in.....

We started out with Real Red cardstock for the base of our card.  We added a layer of Pretty in Pink cardstock that was run through the Big Shot and used the Honeycomb embossing folder to create lots of AMAZING texture and look to the front of our card.
I also had the ladies take a small piece of Real Red Cordination cardstock that had been embossed with the new Honeycomb embossing folder and cut out four hexagon shapes and add those to their card. 
We used the "You Are Loved" stamp set and diecut out that image with the help of the new Oval Framelits.  We matted the stamped image to a one size larger oval framelits and sanded the edges of our Real Red oval to expose some of the Cordination  edges.
Here's a close up look at the Honeycomb pieces cut up and the new 5/8" Vanilla Flower Trim added to the front of our card.
We also added a piece of 7/8" Natural Cotton Ribbon down the center of our card and secured our oval sentiment pieces right over the top of our cotton ribbon.  A Large Rhinestone Jewel was added to the bottom of the cotton ribbon and two additional smaller rhinestones were added to our sentiment.
Here's a close-up of the new 5/8" Vanilla Flower Trim....OH SO PRETTY and OH SO EASY to cut apart and ahere to our card.
The Camp ladies had lots of fun making this card and really enjoyed using LOTS of new product from the Spring catalog.
 
Thanks for joining me today....I'll be back tomorrow to share the last card from my January Stamp Camp with you.  Hope you can make plans to join me for that share.  Keep Living Your Dream!

Saturday, January 19, 2013

January Stamp Camp Card Two

Happy Saturday My Blogger Friends!
Today is the start-up of my first Stamp Club of 2013......and I can hardly wait for my six Club Gals to come together and PLAY.  I have six VERY EXPERIENCED stampers joining me for my first Club of 2013 and I am SO LOOKING FORWARD to some SERIOUSLY FUN TIMES over the next six months.   
 
My post today is the second card that we made at my January Stamp Camp.  Here is that Valentine's Day card.....

This card was inspired from the Spring Catalog (Page 26) and I just put the Kadie spin on this card.
We used the new stamp set "Cross My Heart" to create our focal image.  We stamped this image in Statz-On ink and then cut it out and used small pieces of dimensional adhesive to pop it up from our DSP and Laser Heart.
We used the More Amore DSP for our Laser Heart....and a couple snips with our paper snips made cutting out these Laser Hearts a snap.
We added a Vintage Trinket Safety Pin and stamped the Tiny Tags and Itty Bitties (hearts) and punched them out with the help of the Jewelry Tag Punch.  The Safety Pin was secured to the Stitched ribbon that went around the bottom border piece we created.
The bottom border piece was a Whisper White panel that was punched with the Scallop Border Punch and then a layer of Gray was adhered over the scallop border and a 1/4" Stitched Grosgrain Ribbon was added on top of the Gray panel.
 
The entire card went together fairly quickly and several of the ladies said they were going to use this card as an anniversary card for their husbands.
 
Thanks for joining me today....I'll be back tomorrow to share Card #3 from my January Stamp Camp.....Hope you can make plans to join me tomorrow for that share.  Keep Living Your Dream!

Friday, January 18, 2013

January Stamp Camp Card One

Happy Friday My Blogger Friends!
Today I will begin sharing the cards we made at my January Stamp Camp.  Our theme for January was Valentine's Day and with all the new product that Stampin' UP! has released in the new Spring Catalog......It was not hard to come up with four of the BEST VALENTINE'S DAY card EVER!  Here's the first card we made.....

This first card was inspired by the super fabulous Erin Gonzales at Erin@handstampedstyle.com
She posted this style card on her blog and I FELL IN LOVE LOVE LOVE with it and even though it didn't have new catalog product....I just had to have my Camp Gals make this card at my January Stamp Camp.
We used the stamp set "Delightful Dozen" and stamped our "Be my Valentine" on Pool Party cardstock with Island Indigo ink.  I also had the ladies add a Real Red Bitty Heart to the stamped heart section and add Crystal Effects over the heart to gloss it up.
We used Whisper White cardstock and ran that through the Big Shot using the Perfect Polka Dot Embossing Folder.  After we had our piece embossed, we came in with the small heart punch and punched out hearts ..... making sure we left enough spacing between the punched out hearts so we could come back and use the Postage Stamp Punch to then punch out a scallop square punch with a punched out heart in the middle.
Each kit contained a total of TEN 3/4" circle punches in a variety of colors and those circles were glued to the backside of each postage square punched image and that allowed the punched out heart to be filled in with color.
All the ladies needed to do was then arrange the colored postage stamp squares on their piece of Pool Party cardstock and adhere them down into place.  The finishing touch was to add the small knotted piece of Real Red Stitched Ribbon to the front of our card......and this card was done.
 
Many thanks to Erin Gonzales for creating this darling card.  It was hands-down a favorite of all my camp gals.
 
Thanks for joining me today......I'm off to put the finishing touches on my Stamp Club projects.  The ladies will be coming over tomorrow afternoon to kick off my next Stamp Club session.  I'll be back tomorrow to share the second card that we made at my January Stamp Camp....Hope you can make plans to join me for that share.  Keep Living Your Dream!

Thursday, January 17, 2013

Birthday Card from Kris

Happy Thursday My Blogger Friends!
I was hoping to have the first of my Stamp Camp cards up this morning.....But the night got away from me and I had to face the music that I just had NO MORE ENERGY to get photos and posting done of my January Stamp Camp cards.......SORRY FRIENDS.
 
I do however have one of Jack's birthday cards that my sweet sweet friend Kris made for him - and I want to share that card with you today.  Here is the birthday card that Kris made for Jack.....

Knowing that one of Jack's favorite colors is Orange (and Red and Blue.....), Kris made this SUPER FUN card for Jack ........
But the fun continued when you opened this card to a "Pop-Up" style card......
How amazing is this center pop-up portion of her card...........
It actually POPS UP!
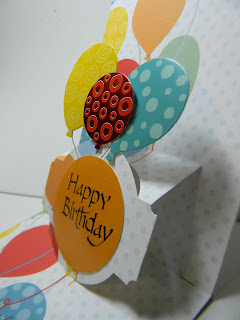
Kris used one of the new Sizzix Pop and Cut dies to create this VERY FESTIVE and VERY FUN card for Jack's 80th birthday.
And to give you a view of what the actual Pop-Up component looks like.....Here is a side view of that section of her card. 
 
Jack loved his card and actually said he thought I should figure how to make this card for the birthday cards that I send out to family and friends this year.....UHM.......Think I will be asking Kris if I can borrow this Sizzix die from her.  It honestly would be easier to simply run the die through my Big Shot......RATHER THAN trying to cut out this by hand.
 
Thanks for joining me today....I'll be back tomorrow to begin sharing the cards that we made at this months Stamp Camp.....Hope you can come back and join me for that share.  Keep Living Your Dream!

Wednesday, January 16, 2013

January SBS Challenge Card

Happy Wednesday My Blogger Friends!
Today I would like to share my January SaddleBrooke Stampers Challenge Card with you.  Our challenge card was to make a card or project with supplies we had received in our challenge packet.  This month our challenge packet had two different colored cardstock (lilac and peach) and a piece of a sewing pattern paper.  We just needed to incorporate all the supplies into our project ..... and here is what I made:
I decided to make a Fold Over Birthday Card.
And secured it shut with a piece of Soft Suede Taffeta Ribbon.
I made a paper flower with the Sewing patterned paper I was given and added several layers of the Lilac and Peach cardstock to create the center ot my flower.  The very center of my flower is one of the largest SU Fauceted Buttons.
The Elegant Butterfly and First Edition DSP were added to the top portion of the front of my card.....
 And when you untied the ribbon......It opened up and exposed the center workings of this card.
This card was created to be a Happy Birthday Card.....Which meant I created it to hold a gift card.
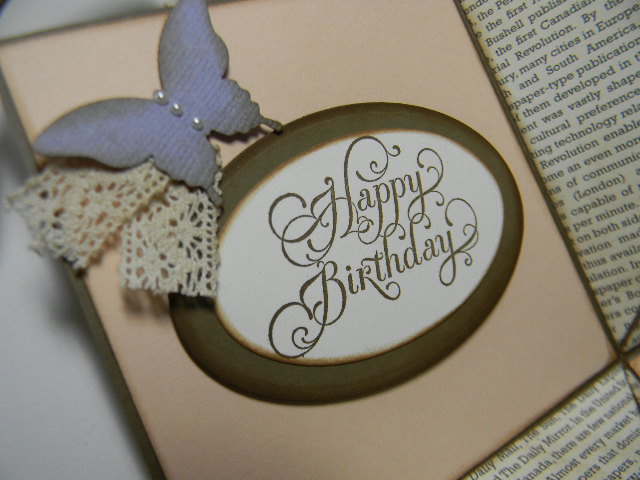
Here is the Happy Birthday sentiment I stamped in the upper left hand corner of my card......
And right below that square I added some First Edition DSP into each of the scored off sections.
And I also added more First Edition DSP to the upper right hand section of my card......
And in the lower right hand corner is where I tucked my gift card.
And all you need to do to close up this card is bend the First Edition panel in and everything folds on top of each other and the entire card closes back up.  This is a fun card project to make and I plan to send this card to someone special this year for their birthday.
 
Thanks for joining me today....I'll be back tomorrow to begin sharing the cards we made at my January Stamp Camp with you........Hope you can make plans to join me for that share.  Keep Living Your Dream!