Sunday, April 22, 2012

April Stamp Camp Cards Part Two

Happy Sunday My Blogger Friends! 
What a fabulous day it is here in SaddleBrooke Arizona.  The weather has finally moved into the GORGEOUS STATE that allows us to leave our windows open and the tank tops are back to the front of the closet along with our shorts and little skirts.  AND THAT WOULD BE WHY I LOVE LIVING IN ARIZONA!
Countdown to Grandkids Arriving = 47 days to go!
Here's a re-cap on the cards/projects that we made at this months Stamp Camp.  Today I will be sharing the 3-D project and the last birthday card we made.  Let's get started........
Our 3-D project this month came from http://stampinfunwithselene.blogspot.com.  HOLY BUCKETS does this gal know how to make fun stuff.  She posted this fun little bookmark on her blog March 29th and I knew from the minute I saw it ........ that this was going to be a project that I would make some day.  We used the "Two Tags" BigZ Die in Chocolate Chip and also cut out a portion of that same die with Magnet Sheets.
We glued the Magnet Sheet images directly onto our die cut tag and left a little portion of the center of our tag without any magnet sheet adhered to it (and that was mainly done for closure purposes).
We used the "Broadsheet Alpha" set to add a monogram letter to our bookmark and layered several circle punches and a Crumb Cake Scallop Circle to the front panel of our bookmark.  I had the gals also add some Crystal Effects to their monogram letter and that just added a little something something to this little bookmark that turned out amazing.  MANY THANKS to Selene for sharing her fabulous creation with us.
And our last card came from Page 66 of our 2011-2012 catalog.  I basically CASE'd this card right out of the catalog.  About the only thing I did not include as the Bitty Buttons to our card (and mainly did that for mailing purposes).  We used the " Bring on the Cake" stamp set along with the new "Summer Smooches" DSP and Baja Breeze, Rose Red and Early Espresso card stock.
Our little flowers were created with the Bitty Flower Punch and those were punched out in Pink Pirouette, Baja Breeze and Wild Wasabi cardstock.  We adde a tiny Pearl to the cente rof each of these and that replaced the Bitty Buttons that were added to the original card on Page 66.
LOVE how easy this card would be to duplicate in other colors and was amazed at how fast this card comes together.

Hope you enjoyed the Birthday Cards/Projects we made at our April Stamp Camp - Next month I told the gals we would be doing a Floral Theme.  Our 3-D project for May Stamp Camp will be a SUPER GORGEOUS Purse/Box that will hold all the cards the gals make at our May Stamp Camp.  I just can't wait to share what I've created for May with the gals.

I'll be back tomorrow to share more Kards by Kadie creations with you - Hope you can come back and join me for that share ....... Keep Living Your Dream!

Saturday, April 21, 2012

April Stamp Camp Cards

Happy Saturday My Blogger Friends......and
HAPPY BIRTHDAY Jennifer!
Countdown to Grandkids Arriving = 48 days to go!
Today I have three of the cards we made at April Stamp Camp to share with you ....... Let's get the sharing started.
Here are the five cards/projects that we made at our April Stamp Camp.  The theme for April Stamp Camp was Birthday and out of the catalog.  That being said ....... I tried to pick card samples that were right in the catalog and ran with a birthday theme. 
First up is our little 3"x3" card.  This sample came from Page 202 of the 2011-2012 Idea Book and Catalog ...... and the only thing different I did with my sample was change up the colors.  I used the Brights DSP Collection for the bottom panel of my card and for the cardstock I used Daffodil Delight, Real Red, Tempting Turquoise, Pumpkin Pie and Early Espresso.  I used Early Espresso ink on the Daffodil Delight circle and stamped "a git for you" from the "Bring on the Cake" stamp set.
I also added a piece of the new Daffodil Delight Seam Binding to the top fold of my card ...... and added some fun stitching to each of the circles with the help of my uni-ball Signo Gel Pen.  LOVE how this card turned out.
Next card is fun little card that I found on the internet back when our new catalog came out and I honestly can't remember who's blog I saw it on (sorry about that  I usually try to jot down where I see things - but this one slipped away from me completely).  I used two stamp sets for this card - Sweets for the Sweet and Happiest Birthday Wishes.  I grabbed my Subtles DSP Stack along with Cherry Cobbler, Old Olive, Pumpkin Pie and Daffodil Delight cardstock and punched out 3/4" circles and cut each of them in half to create my hanging banner across my card.
I stamped the pinwheels in VersaMark and then trimmed each of them out and added a mini brad to the center and popped each of the pinwheels up with dimensionals.  The real eye catcher on this card is that I cut each of the circles in half (instead of folding them over) and just lined them up next to each other and adhered them to my card.  The pinwheels and a piece of the bakes twine tied into a bow at the ends of my banner helped to create the look of my banner being strung across my page with bakers twine.  WHEN IN FACT.......the only place I added the Bakers Twine is at the ends of my circle banner.  TOTALL COOL TRICK!
And my favorite card for this months Stamp Camp is this ADORABLE ELEPHANT card.  It's on Page 17 of our catalog and I changed up the color for this card and created lots more "COLOR" on my sample.  We used the "Elebration" and "Perfect Punches" stamp sets for our card ...... and we also used the XL Oval and Eyelet Border Punch to complete our card.
We stamped the elephants balloon onto a tiny piece of "Bring on the Cake" DSP and ended up cutting that out and added a dimensional to pop it off our card.  A tiny bow was created with some linen thread and that was added to the bottom of our balloon to really add that little something something to our card.  We used our Water Color Brush and some Pool Party Ink to color in our Elephant and what would a birthday elephant be with Real Red nail tips!

Thanks for joining me today!  Today I have my Stamp Club gals coming over and we have some SUPER FUN projects we will be working on ....... Can't wait to see my gals and have some quality time playing with them.  I'll be back tomorrow to share the last two cards/projects from last Wednesday's Stamp Camp - Hope you can come back and join me for that share.  Keep Living Your Dream!

Friday, April 20, 2012

CK Convention Gifts

Happy Friday My Blogger Friends!
Countdown to Grandkids Arriving = 49 days to go!
Check out these ADORABLE gifts that I made for my three gal friends for the CK Convention last weekend............
 I made each of the gals three little gifts to kick off our CK Convention weekend.
Chris received the Blue grouping! 
And here's her fun notepad holder and matching RSVP pen.
 Jan's favorite color is red ...... so all her gifts were made with some retired SU DSP.
 LOVE ...... LOVE ....... LOVE ....... how her notepad holder turned out!
 And Cheri's gifts were all decked out in purple!
Simply love how fabulous her notepad holder turned out.
I stacked all three sets into a shoebox and off to the convention I went.
The gals loved their gifts and each said that the notepad holders came in handy during the convention to jot down some super quick notes.  I was thrilled that the gals liked their convention gifts.

I'll be back tomorrow to share my April Stamp Camp cards with you - Hope you can join me for that share.  Keep Living Your Dream!

Thursday, April 19, 2012

Crafternooners May Cards Part Two

Happy Happy Thursday My Blogger Friends!
Countdown to Grandkids Arriving = 50 days to go!
Thanks for joining me today ........ Today I will be sharing the cards that Jan and I made for my May Crafternooners gathering.  Let's jump right into todays share........
Our May challenge for was selected by Jan and she requested we use Pool Party and Concord Crush colors and our technique challenge was to use our Cricut.  I knew I was going to like this challenge because well ....... who doesn't need an excuse to play with their cricut (and Stampin' UP! colors)?  So here are the projects we submitted and today's share is Jan's and my cards for May.
 First up is Jan's card - It turns out that both Jan and I used the new Close to My Heart Art Philosophy cartridge to make our cards.  I just love the design layout for Jan's card - she seriously knows how to capture the most bang for her buck with her cards.  This card just screams "JAN" to me.
The flowers that she used have a clean and crisp look to them.  LOVE LOVE LOVE the layers of circles she had us add to the center of our flowers and without a doubt ...... the little bit of bling that she adds to the center of her daisy is DARLING!
The sentiment that Jan used fits perfectly into the Nestabilities scallop circles and is the perfect sentiment for this charming card.  Love your card Jan......simply love it!
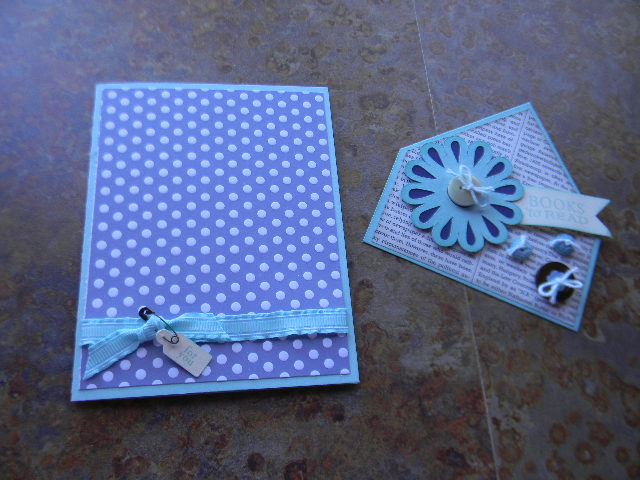
And my card share is right out of the pages of our March Stampin' Success magazine.  We learned how to make this OH SO PRETTY bookmarks which allows us to give a bookmark gift to someone special when we send out this card.
I too used the CTMH Art Philosophy Cricut Cartridge to create the flower for my bookmark card and with the help of some button layering ...... my bookmark came together in NO TIME FLAT!
As you can see here ...... Once you remove the bookmark, the card is basically an open canvas to create a second generation card and you are then able to make a new card that can be sent off to someone special.
Many Thanks for joining me today - I'll be back tomorrow to share more Kards by Kadie creations with you - Hope you can come back and join me for that share.  Keep Living Your Dream!

Wednesday, April 18, 2012

Crafternooner May Cards Part One

Happy Happy Wednesday My Blogger Friends.
Countdown to Grandkids Arriving = 51 days to go!
Today I will be sharing Part One of the cards that my Crafternoon gals made for May.  Let's jump right in with Opal's and Berta's cards .......
Our Crafternooner's challenge for May was to create a card using the colors Concord Crush and Pool Party.  Our technique challenge was to make a Cricut card and/or image.
First up is Opal's card!  She created this darling kite card that included three kites that were stamped and cut out.  She added dimensionals to the back of each of her kites to create some height and actually make them look like they were floating.  She also created a fun cloud background image which she stamped on her cream cardstock and that was the final touch which the kites needed to really make them look like they had taken flight!
Here's a close-up of the fun kites Opal created.  Dont' you just love the tails that she created for her kites!  And I just love how Opal layered two of her kites - Simply Darling!
Opal also added this super dazzling piece of purple glitter paper to the bottom portion of her card.  Love how she matted it to a piece of Pool Party cardstock and slightly offsetted it so it didn't run perfectly across her card.  LOVE YOUR CARD OPAL - Thanks!
And next is Berta's darling double dutch door card.  She used her Cricut cartridge to create this sassy and fun scroll-like image that actually worked as a closure for our card.  We wrapped our ribbon around the back of the card and threaded the ribbon through the cloure on the front and tied a big bow on top.  Our card now took on the appearance of  big package ready to be giving to that someone special.
When you untied the ribbon and opened up your card you lifted up the top flap and folded out the two bottom flaps and inside panel exposed  a place you could write a message and a lovely white scrolled image on the bottom panel of our card.
And here is what the card looks like once you untied the ribbon from the front of your card.  This was a super easy card to create and I can see making more of these cards for some upcoming Birthday's.  Thanks Berta for teaching us how to making this fabulous card.

I'll be back tomorrow to share the cards Jan and I made for our May Crafternooner's card challenge.  Hope you can come back and join me for that share.  Keep Living Your Dream!

Tuesday, April 17, 2012

Stamp Club Challenge for April

I'm Back My Blogger Friends!
I went missing the last couple of days because of a trip I took up to Mesa for the CK Convention.  I attended the annual Creating Keepsakes Scrapbooking Convention this past weekend with three of my favorite scrappin gals (Hi Jan, Chris and Cheri!) ........ and let me tell you something ........ WE HAD A BLAST!  I'm back and hit the floor running in an effort to prepare for my upcoming Stamp Camp - WHICH IS TOMORROW! 

Many thanks for hanging in there and returning each day to see if I had returned.  I'm back and ready to share my April Club Challenge project with you.
Countdown to Grandkids Arriving = 52 days to go!
Today's share is the card I made for our upcoming April Challenge project.  I gave each of the Club gals a Simply Sent card (some got blue and some got red) - a small piece of Summer Smooches DSP and Fabric along with a Summer Smooches Brad and a small piece of the new Daffodil Delight Seam Binding (that will be in the new catalog that will be released on June 1st) ..... and asked them to create something fabulous for our April Challenge Project.
I used the Petite Pennants Builder punch to create three trees as my focal point for my card.  I added the Summer Smooches DSP to the center of each of my trees and tied a small piece of the new Summer Smooches Fabric to the trunk of my trees for a little extra punch of color.
The new Daffodil Delight Seam Binding was wrapped around the entire card and I added one of the Summer Smooches Brad to the center of the ribbon and left a little bit of tails peeking out for good measures.
The clouds were made with the scallop circle punch and I inked up the edges of the clouds with Bashful Blue and added dimensionals to the back of two of my clouds for a tiny bit of dimension to the top of my card.

I simply love how much fun color is packed into the new Summer Smooches DSP and fabric.  I just know this product is going to be a hot hot selling for the upcoming year and can't wait to see what else Stampin' UP! has in mind for our new catalog release.  We don't have to wait that much longer - the new catalog will be realease June 1st ....... so please contact me to reserve your copy.

Thanks for joining me today - I'll be back tomorrow to share Part One of my April Crafternooner cards with you ........ Hope you can join me for that share.  Keep Living Your Dream!

Friday, April 13, 2012

Stamp Club Challenge March Part 2

Happy Happy Friday My Blogger Friends!
Countdown to Grandkids Arriving = 56 days to go!
Today I have Part Two of my March Stamp Club Challenge cards to share with you.  Let's JUMP right in!
First up today is the card that Sally created.  Sally's colors were brown and yell and she created this super sassy flower card with the help of LOTS of flower punches. 
Sally tied her button with the Early Espresso Bakers Twine and used it for the center of her darling flower.  She also used the ribbon on the inside of her card as an accent piece that ran down the outer edge of her card (but I forgot to get a picture of that). 
Next is Jan's card - and she knocked her card out of the park with a pretty pretty vintage look.  Jan's colors were Rich Razzleberry and she used her ribbon across the bottom of her card to help create a beautiful focal point for her cluster of three flowers to rest upon. 
And her button looks anything but alone resting on the front of her card.  Simply beautiful card Jan ...... Simply beautiful! 
Kris picked the color Red and next to pink ...... this is a favorite color of mine - and turns out to be one of my favorite cards for this month.  Kris is the Queen of rosettes and I personally don't think anyone can put a spin on a rosette like Kris does.  She created this super yummy card with the help of a rosette and the new Edgelit Dies.
I love how Kris embossed her Edgelit Die and added one more beautiful touch to her already stunning card.  Gorgeous card Kris! 
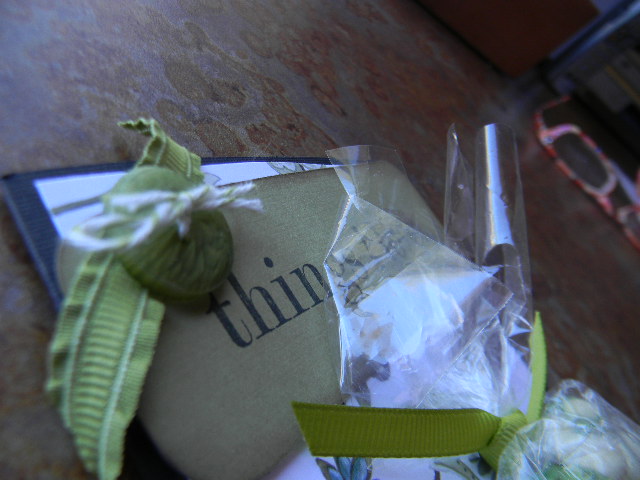
And last BUT CERTAINLY NOT LEAST is the project that had to be voted "BEST IN SHOW" for our March Club Challenge project.  Debbie used every single piece of the challenge packet ..... INCLUDING the cello bag that held all the supplies for this challenge.  Debbie spotlighted her love for Washabi Peas and added a handful to the cello bag - and mounting them to a small card. 
Debbie's focal point was certainly the cello bag of peas - but when she created the topper for her project it brought on a second focal point which spotlighted her ribbon .... button ..... and bakers twine.  I think hands-down EVERYONE voted Debbie's project to be the most creative challenge project submitted for March.  SUPER FUN PROJECT DEBBIE - simply AORABLE!

Love what the gals created for March and think each and everyone of them gave it their all and did a FABULOUS JOB.  The supplies for our April Challenge were handed out at our March meeting and the girls will bring their completed project back to our April 21st meeting.  I plan to share my April Challenge sample project with you tomorrow.  Hope you can come back and join me for that share.  Keep Living Your Dream!