Wednesday, January 25, 2012

CJToo Valentine's Treat

Happy Wednesday My Blogger Friends and today I have a special little surprise post for you.  As you might remember ...... I was planning to post my Stamp Club Challenge idea for you today - but as I was getting ready to post, I had forgotten that on January 25th our fearless leader Tracy at CraftJunkieToo (http://www.craftjunkietoo.blogspot.com) requested that her design team members (that would be me!) schedule a Valentine's Day blog post.  Tracy ask me to create a Valentine's Day something that could be made for a class or an easy project that could be mass produce.  Well let me tell you ...... I hit this one out of the park ..... with the help of my seven grandkids.  Let me explain .........
 Aren't these pencil treats just the LIVING END.......
Making treats for my SEVEN Grandkids classmates for all the holidays requires me to ALWAYS be on the look-out for projects during the holidays that are FUN - FAST and PACK a real WOW FACTOR to 'em.  And without fail ........ Valentine's Day was the perfect time to give one of my grandkids a super duper fun pencil gift to hand out to their fellow classmates on Valentine's Day.
Knowing that I was going to have to mass produce this project helped me stay on track and basically did LOTS of punching ...... stamping ....... stuffing cello bags ........ adhering ....... and adding ribbon to complete 25 of these little hummers in NO TIME!
 I gathered up several different colors of Pink and Red Cardstock and Ribbon - Grabbed my retired "Love You Much" Stampin' UP! Stamp Set and started mass producing these little cuties.
 Here's one of the pink pencil cello bags ...... Oh So Pretty!
 And it just wouldn't be Valentine's Day without Red .........
Overall - I have to tell you that this is one of those projects that is easy to mass produce and it just SCREAMS for those little ones to help assist in making these.  Super Duper Quick and Seriously has a WOW FACTOR attached to it.  I just know one of my seven grandkids will really enjoy passing these treats out on Valentine's Day to their fellow classmates.

I'll be back tomorrow to resume my regularly scheduled blog posting.  I was going to share my Stamp Club Challenge idea with you - but realized that I hadn't taken any pictures of that challenge so - guess I'm out of luck to share it with you this month.   I'm hoping that I have my act together next month and can remember to take some pictures and share that with you in February.  SO SORRY for my Club Challenge idea to be on hold for another month.  I will however have a fun little surprise scheduled to share with you for tomorrow - Hope you can swing by and join me for that.  Keep Living Your Dream!

Tuesday, January 24, 2012

Stamp Club Gift

Happy Tuesday My Blogger Friends - Today I want to share the special little gift I made my Club gals last Saturday ..... I have lots of pictures to share with you ...... Let's jump right in ......
I made these adorable Top Note Bags for each of them - and inside held a special NEW Stampin' UP! embellishment treat.
I picked out six new and retired Stampin' UP! colored cardstock and ribbon and just went to town creating each of these.  I grabbed my Elegant Bouquet Textured Impressions Embossing Folder and ran each of the Top Note Dies that I had cut out through my Big Shot to add that little bit of ........ WOW FACTOR to my project.  Here is a sample of the Rose Red Bag.
The special little embellishment that was tucked inside each of these holders was a bottle of the new Cherry Cobbler Dazzling Details.  I made sure I didn't just drop the Dazzling Details into the Top Note Bag ....... adding a coordinating piece of ribbon and fun sassy button just added to the "SPECIAL" that I wanted to create for each of my Club Gals.
I grabbed up my "Apothecary Art" stamp set and used this awesome stamp to create the message scallop for each of my bags.  (LOVE LOVE LOVE this new stamp set!)
So here is the Brilliant Blue Sample........
And the Sage Shadow Sample........
The Orchid Opulence Sample........
The Baja Breeze Sample........
And last I made a Creamy Caramel Sample........
I had the little brown lunch sacks in my stash - and I'm pretty sure that I had purchased them at Michael's.  I just cut the length of each sack down and sandwiched two Top Note Dies between the lunch sacks and called this one done!
As the girls arrived to my house on Saturday for Stamp Club, I gave them each the opportunity to pick which color they wanted ...... and without a doubt ......The gals LOVED their gifts.

MANY THANKS for joining me today, I'll be back tomorrow to share with you the NEW Stamp Club Challenge that I'll be offering to my Club Gals each month.  Hope you can come back and join me for that share tomorrow.  Keep Living Your Dream! 

Monday, January 23, 2012

Valentine's Day Mail Boxes

Happy Happy Monday My Blogger Friends!

I want to start out my blog post today WISHING MY VERY GOOD FRIEND KRIS A VERY HAPPY AND SUPER FUN BIRTHDAY TODAY!  (Kris........Head out to your mailbox and you'll find a special little birthday treat that I made just for you.  HAPPY BIRTHDAY FRIEND!)

Today's blog share is a fun little Valentine's Mailbox that I made with Debbie and Melissa last Thursday night down at Real Deals.  We had a BLAST.  We Laughed ...... We Cried ...... and We Shopped.  What more could you ask for when you spend time with good friends.  Here is what we created .....
We arranged to take a class that Kimberly Lang was offering at our Real Deals Store last Thursday night.  We left SaddleBrooke and headed downtown Tucson for dinner before the class and then drove right to Real Deals to get ready to attend this super fun class and we even had time to do some shopping before the class started - SWEET!
Kimberly allowed us to pick out the color mailbox we wanted to create - and of course - HANDS DOWN - I picked the pink mailbox (in fact Kimberly pointed out to me that she had one pink mailbox that surely had my name on it).
Kimberly had everything we were going to need to create a super stinkin cute mailbox all ready for us - all we needed to do was open our mailboxes and get started.  (I LOVE LOVE LOVE instructors that have things ready for us when we show up to class - THANK YOU KIMBERLY for being prepared!)
Check out this ADORABLE little Stampin' UP! gal that we used for the front of our mailbox.  Isn't she just the cutiest!
 And here are Melissa and Debbie busy at work creating their FABULOUS Mailboxes!
 Didn't their mailboxes turn out Just Too Cute?
And the super sweet gal that was sitting next to me jumped up and asked if I wanted to have her take a picture of all three of us........Needless to say I threw the camera at her and jumped up out of the seat in one fast little motion.  Not sure she was even ready to take the camera ..... but she caught it and got this amazing and stinkin cute picture of the three of us.
And here are all three of our Valentine's Day Mailboxes.  I think they turned out sooo stinkin cute and have mine proudly displayed in my studio.  Thanks Debbie and Melissa for spending Thursday evening with me.  I had a wonderful time and appreciate all the time I spent with both of you. 

I have a little gift I made for my six Stamp Club gals to share with you tomorrow - Hope you can come back and join me for that share.  Keep Living Your Dream!

Sunday, January 22, 2012

Sweet Treats for Karen

Happy Sunday My Blogger Friends and thanks for joining me today.  I'm SERIOUSLY (and if EVER I said SERIOUSLY - today I MEAN SERIOUSLY) going to take the ENTIRE DAY and spend the day PLAYING in my studio today. 

I have been on a full run since right after the first of the year.  I've been busy with Stamp Camp ...... Stamp Club ...... Crafternooners Group ....... FU Group ....... SaddleBrooke Stampers Group...... SW Stampers Group ........ Ranchette Group ......... and lets not forget the every day Cleaning of  the House - Doing the Laundry - Making the Beds - Tackling the Pile of Ironing - Paying the Bills - Taking out the Trash - Feeding the Pets (ooooopppsss.....got a little carried away - I DON'T HAVE A PET!) Well ...... you get the idea ..... It's all those things that we all do automatically - to keep our families and households running smoothly!  I feel I just need a day that can be spent just hanging out and not feeling like I have to get something checked off my TO DO LIST.  SO TODAY I'm going to time creating in my studio - FOR ME!  I do have a fun little share for you today - that my neighbor Karen asked me to make for a birthday party she was celebrating with her golfing ladies group.  Check this out .......
My neighbor and friend Karen asked me if I would create a dozen of my Hot Cocoa Cones for a birthday party she was throwing for a friend of hers on Friday the 21st.  I was touched and honored that Karen wanted to use a gift that I had given out at Christmas.  And honestly ..... I knew all I was going to have to do was change up the color and make the Hot Cocoa Cones into Birthday Party Favors that Karen could hand out to the ladies that were attending her party. PIECE OF CAKE EASY......CAN OF CORN......CERTAINLY A WALK IN THE PART Y EASY!
I honestly just kept them the same as last years Christmas Gift and just switched up the ribbon and tag to make them pretty in pink for her friend.
 I just love how they turned out and think they were a big big hit for Karen's friends.
OH.......How pretty.......
And this would be the very reason I'm flipped out crazy over the color PINK - What isn't there to love about how fabulous these looks!
I used two different colors of pink ribbon to close up my hot cocoa cones and added a little tulle and a tag to complete these party favors.
LOVE......LOVE.......LOVE how these turned out.  I was so THRILLED how they turned and even remembered that I hadn't taken any pictures of them and was able to slip back over to Karen's house before Friday and get these pictures to share with you.  This was HONESTLY one of those creations that I almost HATED to give away!  I know that Karen LOVED her party favors and I hope all her guests enjoy them too!

I'll be back tomorrow to share a fun little Valentine's mailbox projet that I made last week down at Real Deals.  I went down with two of my girlfriends and we had a BLAST creating our very own cutie Valentine's Day Mailbox.  Hope you can come back and join me for that share.  Keep Living Your Dream!

Saturday, January 21, 2012

Message Board Center

Happy Happy Happy Saturday My Blogger Friends.  Today is Stamp Club and I have six of my favorite Stamper Friends coming over to create some amazing medallion style projects for this months Club.  I will be sharing those projects with you early next week ..... but today ...... I have my sweet Message Board Center to share with you ..... so ....... Let's JUMP right in ..........
Last Saturday I attended my first class down at Real Deals and was surprised with what they are offering in the lines of classes.  The instructor Kimberly is a charming a delightful gal ...... who honestly can match me toe-to-toe with all the supplies she has available for her classes.  We created this CHARMING and OH SO CUTE Message Board Center with the help of an OLD (and I do mean OLD) metal picture that honestly everyone's grandparents had down in their basements.
Kimberly handed us a cute little chalkboard frame and said if we wanted to use it on our creation - to "Go At It".  I covered the edges of mine in some of the DSP I selected for my project and then when I got home ...... I used my chalk markers to dedicate my Message Center to my Blog.
 I figured it would be useful in helping me prepare and plan for my blog posting and since I had the "Note" tablet and the calendar already for placement on my message center......the rest was just a matter of decorating and adhering some DSP to my frame.
Kimerly gave each of us a calendar to use for our message board and I trimmed mine down and matted it with some coordinating cardstock and will be using that to check off the days when I finish posting on my blog.
The real magic of this Message Board Center was the shabby/distressed look that was all around the outer edges of my frame.  All I did was use a sanding block to smooth down the edges and then I was ready to grab my embellishments and coordinating DSP and begin the creative process of creating a real piece of art for my studio. 
We were able to create a magnetic with some metal pieces that were available to us.  I just added a pink flower to the center of my metal flower and by adding a small piece of magnetic to the back ...... I had an instant embellishment for my Message Board Center.
As you can see - the Message Board Center itself is not very thick (or heavy) so it's perfect to have hanging next to my laptop so I can just glance over to see what projects I should be posting.  To me it's all about staying organized and this is just one more way of Staying Organized and Keeping It Pretty (at the same time).
Simply LOVE LOVE LOVE how this project turned out and LOVE even more how pretty this looks in my studio. 

I'll be back tomorrow to begin sharing the cards we made at Stamp Camp this month - Hope you can join me for that share.  Keep Living Your Dream!

Friday, January 20, 2012

Trinket Box

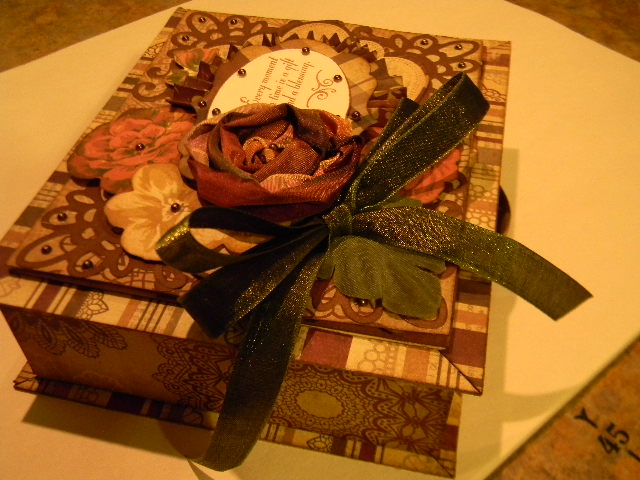
Happy Friday My Blogger Friends and today I have a special (and LONG) post for you - and that is to share the wonderful Trinket Box I created last weekend.  This vintage box was believe it or not - super easy to put together and is honestly one of those classes that you need to have the instructor standing in front of you to walk you through all the steps (which there are MANY) that go to creating this lovely little master piece. 
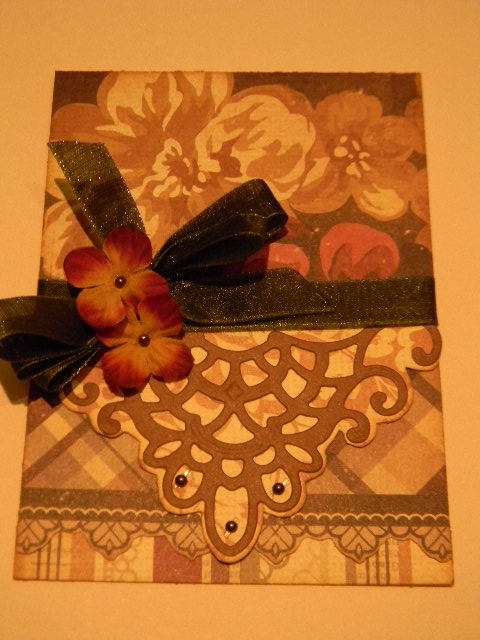
This is the Easel/Drawer Trinket Box that holds three matching vintage cards (I created the cards at an earlier class that Susan offered at my local scrapbook store).
The box itself has a drawer that slides open and holds your matching notecards or other treasurers that you might want to keep tucked away or hidden.
The handle serioulsy brings this whole project together.
 And then the easel card on the top of the box just puts this project right over the top!
The drawer component slides right out .......
And tucked inside the drawer is where I am storing three fabulous matching cards.
They each coordinate perfectly with the DSP that we used to decorate our Trinket Box!
 We used some amazing and very Vintage looking paper ......
 Along with the most amazing and yummy ribbon .........
 And let us not forget the awesome lace edge diecut - that is one of the Spellbinder collection dies.
The entire drawer pulls out and you can even remove it to fill it up with coordinating cards or treasures and then slide it back into place if you want.
 We decorated the top of our box with a rosette and a glubber flower ......
This honestly was the first time I attempted to make a Glubber Flower and I was so impressed with how lovely my flower turned out.
The ribbon was a super soft and super yummy ribbon that I ended up buying extra so I could make attentional cards to tuck inside the drawer of my Trinket Box.
 Now......how fabulous is this picture.  LOVE LOVE LOVE that I can say ...... I CREATED THIS!
The entire Trinket Box came together in a three hour class ....... I'm not sure that the more of these you make the faster you become.  There was a gal that sat next to me - who was making her second Trinket Box and honestly ........ she was taking it step-by-step and not working ahead of the rest of the class.  Our instructor Susan was very organized and kept us all on track and we were able to leave the class with a completely constructed Trinket Box.  LOVE IT!

Hope you enjoyed todays share - I'll be back tomorrow to share the Message Board Center I made at a Real Deals class last Saturday.  Hope you can come back and join me for that share.  Keep Living Your Dream!