Wednesday, June 22, 2011

Card from Opal

It's Weigh In Wednesday for me at Watch Watchers today.....I totally forgot to post my weight loss last week....Another pound! I'm really hoping that I can continue to go down a couple more pounds before we leave for our trip back to Wisconsin.....I'm seriously looking to have a couple Culver's Butter Burger and make a stop or two at Michael's and have one of the FABULOUS Baby Turtle Sundae's. I'll report in tomorrow on how my WW weigh in went.......But on to my card for today...... Today I want to share a sweet little card I received from my stampin buddy Opal. She had borrowed something from me and sent me this sweet little card as a Thank You! I fell in love with this card - as soon as I opened it up...... I think two of the most elegant color combinations are Navy Blue and Silver Shine Paper. WOW - I think these two colors say it all....but then Opal went and used a chicken wire background stamp and embossed the image with silver embossing powder. TOTAL WOW FACTOR on this card. Here's a close-up of the embossed chicken image. I have to tell you that after visiting Di Gibbs this past weekend....every single time I look at a chicken....I can't help but think of her and her three girls! It was so thoughtful of Opal to send me this card and without a doubt.....It made me smile. Thank You Opal for making my day - I appreciate our friendship and all your talent. Tomorrow I'll be sharing my FU groups challenge card for July. Our colors were Lime Green and Purple.....man-oh-man did the ladies meet the challenge this month. Hope you can join me for those cards. Keep Living Your Dream!

Tuesday, June 21, 2011

Cards from SaddleBrooke Friends

It's Tuesday my Blogger Friends and today I want to share with you a couple cards I received from two of my SaddleBrooke friends this past week. They are from Sandy and Judy.....Let's take a look! Sandy sent me this "OH SO LOVELY" Thank You card - she was thanking me for her birthday gift that I surprised her with a couple weeks ago........ I just love how she embossed the Thank you message on the front of the card - and speaking of cards - She picked out my favorite color for my card and the embellishments to match. How do you think she knew I LOVE pink? LOVELY LOVELY Card Sandy! Next up is a card I received from Judy......How cute is this little card? When I opened the envelope the first thing I did was smile....and it has made me smile ever since. SO CUTE and SO FUN! I love the stamp set that Judy used and love how she only colored a handful of the chicks! Thank You Judy for thinking of me and sending me this special little Thank You Wish! I am truly blessed to have such fabulous friends as Judy and Sandy in my life - and the talent that these ladies have when it comes to cardmaking is unbelieveable! Thank You both for sharing some of your talent with me. Needless to say.....both of these cards will end up on my upper studio cabinet.....to be proudly displayed for all to see. Hope you can return tomorrow.....I have a fun little card to share with you that my friend Opal made for me. I also am reminded that we are officially beginning the count down to the release of the new 2011-2012 SU Idea Book and Catalog....Only 9 more days to go until the new catalog is released.......Can't wait! Keep Living Your Dream!

Monday, June 20, 2011

Card from BFF

Happy Monday my Blogger Friends and hope you are ready to kick off another fabulous week - OKAY....Let's not start out the week with such FUN - I know not everyones fit hit the floor happy every day....... We'll start out the week with a card I received from my BFF last week......How in the world does she keep out-doing herself? She did it again with this wonderful bright and happy card! It's kind of hard to see - but the pink paper she used was full of sparkle and glitter (but not the kind of glitter that rubs off on your hands....and ends up on your face!). The stamped message was so extra special to me.......LOVE the font-the color and of course ...... the message! And here's a close-up of not only the sparkly paper - but also the fabulous stamped image that Jan created. UNBELIEVABLE! Jan also added an extra large "Thank You" to the inside of her card......along with a special little message for me! Thank You Jan for sending me such a lovely card - I will sit down soon and make you an extra special card ..... can't believe you've been gone over three weeks and I haven't even sent you ONE CARD.....MY BAD! I'm off to join my friends up at the Ranch today - It's scrapbooking day and I'll be busy working on my recipe swaps today. Hope you'all have a fabulous day and can return tomorrow when I'll share a couple cards I received from some of my SaddleBrooke friends last week. Keep Living Your Dream!

Sunday, June 19, 2011

Happy Father's Day!

It's a Special Sunday today - and I want to wish Jack and my Son and Son-in-Laws ...... along with all the wonderful men in my life a Very Happy Father's Day today. Here is the special Father's Day card I made for Jack this year.......does it look familiar????? Well it should.......I made one of these cards for my SaddleBrooke Stampers Challenge cards in June - My original card was "Enjoy the Journey" and for Jack I added a Happy Father's Day messag instead and had myself a perfect little Father's Day card for Jack. I kind of thought it might be similar to Jack's first car - and he might appreciate traveling down memory lane with this cutie. Basically the card is exactly like the Challenge card that I made - however the main difference is I changed up the message and added a little bit more distressing to Jack's card over the original card. The hardest part of this card was creating the stitching piece that ran along the inside edge of my card. I used the Decorative Border punch from Stampin Up and wrapped some linen thread taround the border and called it a day. SUPER CUTE (NO?)! Here's a close-up pic of that decorative border punch piece. Next up I needed a second Father's Day card that I could repeat several times and came up with this fun little number that not only was fun to put together but allowed me to recreate it several times. I started out with a whisper white base card - added some retired SU DSP - and used my Nestabilities to create two circle layers. The neckties were embossed with black embossing powder and then I cut each of them out. I added three neckties to each layered circle using a small piece of dimensionals to the back of each one. I also added an extra small basic pearl from the SU jewels collection to the center of one of the neckties. And here's another version of the neckties..... I stamped the "Happy Father's Day" greeting for this card and with my bone folder curled up the edges and added dimensionals to the back of this banner to give it a little lift. And for the message of my card - I ran my cards through the printer and had this perfect little Father's Day message printed to each of the insides of the cards I created. Thanks for stopping by today - I'll be back tomorrow to share some cards I received last week from a few of my SaddleBrooke friends....and I also plan to share with you early next week the cards I made at Di Gibbs 10/10/20 class. So hope you can plan to join me all of next week. Until Monday.......... Keep Living Your Dream!

Saturday, June 18, 2011

Special Little Thank You

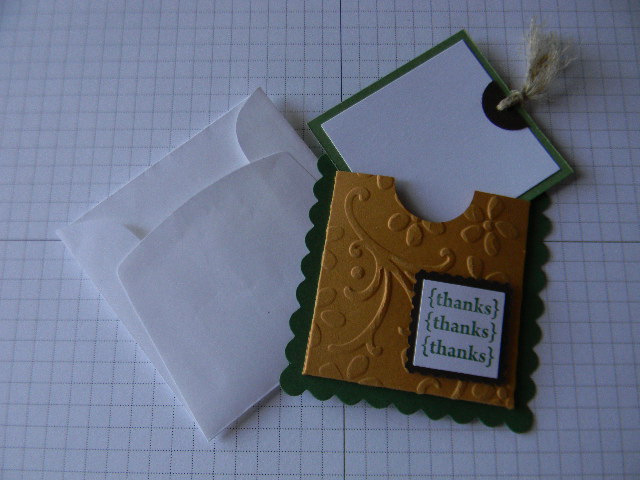
Hi my Blogger Friends - Today I'm heading up to Di Gibbs house to participate in a Stampin Up class - so my post here today has to be quick. Last week, I was asked to do the Make n' Take for my SW Stampers meeting and just knew this cute little card from Becky's blog (Inking Idaho (http://inkingidaho.blogspot.com/) was the perfect little card for my fellow demonstrator friends to make. It's a super cute and super easy 3"x3" card and it turned out to be a wonderful hit with my fellow demonstrators.........Check it out.
The 3"x3" card fits perfectly in the small envelopes from SU! and is a perfect little accent that might be needed to tuck into a gift bag or present for that someone special in your life.
Here are all the supplies (except adhesive) that you'll need to put this little gift card together. You could make this notecard in any combination of colors and would look fabulous in those cute little purses that Becky sells on her blog (http://inkingidaho.blogspot.com/) ................
I first cut out a scalloped square piece with my new SU Bigz scallop square die. (this little die makes two different size scallop squares.....I used the largest square for this project)
To make the pocket for my card I started with a 3"x3-1/2" piece of More Mustard cardstock. I scored both long sides and one short side at 1/2". I then cut out the two scored corners of my little pocket piece.........
And then ran it through my Big Shot using the Elegant Bouquet Embossing folder from Stampin Up!
I used the Pretty Postage stamp set from Stampin Up along with the new Postage Stamp Punch from Stampin Up to create my stamped message.......
And also made a small note card piece to slide inside the pocket card I created.
All that is left is to write a sweet little message on the inside of your notecard and tuck it into a small 3"x3" envelope. You can make a 1/2 dozen of these little cutiest up in no time flat and tuck them inside a matching purse of mini pizza box and you have the most fabulous little gift to give away (or keep).
This little project goes together so quickly and packs a great little punch. I promise you - People are going to think you spent tons of time putting this little cutie together and only you will know how fast and easy it all came together.
Hope you have some wonderful plans for today - I'm off to Queens Creek - I promise to share the cards I make at today's workshop with you on Monday. Tomorrow is Father's Day and I can't wait to share with you the fun little Father's Day cards I made for all the men in my life for Father's Day. Have a GREAT Saturday and hope to see you back here tomorrow. Keep Living Your Dream!

Friday, June 17, 2011

Happy Friday my Blogger Friends....You made it through another long week and can kick back....relax.....and enjoy the next couple of days. I will start your weekend off with some relaxing photo's of my BFF's husband Nick's Rose Garden. I'm not kidding when I say prepare yourself for some amazing color and pure beauty that is packed into a courtyard of my BFF's home in Arizona. Let's get started..... Here is the view when you walk out their front door.......ONE WHOLE WALL of their home is nothing but ROSES! You heard that right......ROSES in Arizona. It's true-I never would have thought that Roses would grow so CRAZY GREAT in the desert-but they do! Now for some close-up shots of all Nick's beauties......I'm hoping that Jan will leave me a comment in my comment section telling all of us the names of these beautiful roses (I know Jan - stop shaking your head-You've told me a couple times all their names-but....well....you know....I live in SaddleBrooke). I'll refer to this little beauty as the Yellow Lovely! Here's a beautiful Rose colored rose..... This orange is SO MUCH PRETTIER in real life! The Pink was of course MY FAVORITE (and should be named Kadie-but I know it's not!) There also is two Red rose bushes - that I must have not gotten pictures of.....SO PRETTY and SO BRIGHT RED! What I can't bring to you in this post is the most amazing scent of roses that fills the couryard of Jan & Nick's home as I stood their admiring their roses. I seriously just stood there for a few moments before I started pruning their roses and took it all in! Thank You Nick for leaving me such a fabulous and lovely job to do this summer! Thanks for letting me share my BFF's beautiful Rose Garden with you - Nick surely has the green thumb and knows exactly what needs to be done to bring such beauty to his home in SaddleBrooke - truely lovely. I'll be back tomorrow to share some card projects that I've been working on. Today I'm heading up to Phoenix with my girlfriend Nancy to do some SERIOUS SHOPPING. We plan to go to Hobby Lobby.....IKEA....The Container Store and Michael's....I'll share any of my finds with you this weekend. Keep Living Your Dream!

Thursday, June 16, 2011

Happy Father's Day Nick

Happy Thursday my Blogger Friends - Today I'm dedicating my post to my BFF's husband Nick. Nick has asked me to take care of his plants while they are back in Colorado and he asked me to go water on the 1st and the 15th of the month....Today is the 15th so off I went to water. My first stop was to go to the back of the house and water the two BIG pots that are on their patio. Your probably wondering what the big deal on that is.....well...check out this picture. Do you spot the MaMa Quail that is on the top of their iron fencing? I surprised her when I started to dump water in the pot and out of the pot she flew! When she first came flying out of the pot - she scared me half to death.....and I thought what the heck.....why is there a bird in the pot.....then I realized....It's Spring Time in Arizona and the MaMa Quail are sitting on their eggs.......OH MY GOSH....All I could think of is....Nick is going to be a PaPa....or MaMa....or something.......check this out...... Can you see the eleven Quail eggs that are hidden in the rocks? Look a little closer..... Happy Father's Day Nick....Your going to be a MaMa.......or a PaPa! Your eleven babies are all snug in the big pot by your patio door. I did water the catcus - but I made sure that the eggs weren't floating in a puddle of water......all is good and MaMa Quail came back and tended to her eggs just as soon as I left the patio....... Here's a close up of your Eleven baby Quail Eggs.......I'll stop up there this weekend to see how things are looking. Not sure when MaMa layed the eggs - so it's anyones guess as to when they might hatch. Hope you can come back tomorrow when I'll be sharing some beautiful pictures of Nick's lovely lovely roses....which I trimmed today while I was up there. All is good in SaddleBrooke and hope you'all are enjoying your day. Keep Living Your Dream!