Tuesday, April 30, 2019

A Sweet Treat Cup For My Monster Kitty

Happy Tuesday My Blogger Friends!
My blog post for today is 'CASE IT TUESDAY'.  That means today I have a fun little 3-D project that I found on the internet ....... And I created a CASE of that project to share with you today.  This project was SUPER FUN to create and want to jump right in and share that project with you now.
 
Only a true Cat Lover would understand the passion behind this little kitty CatNip Treat for my Monster Kitty.  I had created the little 'Sweet Treat Cup' for my downline team a few months ago......And I figured I would create the perfect packaging before I presented it to Monster.
 
That's when I spotted this darling little holder on Pinterest and figured I would forego making the box (As Tashana Lundy from Honeybee's Stamping Hive did) and go with one of our Stampin' UP! 'Mini 'Pizza Boxes'.  All I needed to do was use my 'Layering Circle Framelits' to die-cut out a circle in the center of my Pizza Box and then I could drop my 'Sweet Treat Cup' right inside that cut-out opening.
I created the back panel from a piece of 'Thick Whisper White Card Stock' that measures 3-1/2" x 5".  I adhered that panel directly to the back of the 'Mini Pizza Box' and then started covering the box and back panel with 'Broadway Bound Designer Series Paper'.
  
After I had all the pieces covered with Designer Series Paper ....... I popped my decorated 'Sweet Treat Cup' inside the center of the pizza box and tucked a special blend of CatNip inside the treat cup.
The top of my 'Sweet Treat Cup' was decorated with the 'Nine Lives' set and I even created a ball of black yarn for my kitty to get wrapped up in.
 
I was in Kitty Heaven when Monster came into my studio and found his little Sweet Treat Cup sitting on the floor.  Needless to say.......He went to work IMMEDIATELY trying to figure out how to get to the CatNip inside.  Made my heart smile with happy as I watched him!!!!!
 
Here's a few pictures of that special moment......

Thanks for joining me today!  I'll be back tomorrow to share a Wine Down Wednesday card with you ........ Hope you can make plans to stop back and join me for that share.  Keep Living Your Dream!

Monday, April 29, 2019

Leaping Kangaroo Upgrade


Happy Monday My Blogger Friends!

Today is Mix It UP! Monday and I have an upgraded version of the card I shared with you yesterday.  I used the exact same product that was used to create yesterday's card ....... but added a couple additional products found in the 2019 Stampin' UP! Occasions Catalog to bring this card up to the next stamping level.
 
Here's my Spot Light Sunday card from yesterday on the TOP....
And my Mix-It-UP! Monday card for today on the BOTTOM....
 
For my upgraded version ...... I began by changing up the orientation from landscape to portrait.
 
I started out by stamping my sentiment with Shaded Spruce ink in the upper right hand corner of my 'Whisper White Note Card'.  After my sentiment had a moment to dry ...... I then ran my entire 'Whisper White Note Card'  through my Big Shot and used the 'Subtles' Embossing Folder' ...... and that gave my note card a fun and sassy texture.
 
Next, I added a panel of the 'Animal Expedition Designer Series Paper' to a panel of Shaded Spruce card stock.  Before I adhered that panel down onto my note card ......I wrapped some 'Shaded Spruce Metallic Ribbon' around that DSP panel and then adhered it down to the bottom of my note card.
 
I stamped my kangaroo images onto a piece of Whisper White card stock and then used the 'Animal Friends Dies' to crop out those little cuties.  When it came time to color in my mommy and baby kangaroo......I used my 'Crumb Cake Stampin' Blends' and those little cuties were colored perfectly.
 
My 'Layering Circle Framelits' allowed me to crop out two circles ...... And then I added Stampin' Dimensionals to the back of my colored kangaroos and popped them onto my layering circles.
 
And that's all it took to make this upgraded Kangaroo card.
Tell me friends......Do you have a favorite????

Thanks for joining me today!  I'll be back tomorrow to share a 3-D Tuesday creation with you ...... Hope you can make plans to stop back and join me for that share.  Keep Living Your Dream!

Sunday, April 28, 2019

Leaping Kangaroo Card

Happy Sunday My Blogger Friends
Today is Spotlight Sunday ....... And I have a card I created using product from the 2018-2019 Stampin' UP! Annual Catalog and is one of those sets that will be carried over into the new 2019-2020 Stampin' UP! Occasions Catalog.   This card uses several products from that catalog and I'm thrilled with the way it turned out.  Let's jump right in with my card share for today..........
 
How ADORABLE is this sweet little card????
 
I started this card off with a small panel of the ''Animal Expedition Designer Series Paper' at the bottom of a Stampin' UP! 'Whisper White Note Card'.
 
Next, I stamped my "Thank You BIG TIME" sentiment from the 'Animal Outing' set with Shaded Spruce ink.  I used my 'Dark Shaded Spruce Stampin' Blends' to color in three 'Happiness Bloom Dots' ...... and lined those up right below my stamped sentiment.
 
My sweet little kangaroo and baby were stamped directly onto my note card with the 'Animal Outing' set.  I used my 'Crumb Cake Stampin' Blends' to color in both my little critters.
 
I just couldn't be happier with the way this card turned out.

Thanks for joining me today!  I'll be back tomorrow to share an upgraded version of this very card with you ...... Hope you can make plans to stop back and join me for that share.  Keep Living Your Dream!

Saturday, April 27, 2019

Today We Celebrate You

Happy Saturday My Blogger Friends!
My blog post for today is Paper Pumpkin Saturday ........... And I would like to share with you the project I created using the March Paper Pumpkin kit.   Here's that project.......
 
This card just make me SMILE BIG.  And the only thing I added to this card (besides what was included in the kit) was some extra card stock and a piece of ribbon.
 
I started out by cutting down one of the base cards and matting it to a piece of Poppy Parade card stock ...... And this allowed me to create the perfect little banner panel across the front of my card.
 
Next......I cut two 'Layering Scallop Circles' (one in Poppy Parade and one in Flirty Flamingo) and stamped my sentiment onto the Poppy Parade circle.  I used VersaMark ink and 'White Embossing Powder' to help my sentiment really POP OFF that scallop circle.
 
I added a piece of 'Poppy Parade 1/4" Mini Striped Ribbon' around my center banner panel and tied it up into a pretty knot in the front.
 
And the final touch was adding one of the Bermuda Bay Party Hats that came with this kit to my mounted sentiment circle.   LOVE LOVE LOVE how happy and fun this card turned out.
 
Thanks for joining me today!  I'll be back tomorrow to share a Spot Light Sunday card with you ...... Hope you can make plans to stop back and join me for that share.  Keep Living Your Dream!

Friday, April 26, 2019

Friends Pics

Happy Friday My Blogger Friends!
My blog post for today is Friends Friday.  On Friday's, I have the honor of spot-lighting some of the fabulous cards and projects that I received from Friends ....... Fellow Demonstrators ........ and Family.  Each of these creations are works of art........and it is with great pleasure that I share with you today the AMAZING Make n' Take projects we made at the Spring Scissors and the City Retreat a few weekend ago.
 
When you attend the Scissors and the City Retreat ....... One of things that is included in your registration fee is being able to create a FABULOUS Make n' Take project each day of the event.  Let me share the three VERY CREATIVE projects that Sandy created for this event.
 
On Friday, we created this BEAUTIFUL Sunflower card.  We were taught how to do a masking technique to create the beautiful layers for this card.  Must admit.......This was a SUPER FUN new technique for me.
 
BE STILL MY HEART
Just when I think Sandy has run out of AMAZING projects to share with us ...... So pulls this little rabbit out of her hat (sorry......Just couldn't resist).  My plan is to purchase a fun wooden frame to capture all the festive fun this project holds.
And here is the Make n' Take project we created on Sunday.  This OVER THE TOP PRETTY card showed us how to use the new Spellbinder Inter-nesting dies to create either a pretty pink or blue card.

Thanks for joining me today!  I'll be back tomorrow to share a special Paper Pumpkin Saturday creation with you ........ Hope you can make plans to stop back and join me for that share.  Keep Living Your Dream!

Thursday, April 25, 2019

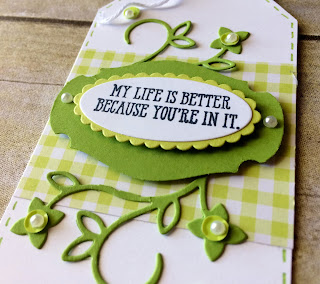
Life Is Better

Happy Thursday My Blogger Friends!
My blog post for today is Tag Thursday.  Today, I will feature a tag I created and show you how easy it is to use minimal supplies to create a SUPER PRETTY TAG.  Now that you have the details for my Tag Thursday creation for this week ........ Let's jump right in with my tag share for today........
Love everything about the way this tag turned out.
I started with a 2-1/2"x 2" Whisper White base tag.
 
I added a panel of 'Gingham Gala Designer Series Paper' along the center of my tag and then began building some fun layers.
First up, was die-cutting the floral swirl that is part of the 'Well Written Framelits' ...... And those were cut using Granny Apple Green card stock.
 
Next, I added a Granny Apple Green 'Story Time Label Punch' to the center.....And then layered a Lemon Lime Twist 'Layering Scallop Circle' on top of that.
 
My sentiment was from the 'Well Said' set.......
 
And I finished my tag off with some 'Granny Apple Green 1/2" Textured Weave Ribbon'.......And a pretty bow was added with the Whisper White Baker's Twine.
 
So that's all it took my friends to create this fun gift tag.

Thanks for joining me today!  I'll be back tomorrow to share some Friends Friday creations with you ........ Hope you can make plans to stop back and join me for that share.  Keep Living Your Dream!

Wednesday, April 24, 2019

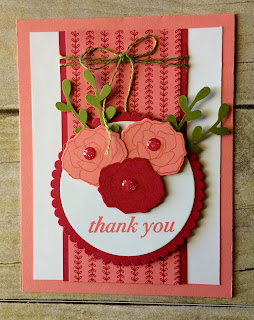
Thank You Card

Happy Wednesday My Blogger Friends!
My blog post for today is Wine-Down Wednesday.  My middle of the week card feature for today will hopefully offer you some inspiration and provide you with some motivation to keep you moving through your busy week.  Let's jump right in with my card share for today........
 
This is one of those cards that turned exactly the way I had pictured it in my mind.
 
This card started out with a panel of the 'All My Love Designer Series Paper' that was adhered to a panel of Lovely Lipstick card stock.
 
Before I adhered that panel down.....I wrapped some 'Old Olive Linen Thread' around the top and tied it up into a pretty bow.  Once that Linen Thread was attached ....... I adhered that completed panel down to my card.
 
I used my 'Layering Circle Framlits' to die-cut a large Lovely Lipstick scallop circle ....... And a Whisper White circle.  My sentiment was stamped onto the Whisper White circle with the 'Florentine Filigree' set using Flirty Flamingo ink.
 
I stamped three flowers from the 'Forever Lovely' set onto Flirty Flamingo and Lovely Lipstick card stock.  I used my 'Paper Snips' to fussy cut each of the flowers and then adhered them onto the Whisper White circle.
 
I finished off each of the flowers with a 'Glitter Enamel Dot' in the center and topped each flower off with a Old Olive "Sprig Punch' piece.
 
 Just the perfect amount of pink for me!!!!

Thanks for joining me today!  I'll be back tomorrow with a Tag Thursday creation to share with you ........ Hope you can make plans to stop back and join me for that share.  Keep Living Your Dream!

Tuesday, April 23, 2019

Hinged Easter Box

Happy Tuesday My Blogger Friends!
My blog post for today is 'CASE IT TUESDAY'.  That means today I have a fun little 3-D project that I found on the internet ....... And I created a CASE of that project to share with you today.  This project was SUPER FUN to create and want to jump right in and share that project with you now.
 
The VERY TALENTED and CREATIVE Chris Slogar created this project back in early March.  I was looking for a quick and easy Easter Mailbox treat for my SaddleBrooke neighbors and friends ........ And when I saw this little project ...,,,,, it just STOLE MY HEART.
 
I have a tradition of hanging a little holiday treat on each of my neighbors and girlfriends mailboxes and this was the perfect little Easter Mailbox Treat to leave for each of them.
 
The 'Gingham Gala Designer Series Paper' makes this project happy and fun......
 
  But the real magic is the hinged system that Chris designed.
 
The top to this little box flips up to reveal a YUMMY Easter treat. 
 
And decorating the top with the 'Best Bunny' set just completed this little project.
 
I ended up creating several of these in all five colors of the 'Gingham Gala Designer Series Paper' and delivered each of them to several mailboxes in Saddlebrook.

Here is the link to the video Chris Slogar shared on her blog.
 Hope you will consider making some of these for yourself.

Thanks for joining me today!  I'll be back tomorrow to share a Wine Down Wednesday card with you ........ Hope you can make plans to stop back and join me for that share.  Keep Living Your Dream!