Happy Friday My Blogger Friends
Today I am kicking-off my 30-Days of Christmas Extravaganza! Every day ....... for the next 30 days ........ I will be posting a Christmas/Holiday Card - Tag or 3-D project for you to CASE and CREATE yourself. That's right ....... 30 days of nothing but Christmas Fun!These projects will be using product that is mostly featured in the 2017 Stampin' UP! Holiday Catalog and along the way ......... I will be using product from the 2017-2018 Stampin' UP! Annual Catalog too. Hope you are ready for some FUN & AMAZING projects.

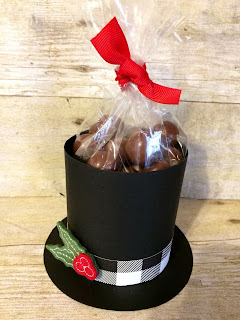
To kick off this extravaganza ......... I've created these FUN & FESTIVE snowman treat Top Hats.

They use a 3" x 8" piece of Basic Black cardstock and score it at 1/2" on one long side. You will want to use your Paper Snips and cut up on the 1/2" side to the score line going all the way across the length of this long side ........ You will be making tabs on this piece of Black cardstock that will form your Top Hat.

Next use the Layering Circles Framelits and die-cut the largest circle (for the brim) and the 3rd largest circle (for the 3"x 8" black cardstock to be adhered to).

The easiest way I found to adhere the 3"x8" piece of Black cardstock to the 3rd circle is to use your bone folder to gentle soften up the fibers of that piece of cardstock. This will cause your Black cardstock to start curving and that will make adhering the tabs down onto the 3rd circle so much easier. Adhere all the tabs down and cut off any excess cardstock from the 8" piece that might be left over.
Once all your tabs are adhered down onto the circle, add adhesive to the two ends of the Black cardstock and secure this piece closed. Adhere this completed piece to the center of the largest Black cardstock circle and your top hat will take form. To give your project a completed look on the inside ........ Die-cut one more 3rd largest Black circles. Add adhesive to the backside and drop it into your formed hat, pressing down to get good contact.

Now take a 1/2" x 8" piece of Designer Series Paper (I used the 'Merry Little Christmas DSP') and adhere that piece to the bottom of your formed Top Hat. Embellish your hat with a 'Stitched Felt Embellishments' (I used the felt holly) and fill your Top Hat with whatever treat you like.

I grabbed a 6"x8" Cellophane Bag and filled it with candy snow drops (one of my all time favorite Christmas candies). And after my cello bag was tied up with a pretty red ribbon ...... I used my Paper Snips to cut down any extra cello bag that I had left over.

All that was to do was gather up all of my Snowman Top Hats and get ready to give them away!
Thanks for joining me today! I'll be back tomorrow to share Day 2/32 Christmas Extravaganza with you ........ Hope you can make plans to stop back and join me for that share. Keep Living Your Dream!
Hats off to a clever idea. I can see these dapper guys for "groom" or New Year's Day, too!
ReplyDelete