Monday, March 31, 2014

Scissors and the City Make n' Take Part 2

Happy Monday My Blogger Friends!
Today I have the other two make n' takes we made at the March Scissors and the City Retreat.  Check out this super fun tag......
We started with a red tag and then used a stars template over the top of it.
We used a white dabble ink to color in the stencil and when we move it......
Instant white stars on our red tag.
We then added glue all over our star and then dipped it into glitter.......We were able to create the most amazing and glittery star!
The last step we took was to dye our white seam binding BLUE.....and all we needed to do was scrunch it up into a ball and let it dry.  Then we unwrapped it and we had the most amazing a beautiful vintage blue seam binding.  SUPER FUN!
And my last make n' take share is this embossed card.
We started out by stamping our flower image to the center of our yellow cardstock.  We then put our stamped image into an embossing folder and added an oval shim over the top of our embossing folder and ran it through the Big Shot.
When we remove the yellow cardstock from the folder we were left with the center stamped portion of our card with NO EMBOSSING.........and the rest of the yellow cardstock was embossed.  It was like MAGIC!
THANK YOU Sandy for sharing this SUPER AMAZING technique with us!  This was one BEAUTIFUL card!

Thanks for joining me today!  I'll be back tomorrow to share with you the gifts I received from my Scissors and City GalPals ......Hope you can make plans to stop back and join me for that share.  Keep Living Your Dream!

Sunday, March 30, 2014

Scissors in the City Make n' Take Part One

Happy Sunday My Blogger Friends!
Today I have Part One of the Make n' Takes that we made last weekend at the Spring Scissors and the City Event.  Let's jump right in with this DARLING SWING CARD.
Sandy designed this darling little swing card that was created using a framelits die.
We stamped and diecut out the chicks, tree and sentiment.......
And even added DSP to the inside of the card and created a charming rolling hilltop at the bottom of our card.
Both Sandy and Dale did an amazing job of teaching us how to make this card and gave us some VERY IMPORTANT tips along the way on how to create this card.  Thank You for letting us make this FUN FUN card!

Thanks for joining me today!  I'll be back tomorrow to share with you Part Two of the Make n' Takes we made at the Scissors and the City Event last weekend.......Hope you can make plans to stop back and join me for that share.  Keep Living Your Dream!

Saturday, March 29, 2014

Scissors and the City Gifts Part 3

Happy Saturday My Blogger Friends!
I'm heading out early this morning with two girlfriends and heading up to Mesa to enjoy a FULL DAY of shopping and playing.  We are making a stop at IKEA and I will hopefully be able to pick-up my studio chair and Raskog rolling cart that I've had my eyeballs on.  
My share for today are the darling little gifts that I made last weekend for my Scissors and City GalPals. I made these darling little bags that hold 3 little 3x3 notecards.
Here's a close-up of the bag I made.  It's two scallop circles that are attached to the sides of a small white craft bag (cut down) and then the bottom of the circles are just cut off.  I used the next smallest circle framelit to create the DSP layer and then added the initial of whoever I was making the bag for.  In this case.......It was my bag.
Here's a close-up of the initial that I diecut.
On the inside of the bag I tucked three darling little monogrammed 3x3 notecards and envelopes.
 And here's what the monogrammed notecards looked like.
And I leave you today with a recap of all four projects that I made for five of the BEST Phoenix/Mesa GalPals a girl could have.  THANKS LADIES for letting me join you for yet another FABULOUS and FUN weekend.........I look forward to seeing you'all in October.

Thanks for joining me today!  I'll be back tomorrow to share with you Part One of the Make n' Takes we made at the Scissors and the City Event last weekend.......Hope you can make plans to stop back and join me for that share.  Keep Living Your Dream!

Friday, March 28, 2014

Scissors and the City Gift Part 2

Happy Friday My Blogger Friends!
Today I have two special little Scissors and the City retreat gifts to share with you.  I made water bottle holders and Hersey Nugget holders for each of my Gal Pals.
Here's what all those gifts looked like.
Each water bottle holder was created especially for one of my Gal Pal friends.  I stamped their initial and added some pretty designer series paper and ribbon to each holder.
I also created a yummy treat for each of them.  I used the same colored cardstock for their yummy treat holder as I used on their water bottle holder.....and used the new Tag Topper Punch to create the actual base of their yummy treat holder.
Here's a peek of the inside of their holder.  I wrapped two Hersey Nuggets with some DSP and tucked them inside the Tag Topper holder I created.
For each treat holder......I stamped and embossed their initial and then created a darling little frame for each holder.  LOVE LOVE LOVE how these treat holders turned out.
And here's what's coming tomorrow.........
 
Thanks for joining me today!  I'll be back tomorrow to share with you Part 3 of the Scissors and the City Gifts I made for my GalPals.........Hope you can make plans to stop back and join me for that share.  Keep Living Your Dream!

Thursday, March 27, 2014

Scissors and the City Gifts Part 1

Happy Thursday My Blogger Friends!
Last weekend.......I attended the Spring Scissors and the City event with my GalPals from Phoenix.  We reserve a table for the six of us........And spend the entire weekend PLAYING.  At each retreat.....I make each of them (plus Dale and Sandy-who put on the event) some table-top gifts and this year was no EXCEPTION.  Here's the first gift I made for each of them.
I created these ADORABLE little floral bouquets to not only celebrate our time together......but the beginning of Spring.
I used a plastic salt and pepper shaker from the dollar store (THANK YOU Terry for the idea) for the vase and then filled each vase with five spiral flowers.
I used the new Stampin' UP! Spiral Flower Die to create each of the flowers and then wrapped each flower around a dum dum sucker.
Some clear green wrap went around the vases and each vase was tied off with some White 5/8" ribbon.
 Here's what they looked like all clustered together......
 And a close-up view of the flowers.......
OH SO PRETTY!
 And here's a peek at what's coming up tomorrow.

Thanks for joining me today!  I'll be back tomorrow to share with you Part 2 of the Scissors and the City Gifts I made for my Phoenix GalPals.........Hope you can make plans to stop back and join me for that share.  Keep Living Your Dream!

Wednesday, March 26, 2014

Banner for Hailey

Happy Wednesday My Blogger Friends!
Today I have a special little share for you that my good friend Debbie made for my granddaughter Hailey.  While Hailey was here in February.......Debbie surprised her with this DARLING little banner for her room.
Here is what the completed banner looks like.
Debbie had asked Hailey what her favorite colors were and then went to town creating a special little banner just for Hailey's room.  Her two favorite colors are Lime Green and Turquoise.

Here's the "H"....
And the "a"........
The "i".....
The "l".....
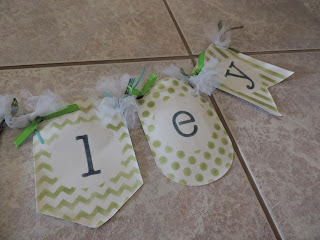
The "e"......
And the "y".
Debbie added all kinds of pretty ribbons......
And some yummy tulle.....
And each banner has a darling inked pattern on it.
Here's one final view of the SUPER FUN banner that Debbie created.  MANY THANKS Debbie for making this banner for Hailey.....I know she loved it and has it hanging in her room back in Wisconsin.
 
Thanks for joining me today!  I'll be back tomorrow to share with you Part 1 of the Scissors and the City Gifts I made for my GalPals.........Hope you can make plans to stop back and join me for that share.  Keep Living Your Dream!

Tuesday, March 25, 2014

Simply Happening Kit Part 6

Happy Tuesday My Blogger Friends!
Today I have the final two Simply Happening Kit cards that I made......
First up is this HAPPY Strawberry Slush circle Card.
I created three layered flowers that we mounted onto two layers of circles......
And added a "thanks" banner under the center flower circle.
Here's a close-up of how those three flower circles were layered.
And my final Simply Happening Kit remake is my FAVORITE card creation!
I created this button embellishment with several layers of circles and scallop circle punches.....And added two Glimmer flags for a little WOW FACTOR!
I used some of the Bakers Twine that came with this kit and created this SUPER HAPPY hanging banner across the top of my card.
I used the Sale-a-Bration banner punch and added some little flowers to the top of each of my banners.  JUST LOVE how this card turned out.

Thanks for joining me today!  I'll be back tomorrow to share with you a FUN little banner that my girlfriend Debbie made for my granddaughter Hailey..........Hope you can make plans to stop back and join me for that share.  Keep Living Your Dream!