Sunday, July 31, 2011

Happy I Do Card

Hi Blogger Friends and Happy Sunday to you.  My plans to spend all day yesterday in my Sudio or in the Pool were a HUGE HIT and today I figured.....what the heck......carry on PLAY some more.  I figured I would make it a caught up weekend on my relax time and just spend the rest of the weekend PLAYING.  For today......my card is a fast little "I do day" card that uses one amazing product.....Duct Tape........
My SaddleBrooke Stamping Friends asked me to demo Nestabilities in June and at the very end of my demo I showed the ladies this fun little card I created using none other than Duct Tape on my card. 
I ran a piece of Duct Tape through one of my embossing folders and then secured it onto the center of this "I Do" card.........love all the detail the tape picked up from the embossing folder.......
 The Stamp set I used was Word Play and I added a touch of bling to the top of the "DO" of this card.
Just love how elegant this card turned out - and without a doubt - you can't go wrong with black and white for a wedding card.  And the fun with this recipe is.....You can add about any message to your Nestabilities or TopNote diecut piece.

Thanks for joining me today - I'll be back tomorrow with more Kards by Kadie creations to share with you.  Keep Living Your Dream!

Saturday, July 30, 2011

FUN SHOP Candle Project

Happy Saturday my Blogger Friends!  Today is seriously going to be all about Studio Time and Pool Time.  I plan to spend the entire day in both of those locations.  Hope you have some amazing plans set up for today.

Today, I would like to share the project that I made at last Saturday's Fun Shop.......Linda taught us how to make these really cute candle wraps and tealight holders........Check em' out........
This was made with a couple SU punches and some dollar store candles.........
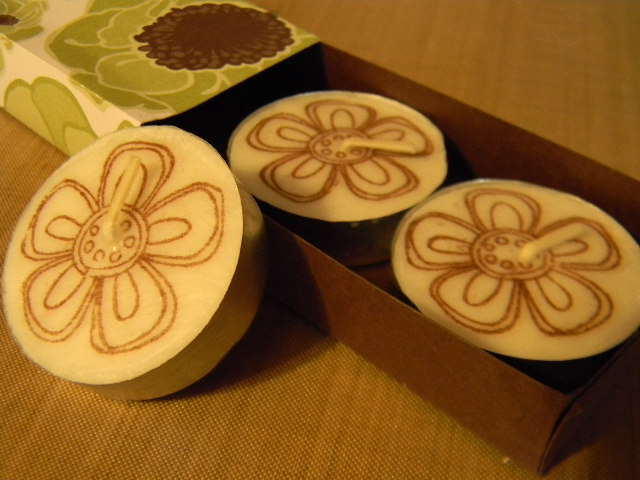
The packaging holdes three little tealights......and as long as your candle is not a "Party Lite" candle....It should burn down the center and your only worry will become when the candles burns over halfway down.  I would still take great caution in watching over this little cutie if/and when you burn it.  Mine....are going to be for display only.........
 Here's a close up look at the pillar candle......
Just love love love how the retired "GreenHouse Gala" DSP from SU made it possible to POP the flowers right off the candle.....
Seriously giving this a 3-D look.........
I aded a little "Friends" banner tag to the base of my candle and plan to give this to a neighbor who has been having some health issues.
Here's a close up of the tealight holder wrap.  I punched out two of the 5-star flower punches and a single Boho Blossom punch and stacked them together and added a brad......
I then punche out three 1-1/2" circles from white tissue paper and stamped onto those circles a flower from a retired SU set using chocolate chip ink........
Just love how the color of the tealights now match and coordinate with the rest of my gift.
My belly band was created using Chocolate Chip cardstock that was long enough to wrap around the entire gift box ...... and layering Pear Pizzazz - Certainly Celery cardstock and a thin piece of the retired GreenHouse Gala DSP.  The flower I had created was secured down with a couple glue dots and a "Friends" banner tag was added to the flower.
And I leave you today with a view of my entire creation that is just waiting to be deliveried to my neighbor.  Just know she is going to LOVE receiving this little cutie.

Thanks for stopping in today - and you can join me tomorrow for a fun little "I Do" card .  Hope you have a SUNNY and HAPPY Saturday - Keep Living Your Dream!

Friday, July 29, 2011

Happy Birthday Cheri

Today I have a belated birthday post to share with you for my scrapbooking/stamper friend Cheri.  It was Cheri's birthday on Thursay and I made her alittle something something for her birthday - check it out.
Here's a copy of the card I gave to Cheri on Monday when I saw her at our Scrapbook gathering at the Ranch,  Many HAPPY wishes Cheri for a fabulous day and hope your kids made you the Cherry Cream Cake that you were expecting.  HAPPY HAPPY girlfriend.

I also made Cheri a little matching something to go along with her cupcake card.........Here's the packaging all prettied up - Just waiting for Cheri to dig into it.......
 
 A close-up view of the present I gave to Cheri.......
 And a shot of the pretty little flower embellishment that I made for the top of her package.......
And here is what was tucked inside Cheri's little package........Three little tealight candles which I decorated using a 1-1/2" circle punch and my Circle Circus stamp set from Stampin' UP! and tissue paper!
The 1-1/2" circle punch was punched out with tissue paper and then the Circle Circus stamp set was stamped on the tissue paper and then the tissue paper was heat-set onto the top of each of the tealight candles.
 Here's one last view of how the tealights were packaged into this darling little slider box.
And I leave you today with the entire packaging and card that I made for Cheri!  Super fun project and in fact......I have another candle project that I'm going to share with you for tomorrow. 

Thanks for stopping in today - I'm hoping to see you back here tomorrow..........
Keep Living Your Dream!

Thursday, July 28, 2011

Inspired Flip Flops

Okay Blogger Friends - Hopefully I'm back on track with my post - Sorry for the Craft Junkie Too blog post mix up yesterday.  Today I have a NON-STAMPING but SU approved post - and one that Lorri Heiling at Stampining Addict (http://stampingaddict.blogspot.com/) was sited wearing at this years SU Convention.  Check these little cuties out that I made...........
YES......Those are my little PIGGIES!  I had almost all the supplies to make these little cuties - except for the vintage brad that Lorri used - so I went digging and found brushed silver ones and used those.  The idea is brilliant Lorri and the only wish I had was my feet looked as DARLING as Lorri's did in her little cutie flip flops.
The flip-flops were purchased at Wal-Mart ......... I have a dozen of these little babies tucked everywhere in my house.  I'm always grabbing a pair to head out to the pool - run to get the mail - whatever might be on my list of outdoor activities.....seems I have a pair in every color.  So prettying these little babies up with some of the fabulously yummy Stampin' UP! 1-1/4" grosgrain ribbon is without a doubt FABULOUS!
Here's a close-up of the vintage brads I had on hand and just dropped it onto a chocolate chip button.
Just love how adorable the ribbons all looked bunched together.......
 Here's what they look like without any little piggies in them.......darling just the same!
And one last look with my french manicure piggies just waiting to head off for a quick errand - wonder how many folks are either going to give me the EVIL STINK EYE....or stop me and ask me where I bought my flip flops.  I received the mother of all approvals when I modeled them for Jack and he looked at my feet and then looked up at me and SMILED BIG.  He said "those are really CUTE"......so....I knew FOR SURE these little cuties were going to be worn out of my house.

Thanks for stopping in today and visiting.  Tomorrow, I have a special Birthday wish scheduled along with a sneak peek of something coming up for the weekend.......Hope you can return and join me for some FUN.  Keep Living Your Dream!

Wednesday, July 27, 2011

CJToo Design Team Post

Happy Wednesday my New and Returning Blogger Friends!  Sorry for the delay in my post - I really thought our Craft JunkieToo post was to post on Friday the 29th - but appears to be posting today - so ....here goes......

Today our fearless leader Tracey over at CraftJunkieToo (http://www.craftjunkietoo.com/) has asked her Design Team members (that's me.....) to prepare a project with a theme of anything Happy and Bright.  SO.....I decided to take care of Two Happy and create One Bright card.  The 2-Happy would be to welcome a new neighbor to our neighborhood and the other is to meet our Design Team challenge with Tracy.....DONE!  I'm adding the Bright because it's part of the challenge...but also because you can't possibly have a "Welcome to the Neighborhood" without throwing in LOTS of Bright!
Here's the card I prepared for Tracy's Design Team Challenge.  I got my inspiration from Carrie over at Artistic Avenger (http://artisticavenger.wordpress.com/).   I saw Carries creations and thought....I need to make that card - so.......while I was chatting on the phone with my BFF one day...... I re-created Carries card and realized that I had finished my card and was sooooo happy with the way it turned out.
I used my Scallop Circle Punch for the clouds and grass.......and I then used LOTS of dimensionals on my card to pop up the sun and the grass........
The sun was created using a 1" circle punch and lots of Pumpkin Pie ink was added to the edges of the sun and the rays to create a distressed edge look.
The grass was created with snippets of  the SU Scallop Circle Punch in Old Olive.  I used my Old Olive ink to distress of the edges of all the scallops........and I also added dimensionals to the back of grass pieces to give this card lots of dimension.
Here's a close-up look of the grass........You can see how much lift the Stampin' UP! dimensionals give to this project.........LOVE IT!
And speaking of dimension......Check out this sun.....totally lifted right off the page.  The single best thing I love about this card is the curled back corner of the frame.  I sepearated each of the layers of both my Crumb Cake frame and my Chocolate Chip frame and by pulling back the layers it created this fun little curled edge to my center frame.  ADORABLE!
And I leave you today with one last look at this fun card that will be going out to one of our new neighbors this weekend.
 
Also.....Many Thanks to Carrie for all her amazing creations that she comes up with.  I totally understand why Carrie has won the Stampin' UP! Artisia Award.........Handsdown........She is fabulous!

Thank You for visiting my blog today and hope you can return tomorrow for (a repost of) my Flip Flop project (just in case you didn't see that post earlier).  Keep Living Your Dream!

Tuesday, July 26, 2011

Baby Quail - Not such Babies Anymore......

Happy Ding Dong Tuesday to you my Blogger Friends.  The week is moving ahead in full steam and I thought today I would slow it down a bit and share some Arizona Wild Life with you.  This year - I have been blessed with three different Quail Families in my yard.   I have a family of three babes (that's this family)....one family with two babes and one family with five babes.  My all time favorite family is the one I'm going to share with you today.
These three little siblings have grown up right in front of my studio window (and I do mean RIGHT IN FRONT OF MY STUDIO WINDOW).  They have given me countless hours of entertainment and even more hours of lauhgter.  When these little guys take off a running - They first of all run like they have roller skates on........and then I think they are trained to split into different directions when they HAUL IT away.
I actually zoomed in from my studio window for this shot and here my three little siblings are feeling fearless and on their own withou MaMa and Pop standing right next tot hem.  Trust me.....MaMa and Pop aren't too far away!
These little guys pretty much stay together - unless something spooks them and then it's anyones guess which direction they are going to take off in (and that would be where the countless hours of laughter comes into play for me from these little guys).
Here's MaMa rounding up the three babes........and in perfect form...........the babes take their place behind MaMa and begin their fast and frenzy march to keep up with MaMa. (seriously their little legs move in such a speed that it looks like they are just rolling across the ground - hence the reason why our golf course community residents say the Baby Quail look like little golfballs)
And then Pop entered the picture and they all settled right down and got down to business.  I just think that if I can come back in another form.........I want to come back as a baby Quail.  It amazes me how both the male and female take such an active rule in raising their young - and both parents are so loving and protective - that I think being a baby Quail would be a BLAST!

Thanks for letting me share my Baby Quail pictures with you......I'll be back to my regular programming tomorrow with a FABULOUS Flip Flop creation to share with you.  Keep Living Your Dream!

Monday, July 25, 2011

Gift for my Stamp Club Ladies

Happy Monday my Blogger Friends - Can you even believe that the weekend is OVER!  HOLY BUCKETS when did that all happen?  I'm serious.......I'm wondering how I ever got all that I did done and still had time to work (outside the home).  I can barely get it all done now....and I don't work outside the home and......I go on about 4 hours sleep every night.....Lordy Help Me!
Today I want to share with you the gift I made for my Club Girls for our Kick-Off meeting in July.  I had told the girls they could redeem a coupon which was good for a new SU Embellishment when they signed up for my Stamp Club - and as it turned out....Club filled up in less than an hour of the notice going out.......HOLY BUCKETS LADIES.....I was blown away at how fast the 6-slots filled up.  SO.......I purchased the new mini clothespins and couldn't just hand them to my Club Gals........SO...without fail.....I pulled out my SU product and Big Shot and started creating.........
I started out by die cutting a Fancy Favor box and using coordinating 1-1/4" Striped Grosgrain ribbon to wrap around the box.  I then tied off the 1-1/4" Striped Grosgrain ribbon with the help of the OH SO PRETTY 1/2" Chantilly Crochet Trim from Stampin' UP!............OH SO PRETTY!
The clothespins that were tucked inside were decorated with a fun little decorating idea that Becky Roberts (http://inkingidaho.blogspot.com/) over at Inking Idaho had (thank you Becky for your fabulous idea).  She decorated her 1-1/4" Striped Ribbon with the BigShot Scallop Circle and LOTS of fun punches.  I put my own spin on the clothespin container and just went to town decorating and making the packaging anything but same old same old.
The BigZ scallop circle dies works perfectly to cover the clear containers that the SU brads, buttons and other embellishments come in................
And the Fancy Favor box made for the perfect packaging fit for my decorated containers and a single stamp package.
Just love how pretty the packaging turned out for the clothespins and with everything coordinating along with it....It made for the perfect little surprise for my Club Ladies.
Here's a look into the box - which had some fabulous chocolate tucked in the bottom - (because we all need to keep our strength up when we are stamping).
And witout a doubt.....the all time pretty award goes to the touch of vintage that the Chantilly Crochet Trim brings to this "OH SO CHIC PACKAGING"!

Thanks for stopping in today - Hope your back to join me tomorrow when I'll be sharing some fun pictures of my Quail Family.  They are getting so big....I can't about stand it!  Keep Living Your Dream!

Sunday, July 24, 2011

Suprise FU Cards

Hi Blogger Friends and Happy Sunday to you.  Today I want to share the cards that I made for my FU group cards in June.  Kris and I met and made two cards each for our FU group and I created two extra cards for Debbie and Ann.  These cards were CASED from other blogs and just changed up ever so slightly to work with the stamp sets that I own.  My hopes are that I can head over to the post office this next week and get these cards in the mail to both Debbie and Ann.
The first card is a happy little card using the SU set Word Play.  It also uses the Beyond the Garden DSP along with some retired SU ribbon.  I just LOVE LOVE LOVE how this card makes me feel HAPPY - each and every time I look at it.
I used my Jewelry Tag punch to create a sweet triple tag that was added to the ribbon with one of the SU Vintage Trinkets.  So pretty........
Here's a close-up of the three tags that were punched out using Daffodil Delight/Pacific Point and Pretty in Pink cardstock.  I used the "friends" stamp from the Tiny Tags set to add a sweet little message to my Pretty in Pink tag.
 And one last look at this HAPPY little card.
My next card uses the Sunny Fun stamp set from the Summer Mini Catalog.  I embossed the flip flops and added a little rhinestone bling to one pair of fip flops - it totally adds a little FUN to this already FUN card.
I embossed "A Happy Hello" greeting from a Hero Arts set I had and used dimensionals to pop that fun little message onto my card.
 I also ran my Whisper White cardstock through my BigShot using my Square Lattice embossing folder - seriously added yet another layer of FUN to this card.
 And here's one last view of this card - which I just know both Debbie and Ann are going to love receiving.
And my last picture is of the inside of my card.  Just couldn't leave the inside of this card plan....so I grabbed out some white text paper and embossed the flip flops onto that and adhered it to the inside of my card.  SUPER FUN!

Thanks for joining me today - I would like to give a big thanks to http://nanceleedy.blogspot.com/ for her original creation on this card - which she posted on June 1st......All I basically needed to do was add my sententiment touches to this already fabulous card.  I'll be back tomorrow to share the gifts I made for my Stamp Club ladies - I had given each of them a coupon to redeem at our first Stamp Club and holding true to my FUN side....I couldn't just hand them their gift.....I had to pretty it up - and that is what I'm going to share with you tomorrow.  Please stop back to take a look at what I created.  Until Monday morning....Keep Living Your Dream!