Hi My Blogger Friends and CraftJunkieToo Visitors - Welcome to my blog. Today I have a special post as part of the design team for Tracy over at CraftJunkieToo (
http://craftjunkietoo.blogspot.com). We were asked to create a project using the changing colors of fall as our inspiration ..... AND....It needed to be ANYTHING BUT a card. I decided to make these fun "Fall" blocks for my studio. Let me share with you how I created this project............
I started out with some lumber that my neighbor cut down with his power saw (I asked my neighbor to do this......Mainly because......those industrial tools ARE NOT ALLOWED in our house - *W*I*N*K W*I*N*K Honey!......). After the lumber was cut and sanded, I grabbed some DSP and my acrylic paints and started painting all my blocks and the edges of my DSP.
I used "Craft Smart" acrylic paint in Brown, Pure Pumpkin, Golden Brown and Spanish Olive. My DSP is from a paper pack that was purchased from Hobby Lobby and I just used my Brown acrylic paint to distress the edges of each piece of DSP.
I basically worked in an assembly line to get all my blocks painted.......and then I just used my white glue to attach the DSP to the front of each block.
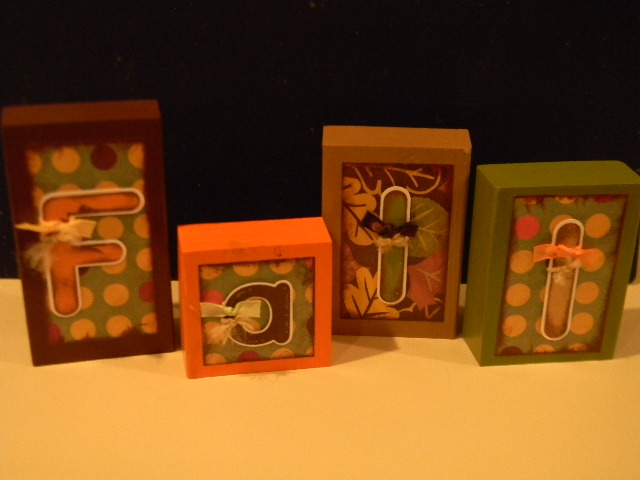
Here's what the blocks looked like when I got them all painted and distressed.
I even added matching DSP to the backside of each of the blocks..........I wanted to make sure that the back was going to be just as pretty as the front.
I arranged the DSP so my pattern was random and there was no right or wrong order being put into how this was all going to play out.
I attached my letters which I cut out using my Cricut. I used the
"Learming Curve" cartridge and cut the
"F and two l's" out at 3-1/2" and the
"a" was cut out at 2-1/2". The shadow was cut out 1/4" larger and then I just layered all the pieces together and with the help of dimensionals - this came together in a snap.
Here's a close-up of the "F"........
The "a"........
One "l".........
And the other "l".........
The entire project took me NO TIME to put together......the most time I spent was waiting for the paint to dry......and even that.....I was able to put the letters together and work on attaching ribbon and fibers to each letter as the paint was drying.
My inspiration for this project came from my BFF (Jan) who had a similar project in her studio last year and when I saw it I just fell in love with it (last fall). The plan was to do this project LAST YEAR....but as things go with me sometimes......It got put on the back burner and other things got done instead. SO - When Tracy gave her design team our Fabulous Fall Challenge - I just knew ..... THIS YEAR would be the year I got this project done. (I'm sure none of you can relate to that situation now can you.......)
Thanks for joining me today and if your a new visitor......check out my subscribe button at the top of my blog to receive daily post from me. Appreciate you stopping by and hope you can return tomorrow for more Kards by Kadie creations. Keep Living Your Dream!


Love this idea! Now I am going to ask my hubby to cut some wood pieces for me! Could be done for any holiday or even to create a grandchild's name! Oohh...the possibilities. TFS!
ReplyDeleteGreat project. Wonderful for use at our home.
ReplyDeleteIndira
Hi Kadie,
ReplyDeleteI love this project... as I am reading your post I looked over at my hubby and asked if we had any scrap 2x4s! :) Great job.
Big hugs,
Cheryl @ CardsbyCG.blogspot.com
What a great idea! I am so going to have to steal this - probably wont get done until next year though!
ReplyDeleteLove these Kadie, the colors are right on.
ReplyDeleteJudy
CUTE blocks!
ReplyDeletecraftin-on-my-door.blogspot.com